


Looking back, it seems inevitable that my love for both art and nature would intertwine, leading me to become an animal artist. However, teaching was never part of my original plan. I simply documented my paintings and drawings for me to use as an aide as I taught myself, first through photographs and later through videos. As interest in my techniques grew, so did my passion for sharing knowledge. Now, 25 years later, I have created over 300 lesson videos, helping thousands of artists develop their skills. And I must admit, I find just as much, if not more, joy in seeing my students achieve things they once thought impossible than creating my own artwork.
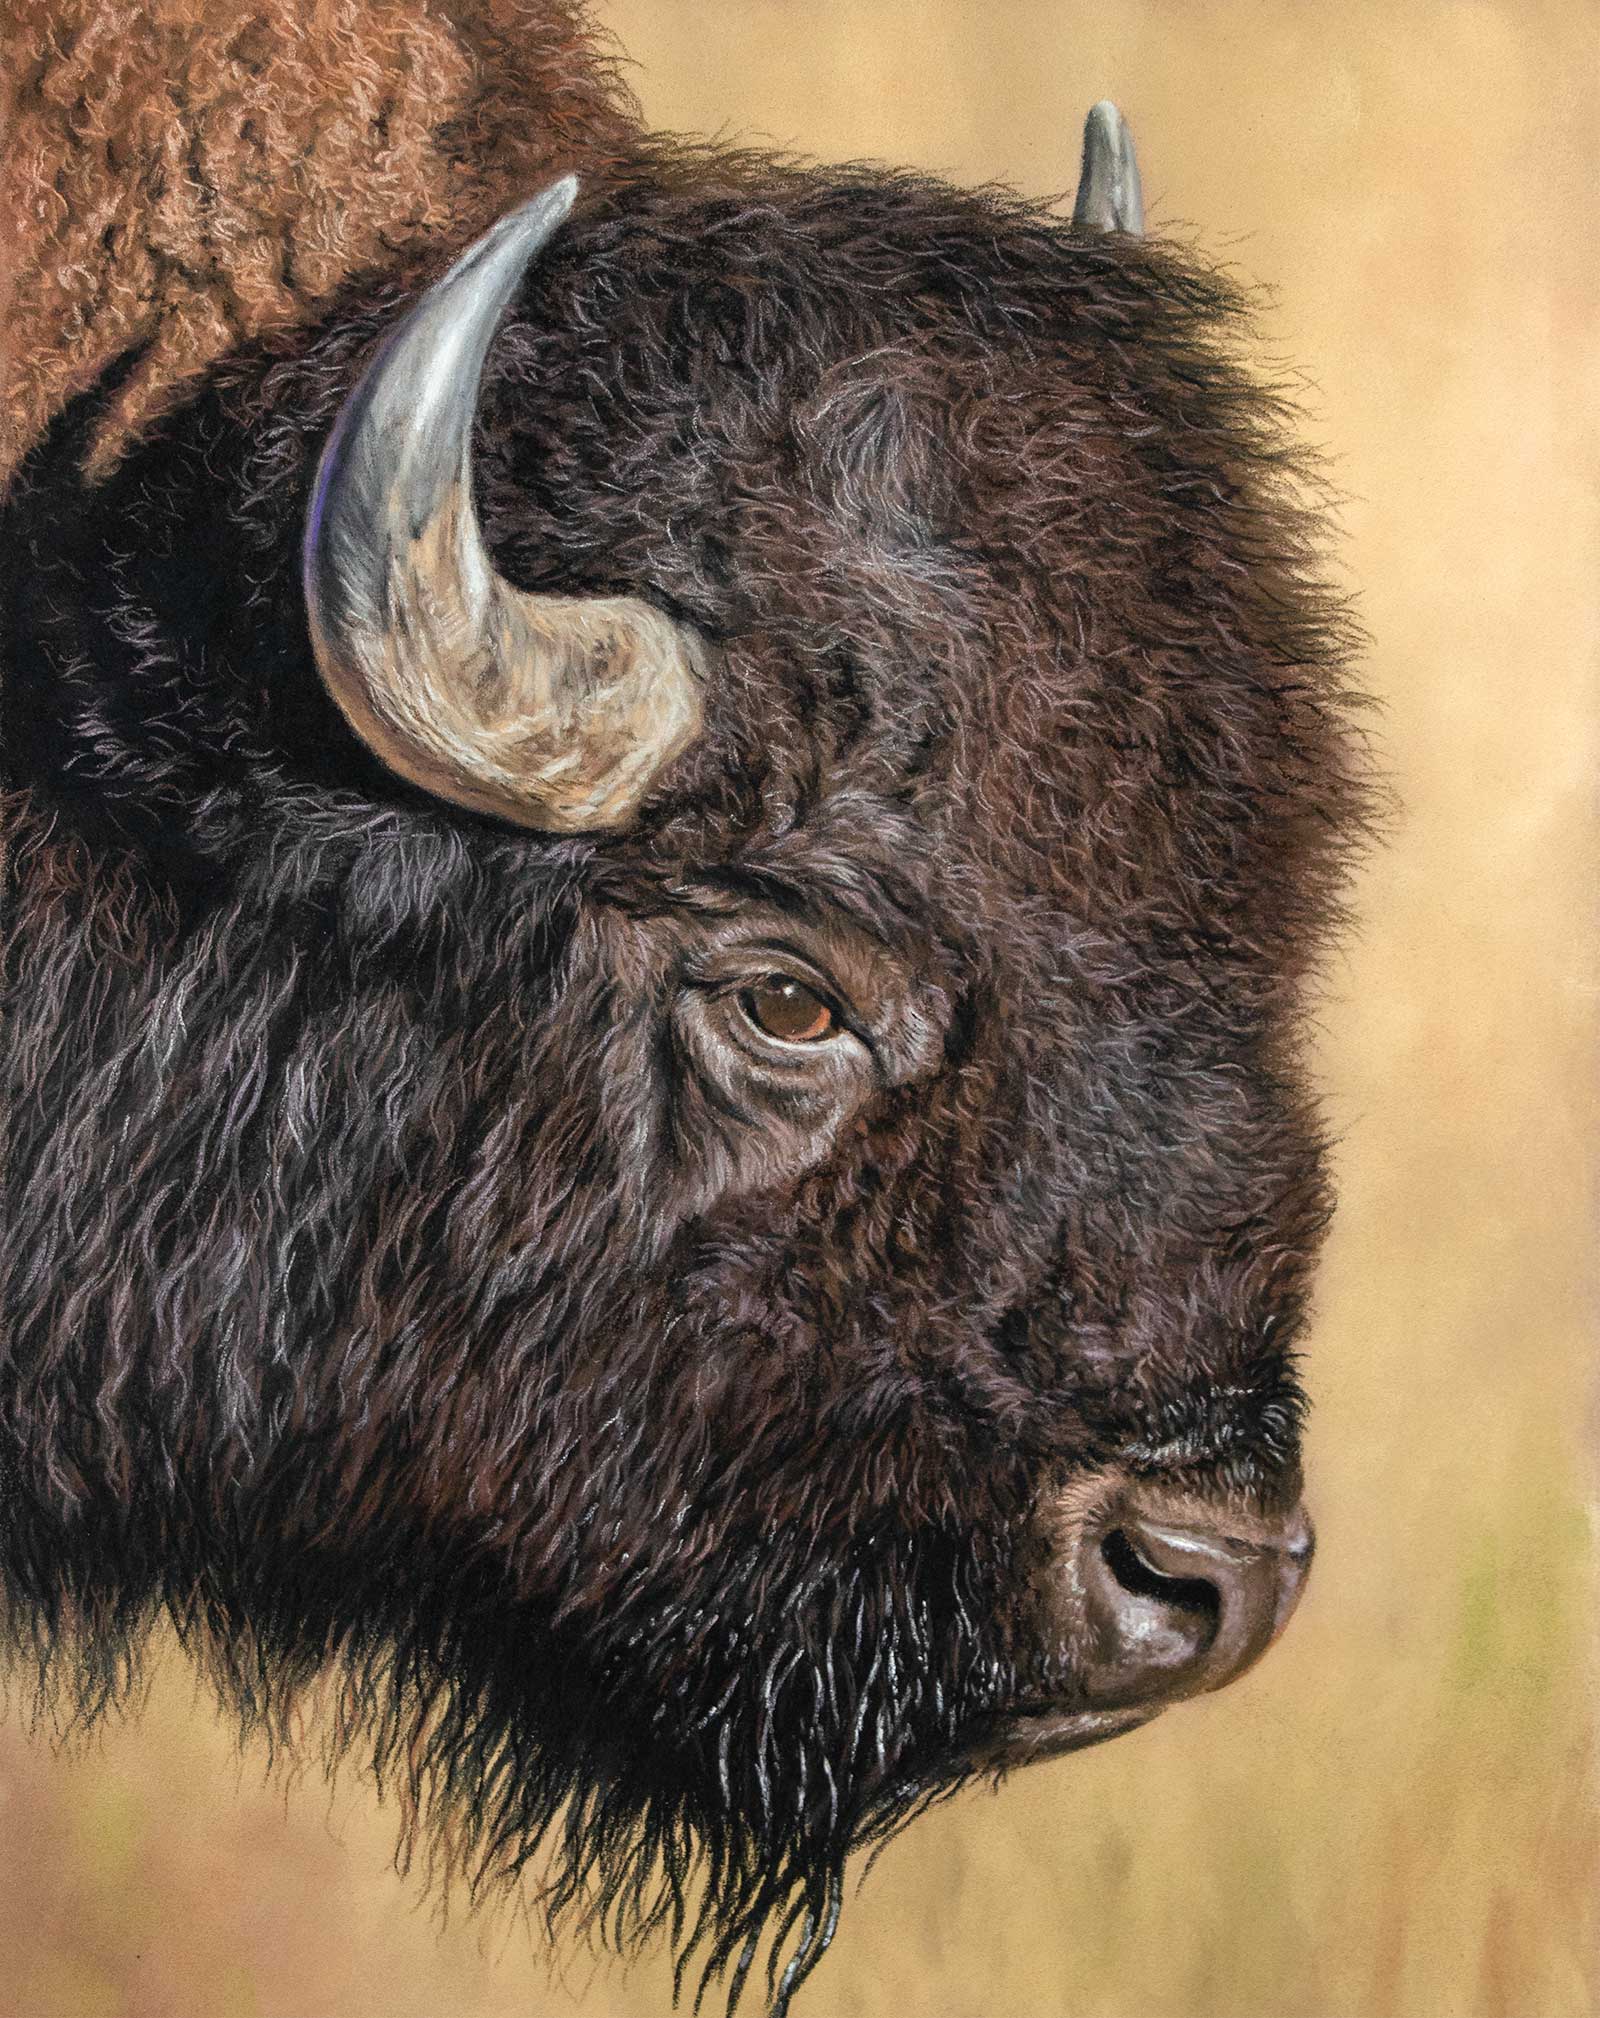
Bison, pastel, 12 x 10” (30 x 25 cm)
Many artists feel intimidated by the idea of drawing and painting animals. They may have a strong desire to capture the beauty of their pet or a favorite wildlife subject, but the complexity of fur, texture and detail can feel overwhelming. Where do you even begin? One of the biggest lessons I’ve learned is the importance of breaking a complex subject into manageable stages. This is especially true when working with animal fur. I approach it in distinct layers, each building upon the last to create depth and realism.
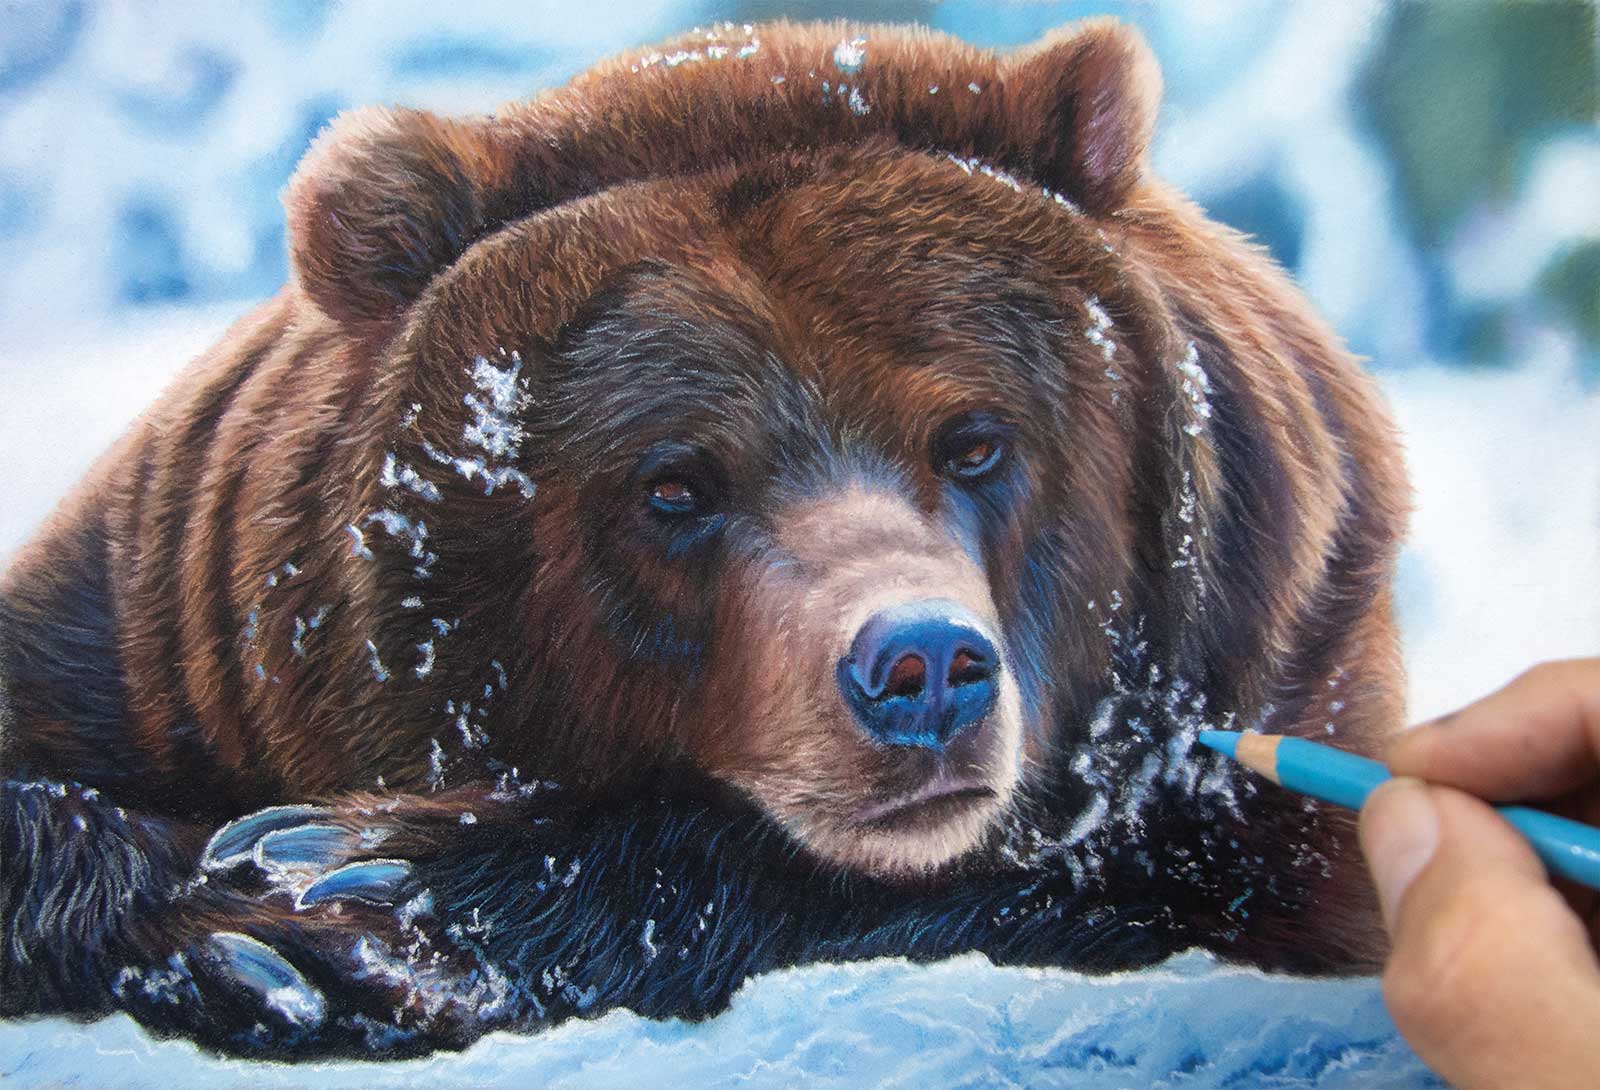
Bear, pastel, 9 x 6” (22 x 15 cm)
The first stage is all about establishing the base tone and color. I make this layer slightly darker than my intended final result so that lighter details can stand out when added later.
The second stage involves defining the shadow areas within the fur. This means carefully placing small darker strokes on the base layer to create the appearance of texture.
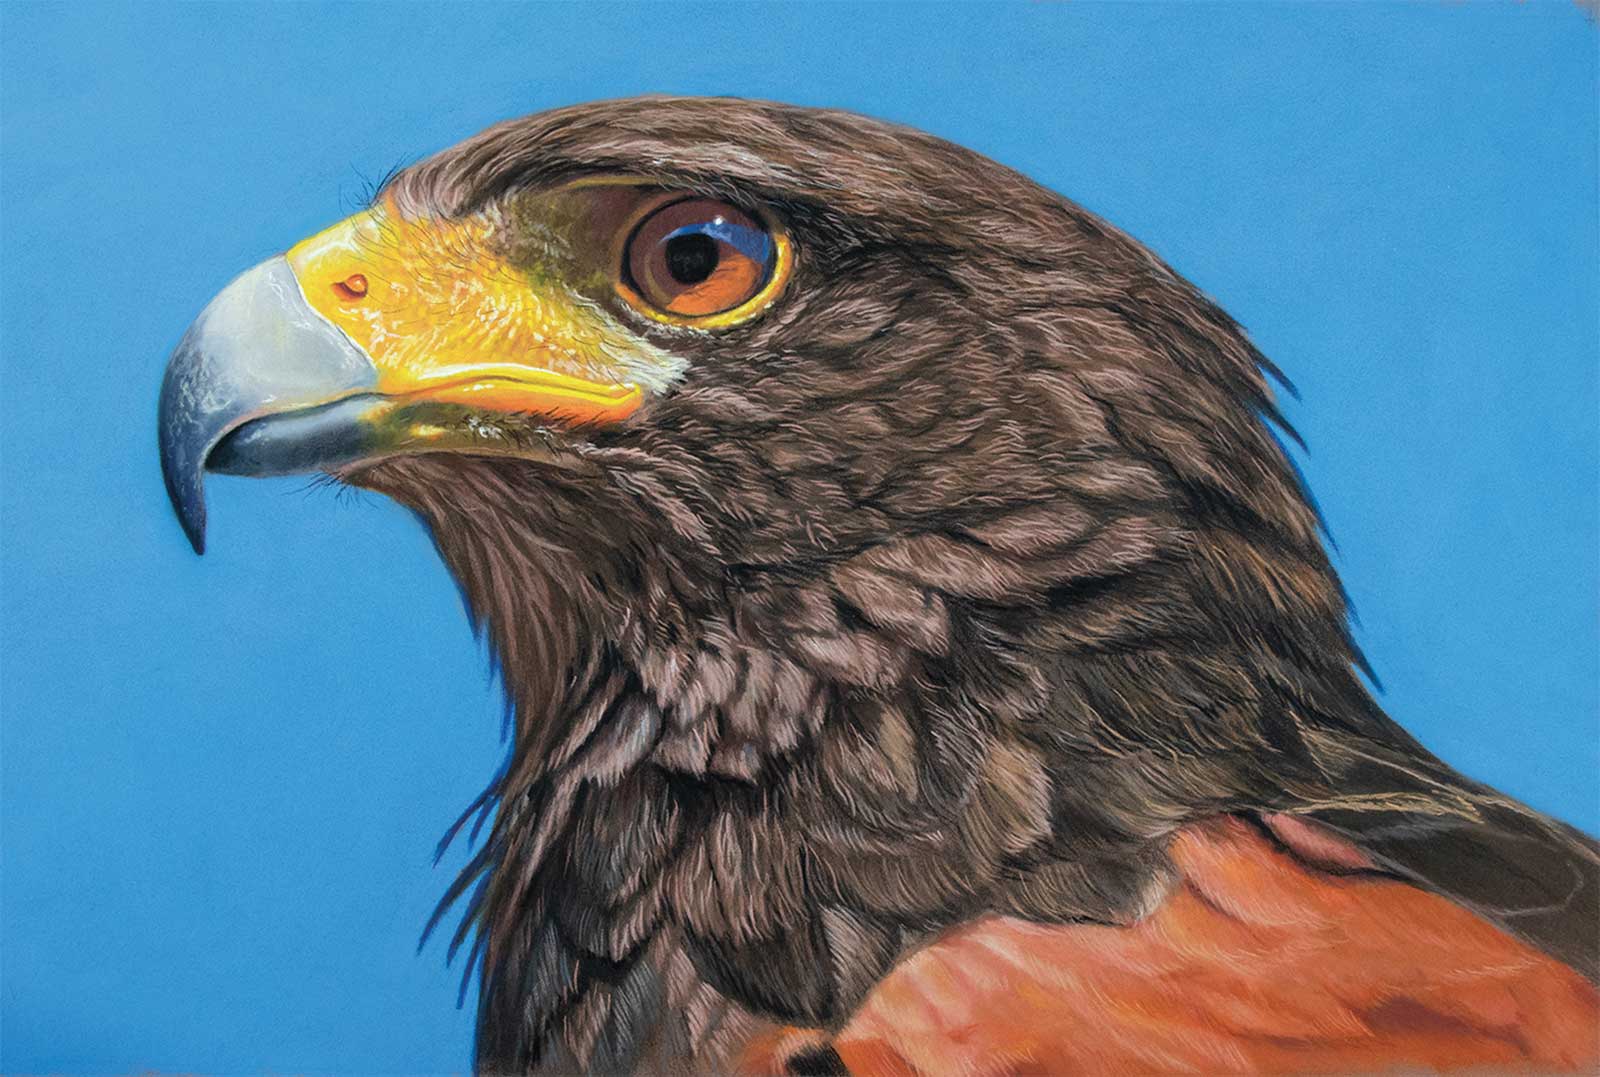
Hawk, pastel, 12 x 8” (30 x 20 cm)
The third and final stage is where the magic happens—bringing in the lighter and finer, more delicate hairs that give the fur its realistic quality. This step often requires multiple layers, sometimes two or three, before the artwork reaches the desired level of realism. Patience and layering are key. By simplifying complex elements into structured steps and using the right equipment, creating realistic animal art becomes a much more enjoyable and rewarding experience. My goal has always been to make this process logical, so that every artist, no matter their skill level, can bring their vision to life.
My Art in the Making Pastel Puppy
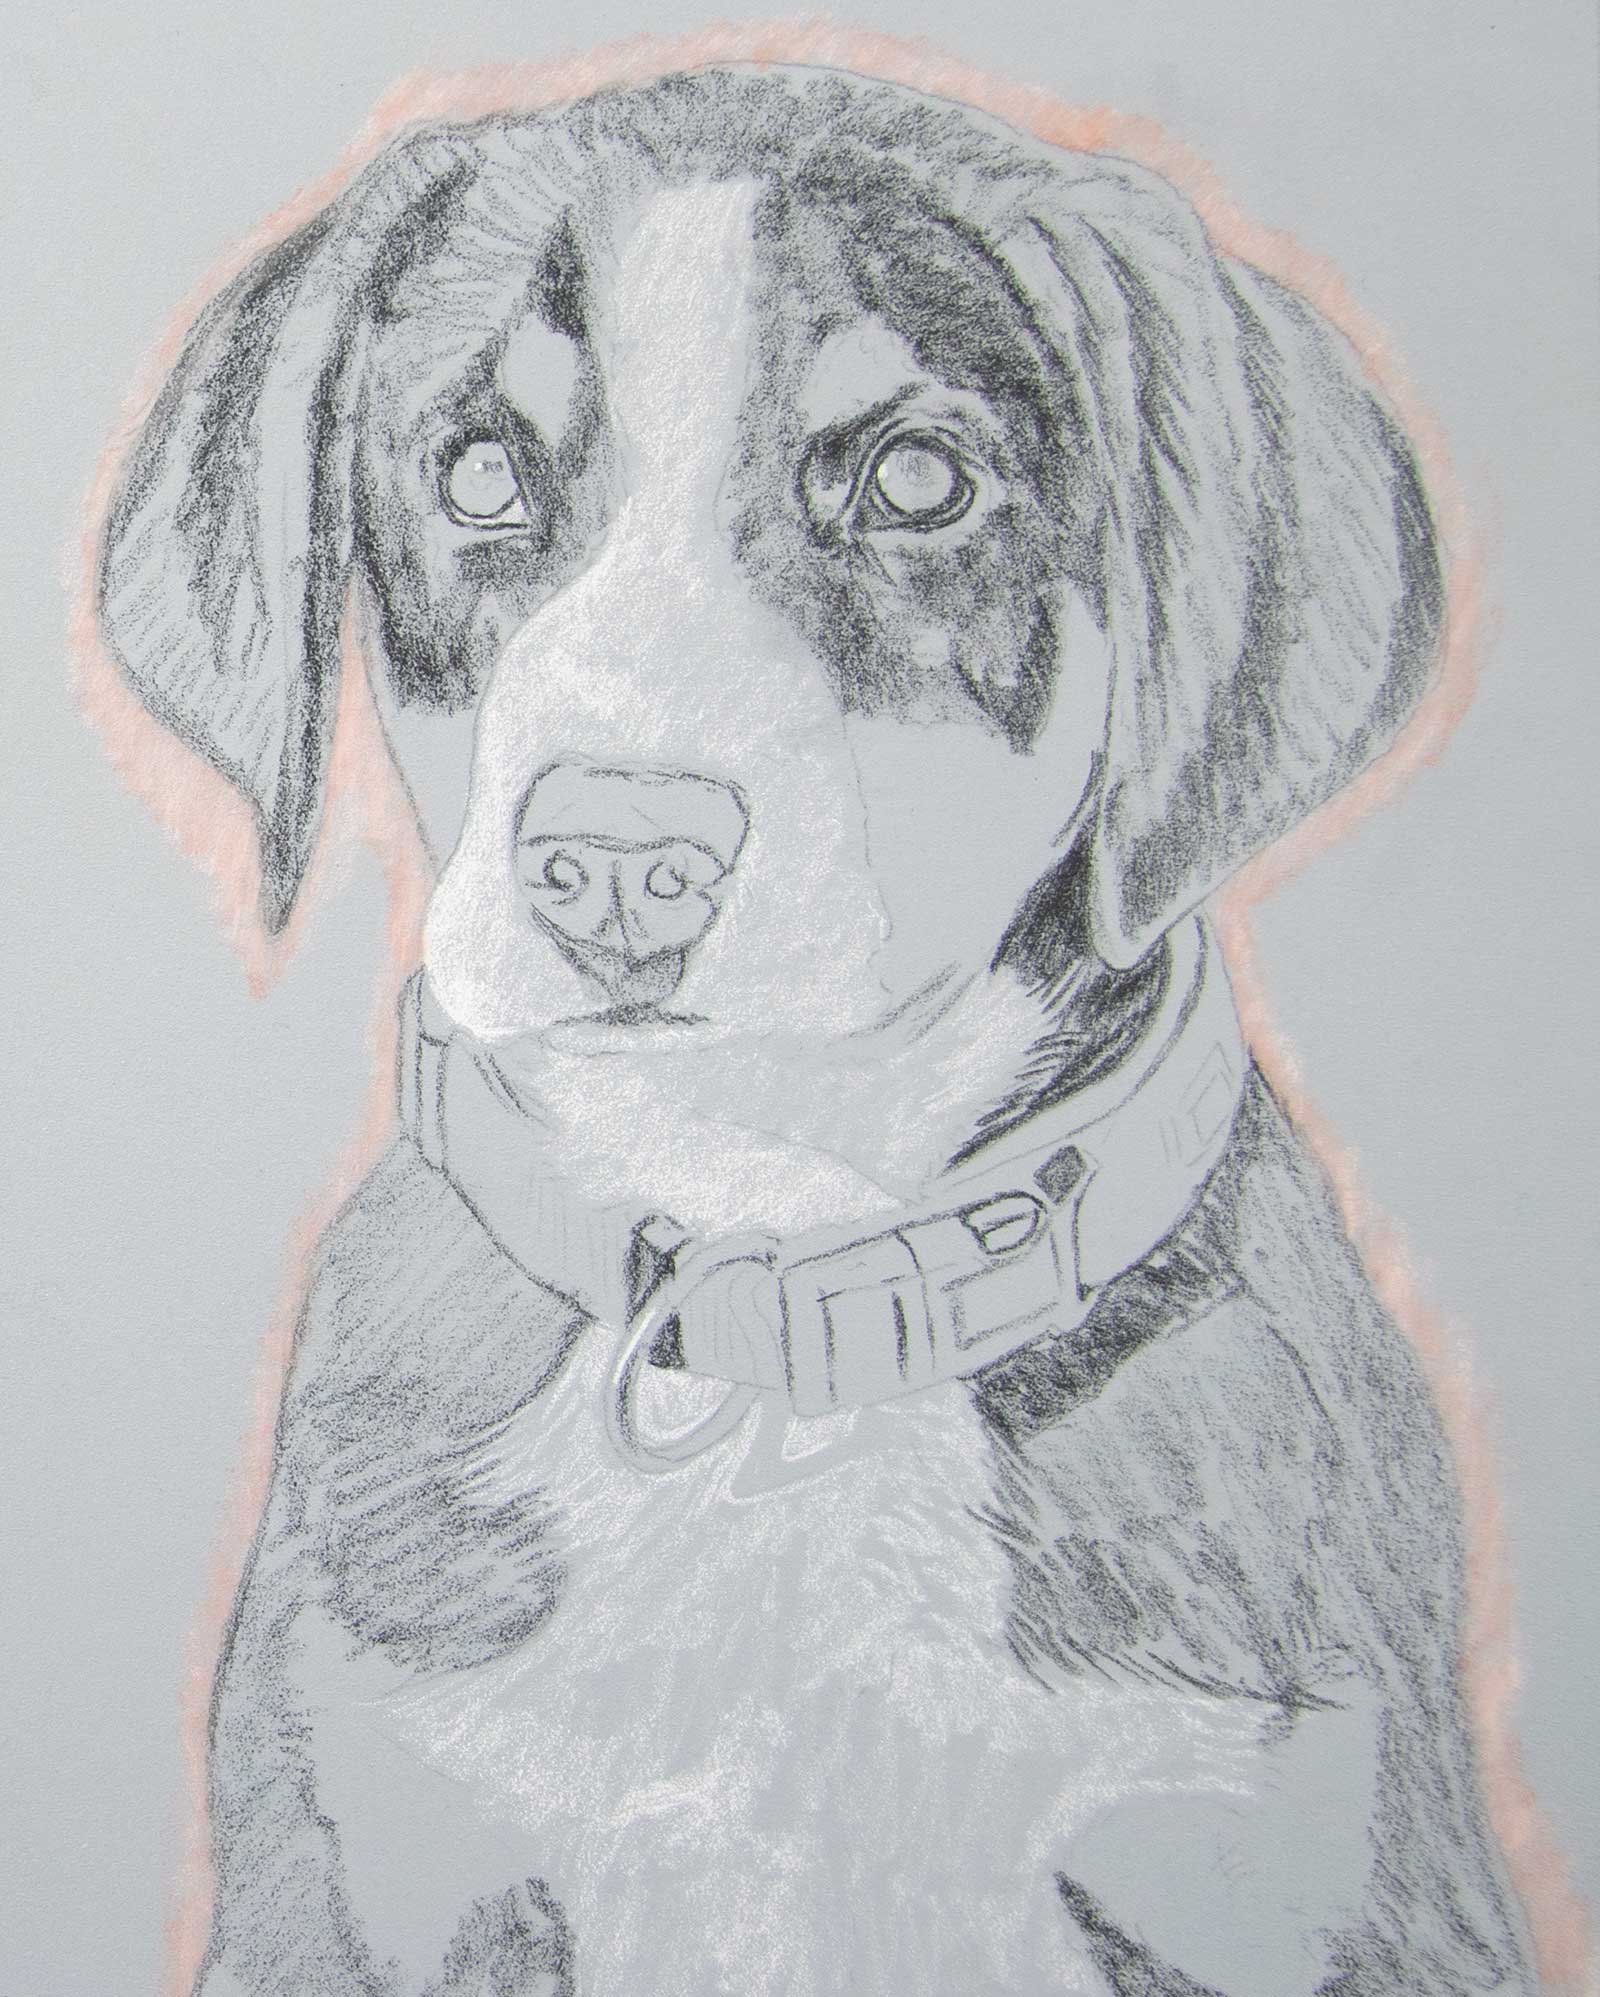 Stage 1
Stage 1 Loosely Mapping Values and Colors
After sketching or transferring my main outlines, I loosely mark where the highlights and shadows will be. This approach is especially helpful for complex subjects with detailed markings or patterns. At this stage, I typically use just a white and a black pastel pencil, applying light pressure to keep the pastel layers thin and easy to build upon. You’ll also notice I’ve added a small area of background color around the dog. This helps separate the subject from the background and makes it easier to judge the dog’s colors. I usually wait to fill in the entire background until much later, to reduce the chance of contaminating it with darker pastel dust.
 Stage 2
Stage 2 Underlayer with PanPastel
I frequently use PanPastels for my underlayers, especially for larger drawings. By their very nature, PanPastels discourage you from jumping into details too early, which keeps the focus on basic tonal values (lights and darks) and foundational colors. At this stage, my goal is simply to establish a solid base for the subject. I’ll refine everything later once I’m happy with the overall structure and color placement.
 Stage 3
Stage 3 Completed Underlayer
Here, you can see the underlayer fully in place. If you don’t have PanPastels, you can achieve a similar result using pastel sticks or even pastel pencils. The key is to avoid overloading the paper with pastel; once the tooth is filled, it’s much harder to add fine details.
 Stage 4
Stage 4 Detail and Refinement
When I start adding details, I typically begin with the darker textures and then move on to lighter ones, layer by layer. Fur is usually made up of many subtle layers, so to replicate that in a drawing, we need to build our layers gradually as well.
 Stage 5
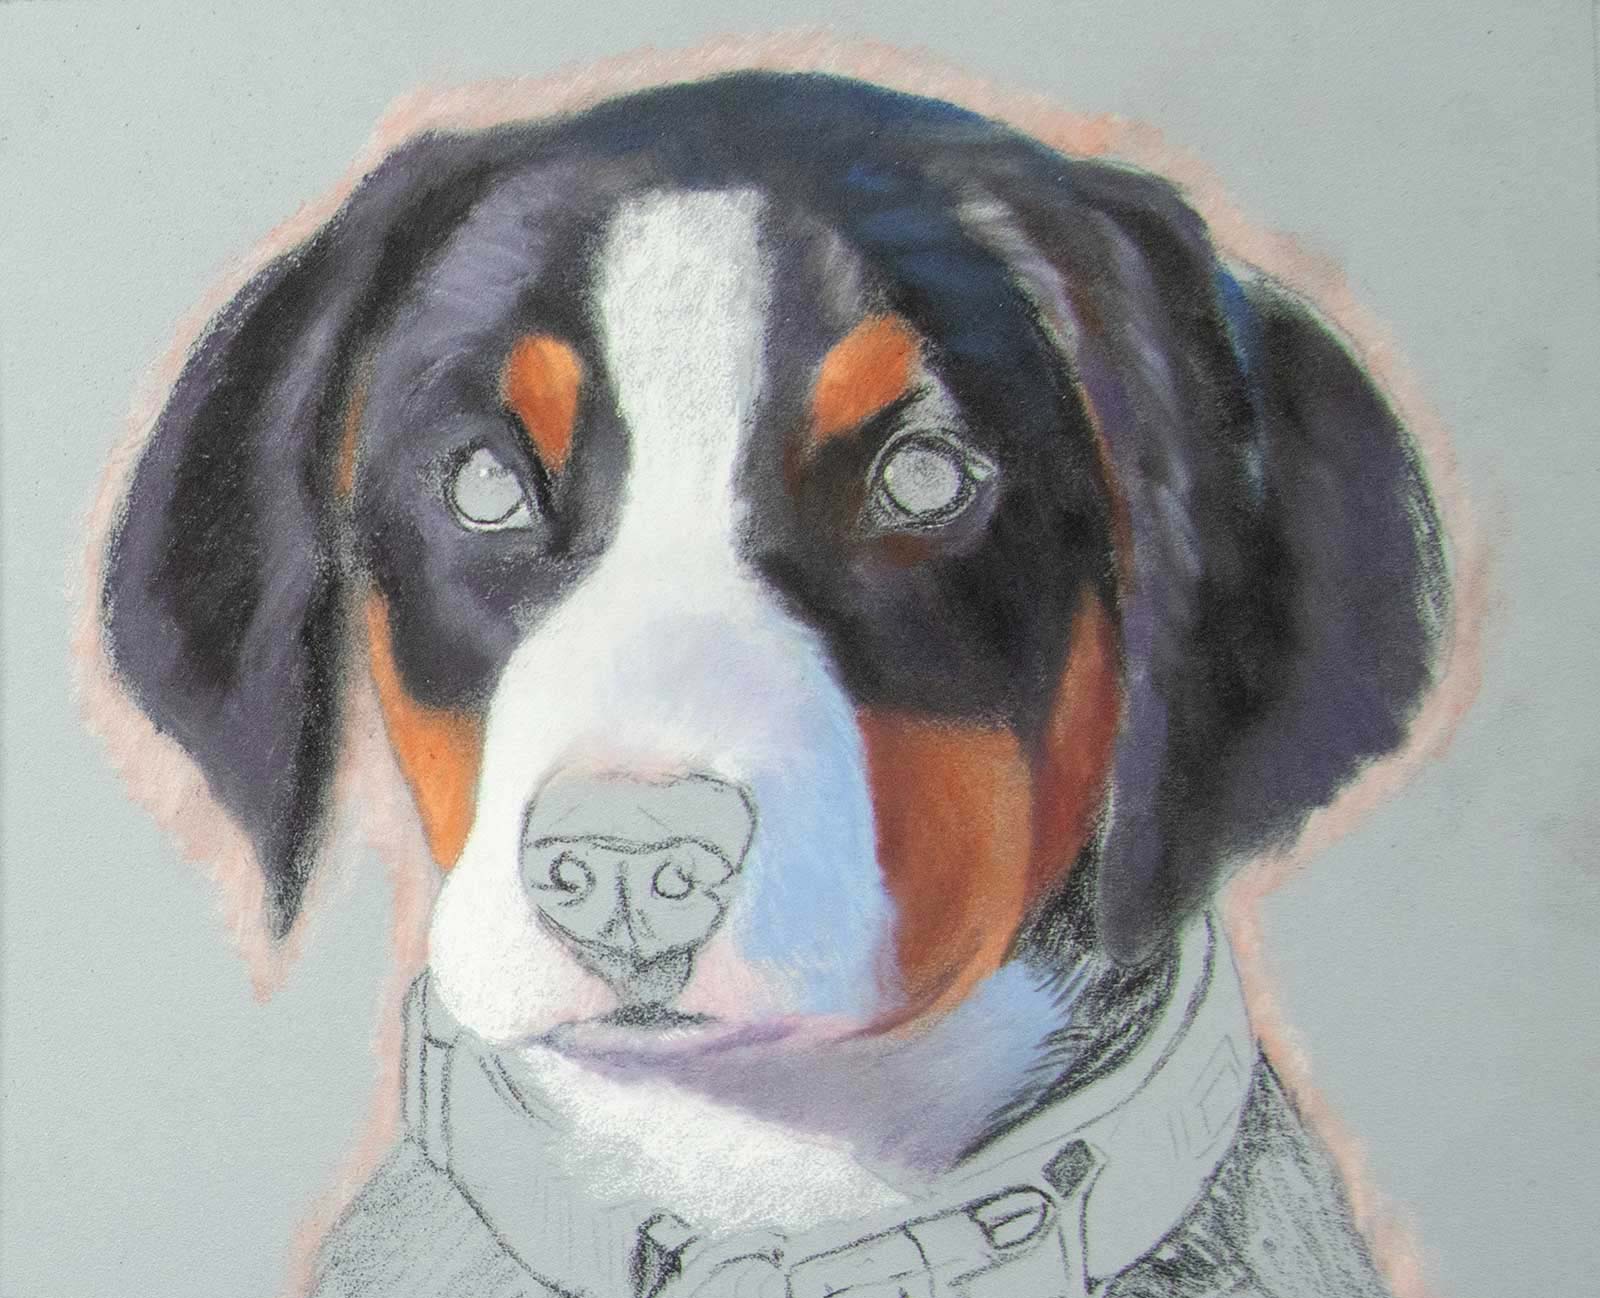
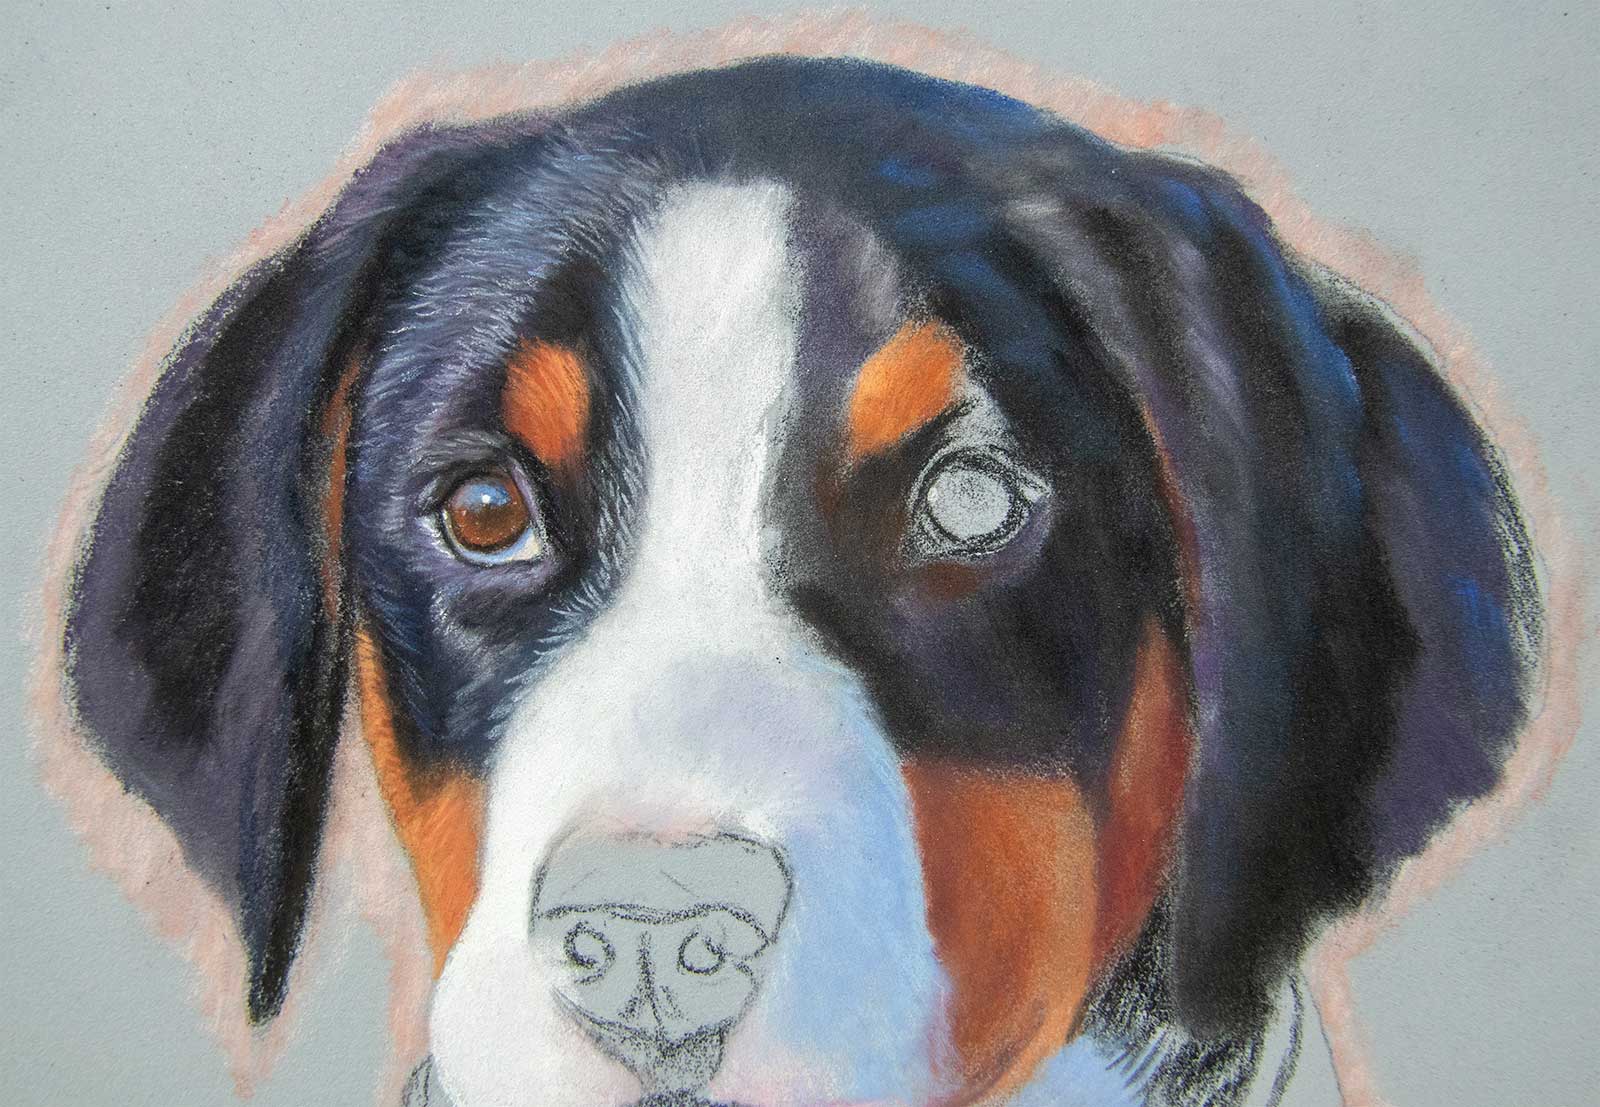
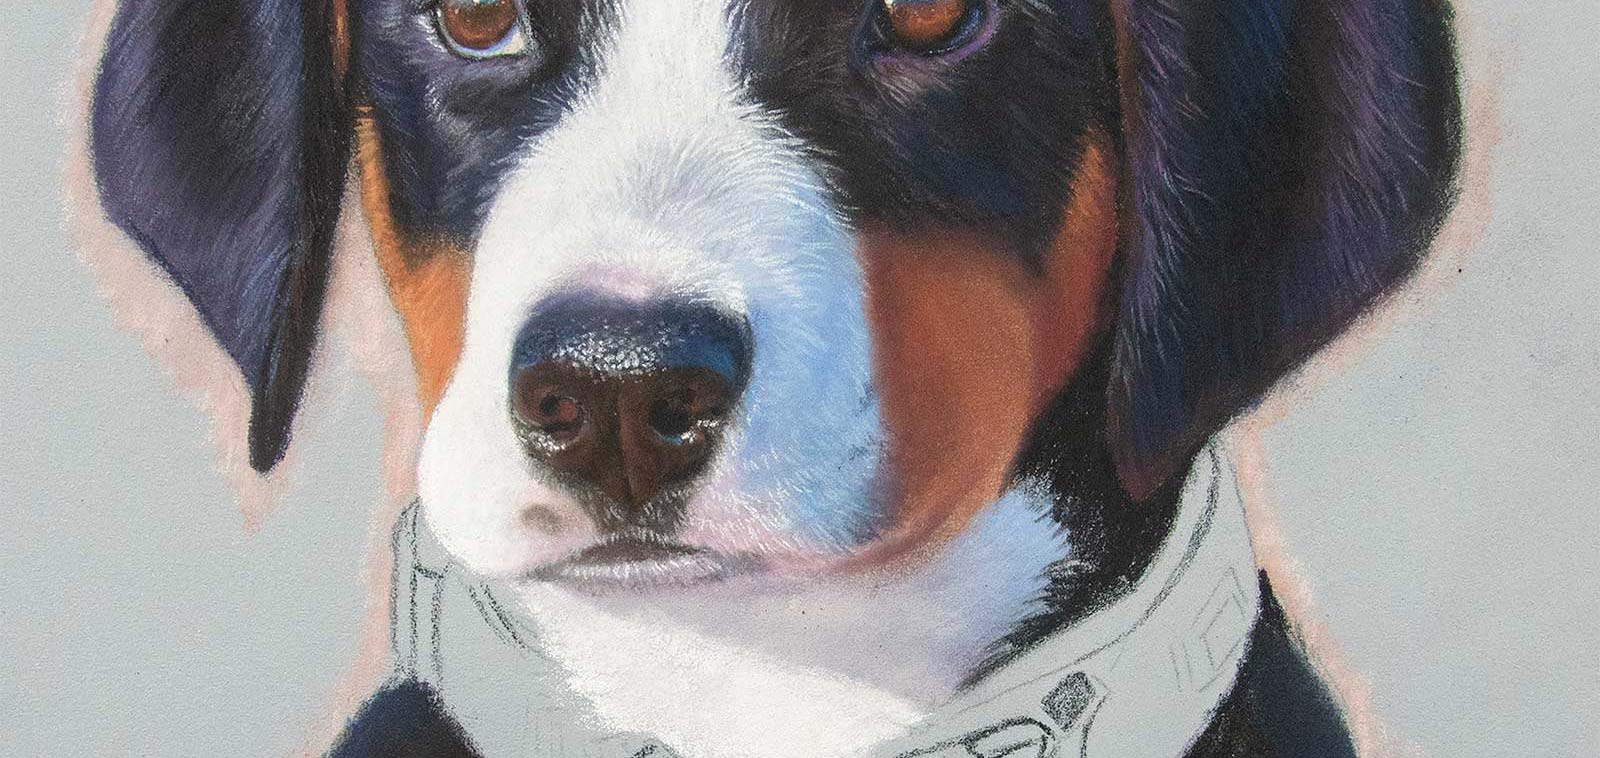
Stage 5 Muzzle and Nose Details
At this point, I’ve refined most of the head and completed the nose. Notice how the shadowed side of the dog’s muzzle has a blue tint. This often comes from reflected light or the surrounding sky, so always keep an eye out for unexpected colors in shadowed areas.
Drawing Set-up
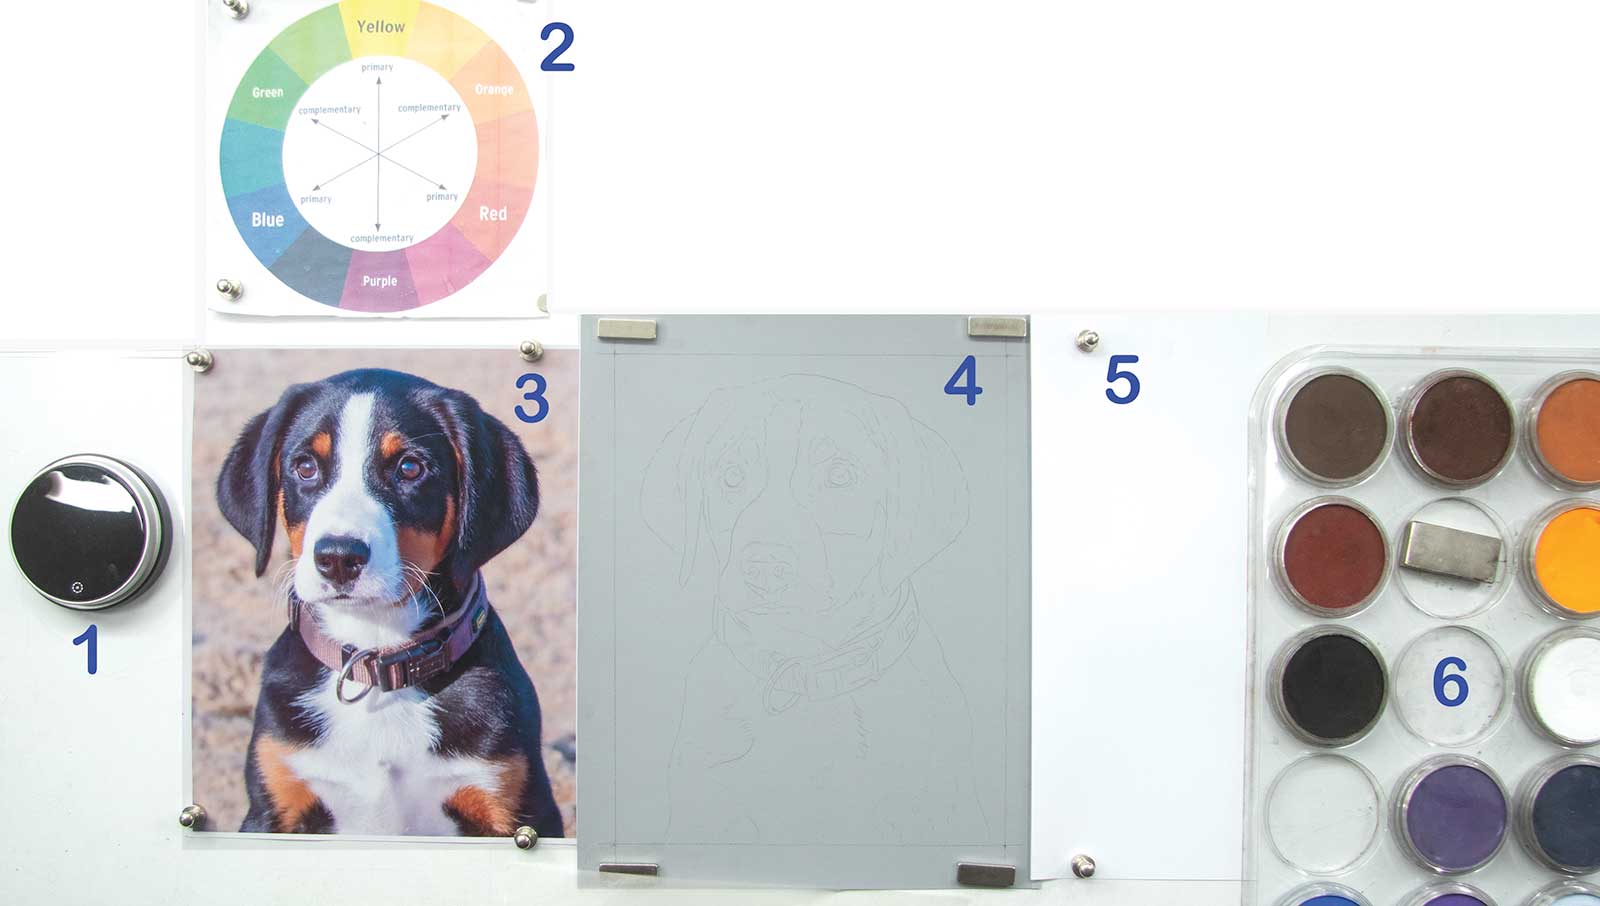
1. Posture and Reference Set-up: I use a magnetic whiteboard so I can easily move my reference photo and artwork around. I also work at an angle of about 60 to 70 degrees to keep my posture upright. In the photo labeled #1, you’ll notice a small black circle—this is a simple timer I set for 20 minutes whenever I sit down to draw. Although it might seem an odd thing to do, I’ve discovered that avoiding long stretches of sitting is crucial for maintaining good posture, especially as a full-time artist. Nothing spoils the excitement of creating art faster than an aching back. And the timer reminds me to move frequently, even when I get carried away drawing.
2. Color Wheel: I keep a basic color wheel on my drawing board as a handy reference. It’s a quick way to remind myself about complementary colors and other important color relationships.3. Reference Photo: I prefer to print my reference photo the same size as my intended drawing, ensuring it’s a high quality print. This way, I can clearly see the colors and tonal values I need to capture. Working from a poor quality reference often results in a poor drawing.
4. Pastel Paper: Over the years, I’ve experimented with nearly every pastel paper on the market. For my techniques, only two papers allow me to layer effectively and achieve both fine detail and soft blends: Clairefontaine Pastelmat and the new Canson Velvet paper. I typically use a mid-tone surface, like gray or another neutral color, to help balance lights and darks.
5. PanPastel Mixing Surface: When I use PanPastels for an underlayer (as shown in this drawing), I like to use a sheet of inexpensive printer paper as a mixing surface.
6. PanPastels: I use a strong magnet to secure my PanPastel palette with the colors I’ve chosen for the underlayer. If I’m working with pastel pencils, I’ll swap this out for a small pencil tray that holds my pre-selected colors.
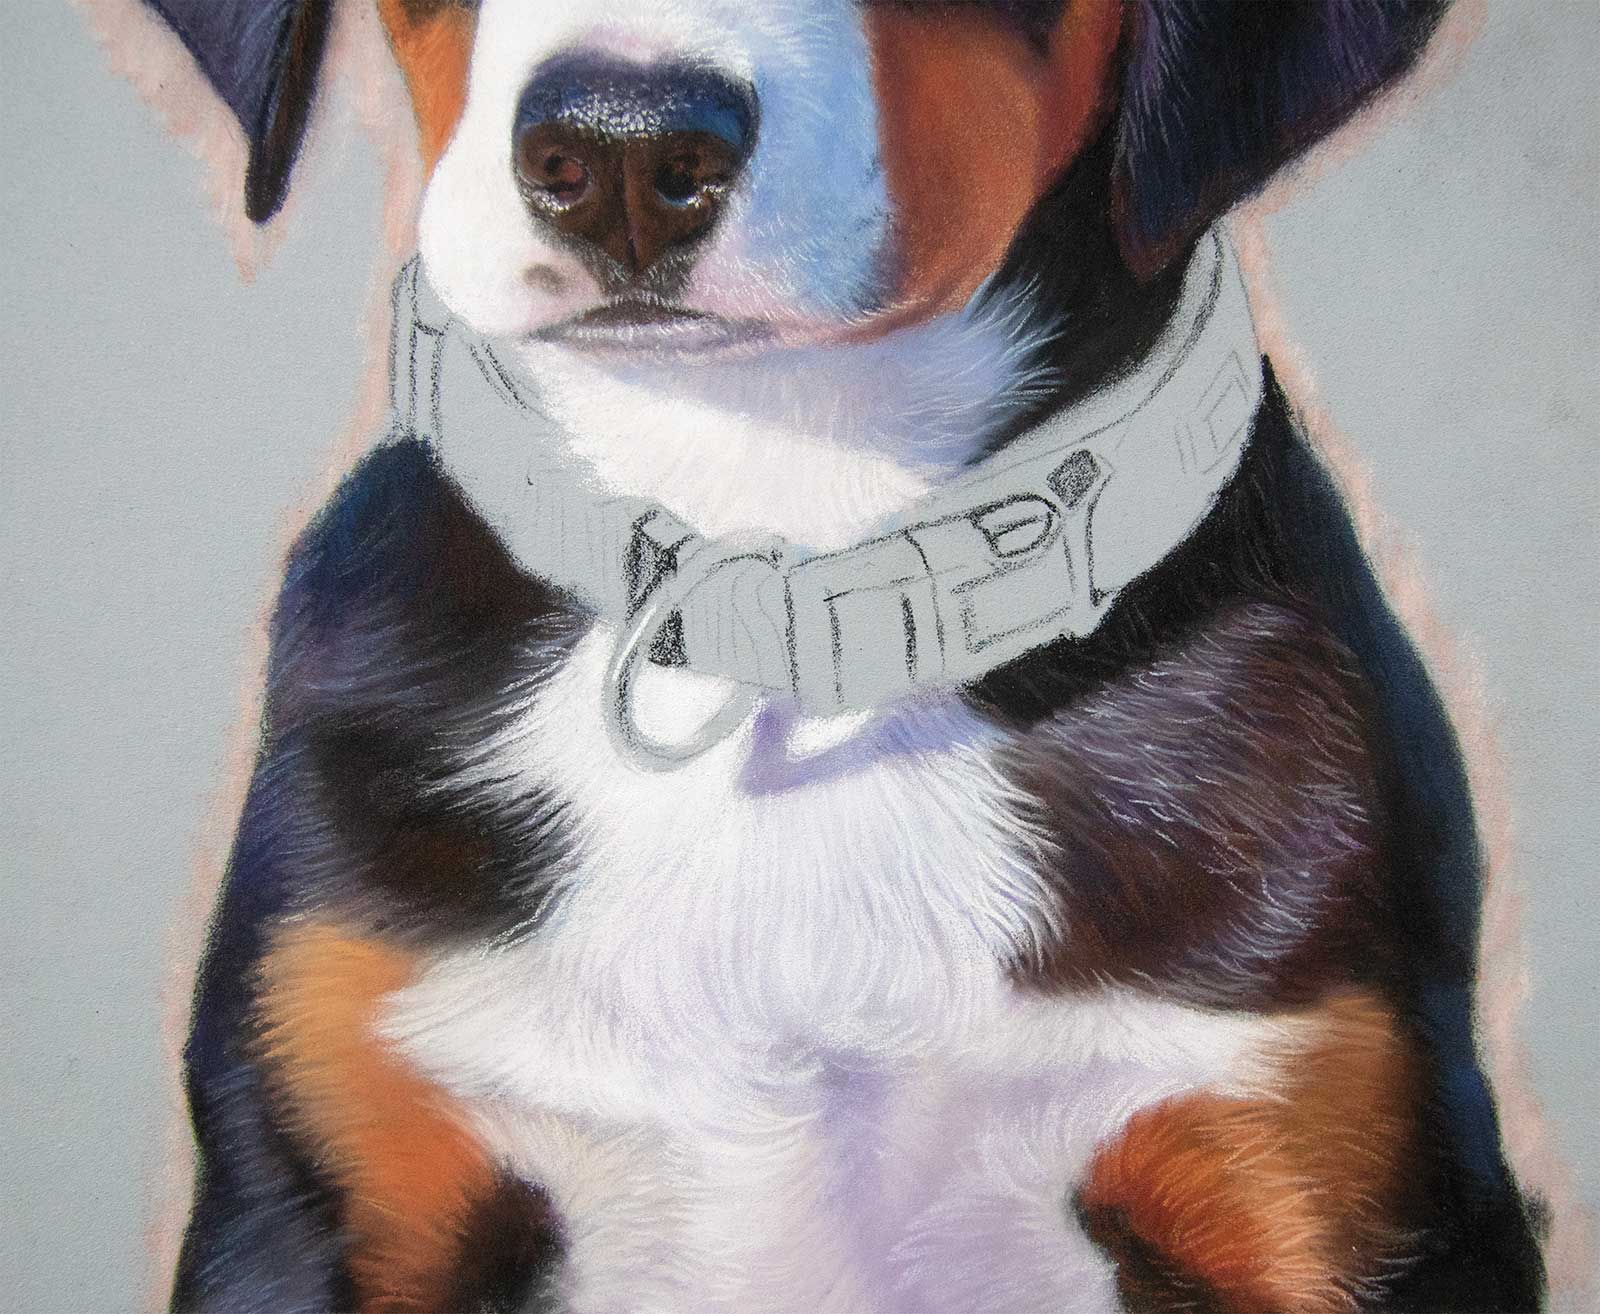 Stage 6
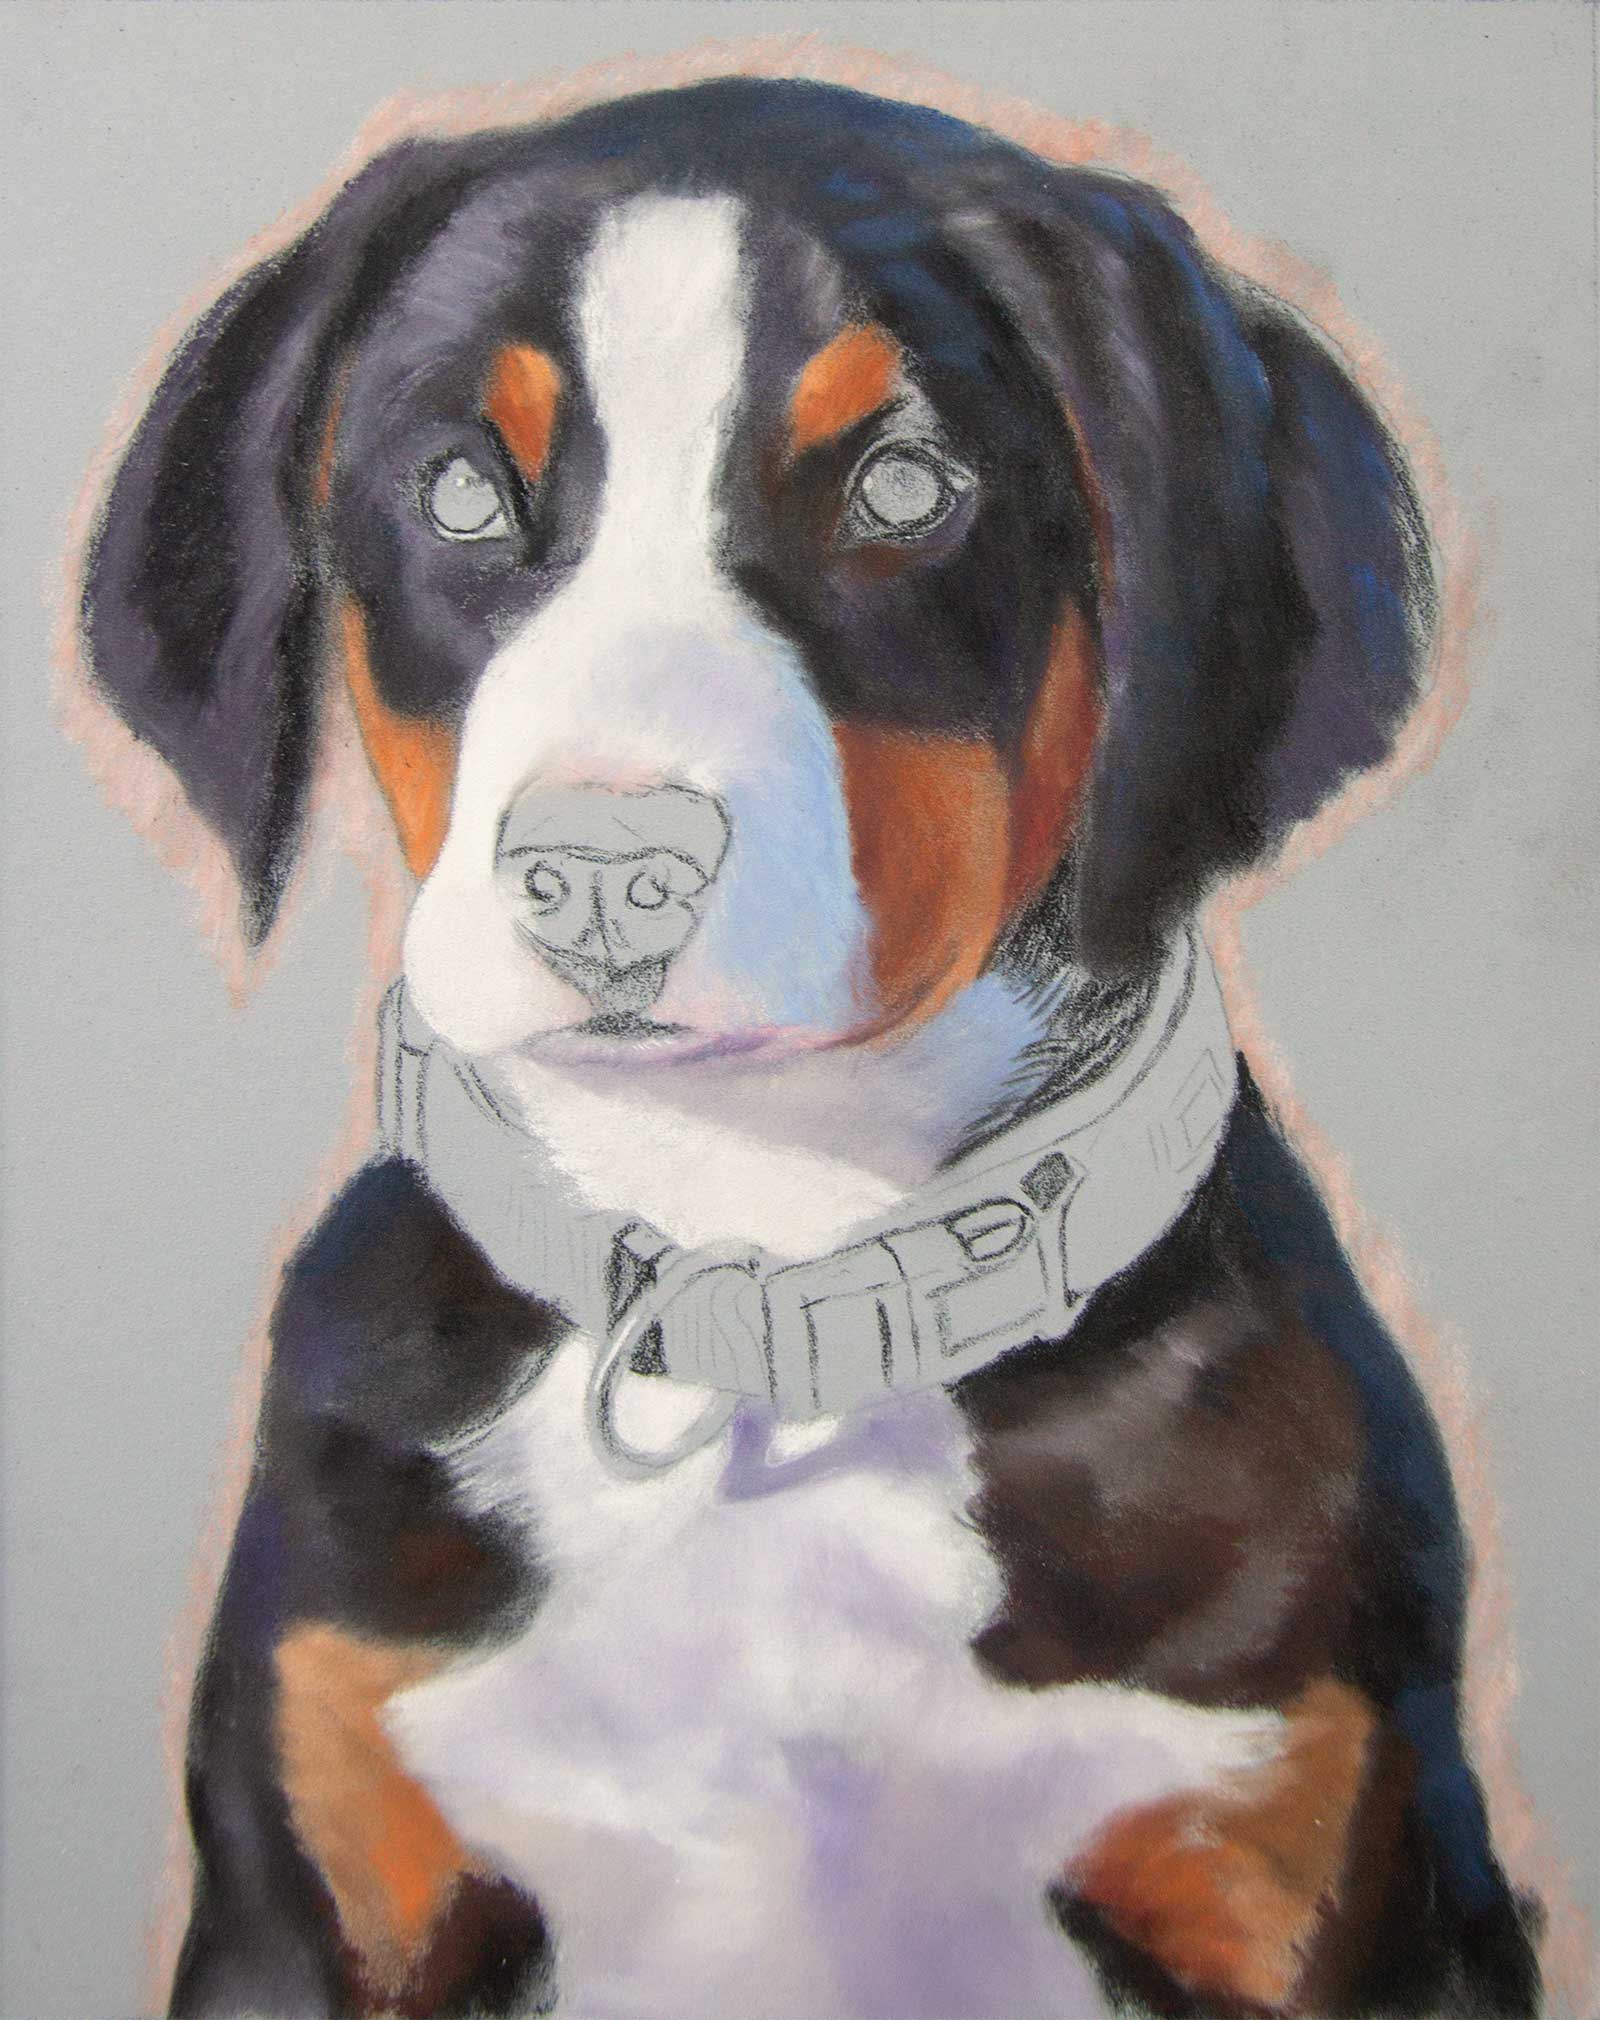
Stage 6 Body Refinement and Details
I used the same layering and refinement process on the dog’s body. To prevent the white fur from becoming muddy when drawing over darker areas, I wiped the tip of my pastel pencil on a microfiber cloth after each stroke. By moving from the white chest into the dark fur, then wiping the pencil before repeating, I kept the white hairs clean and crisp.
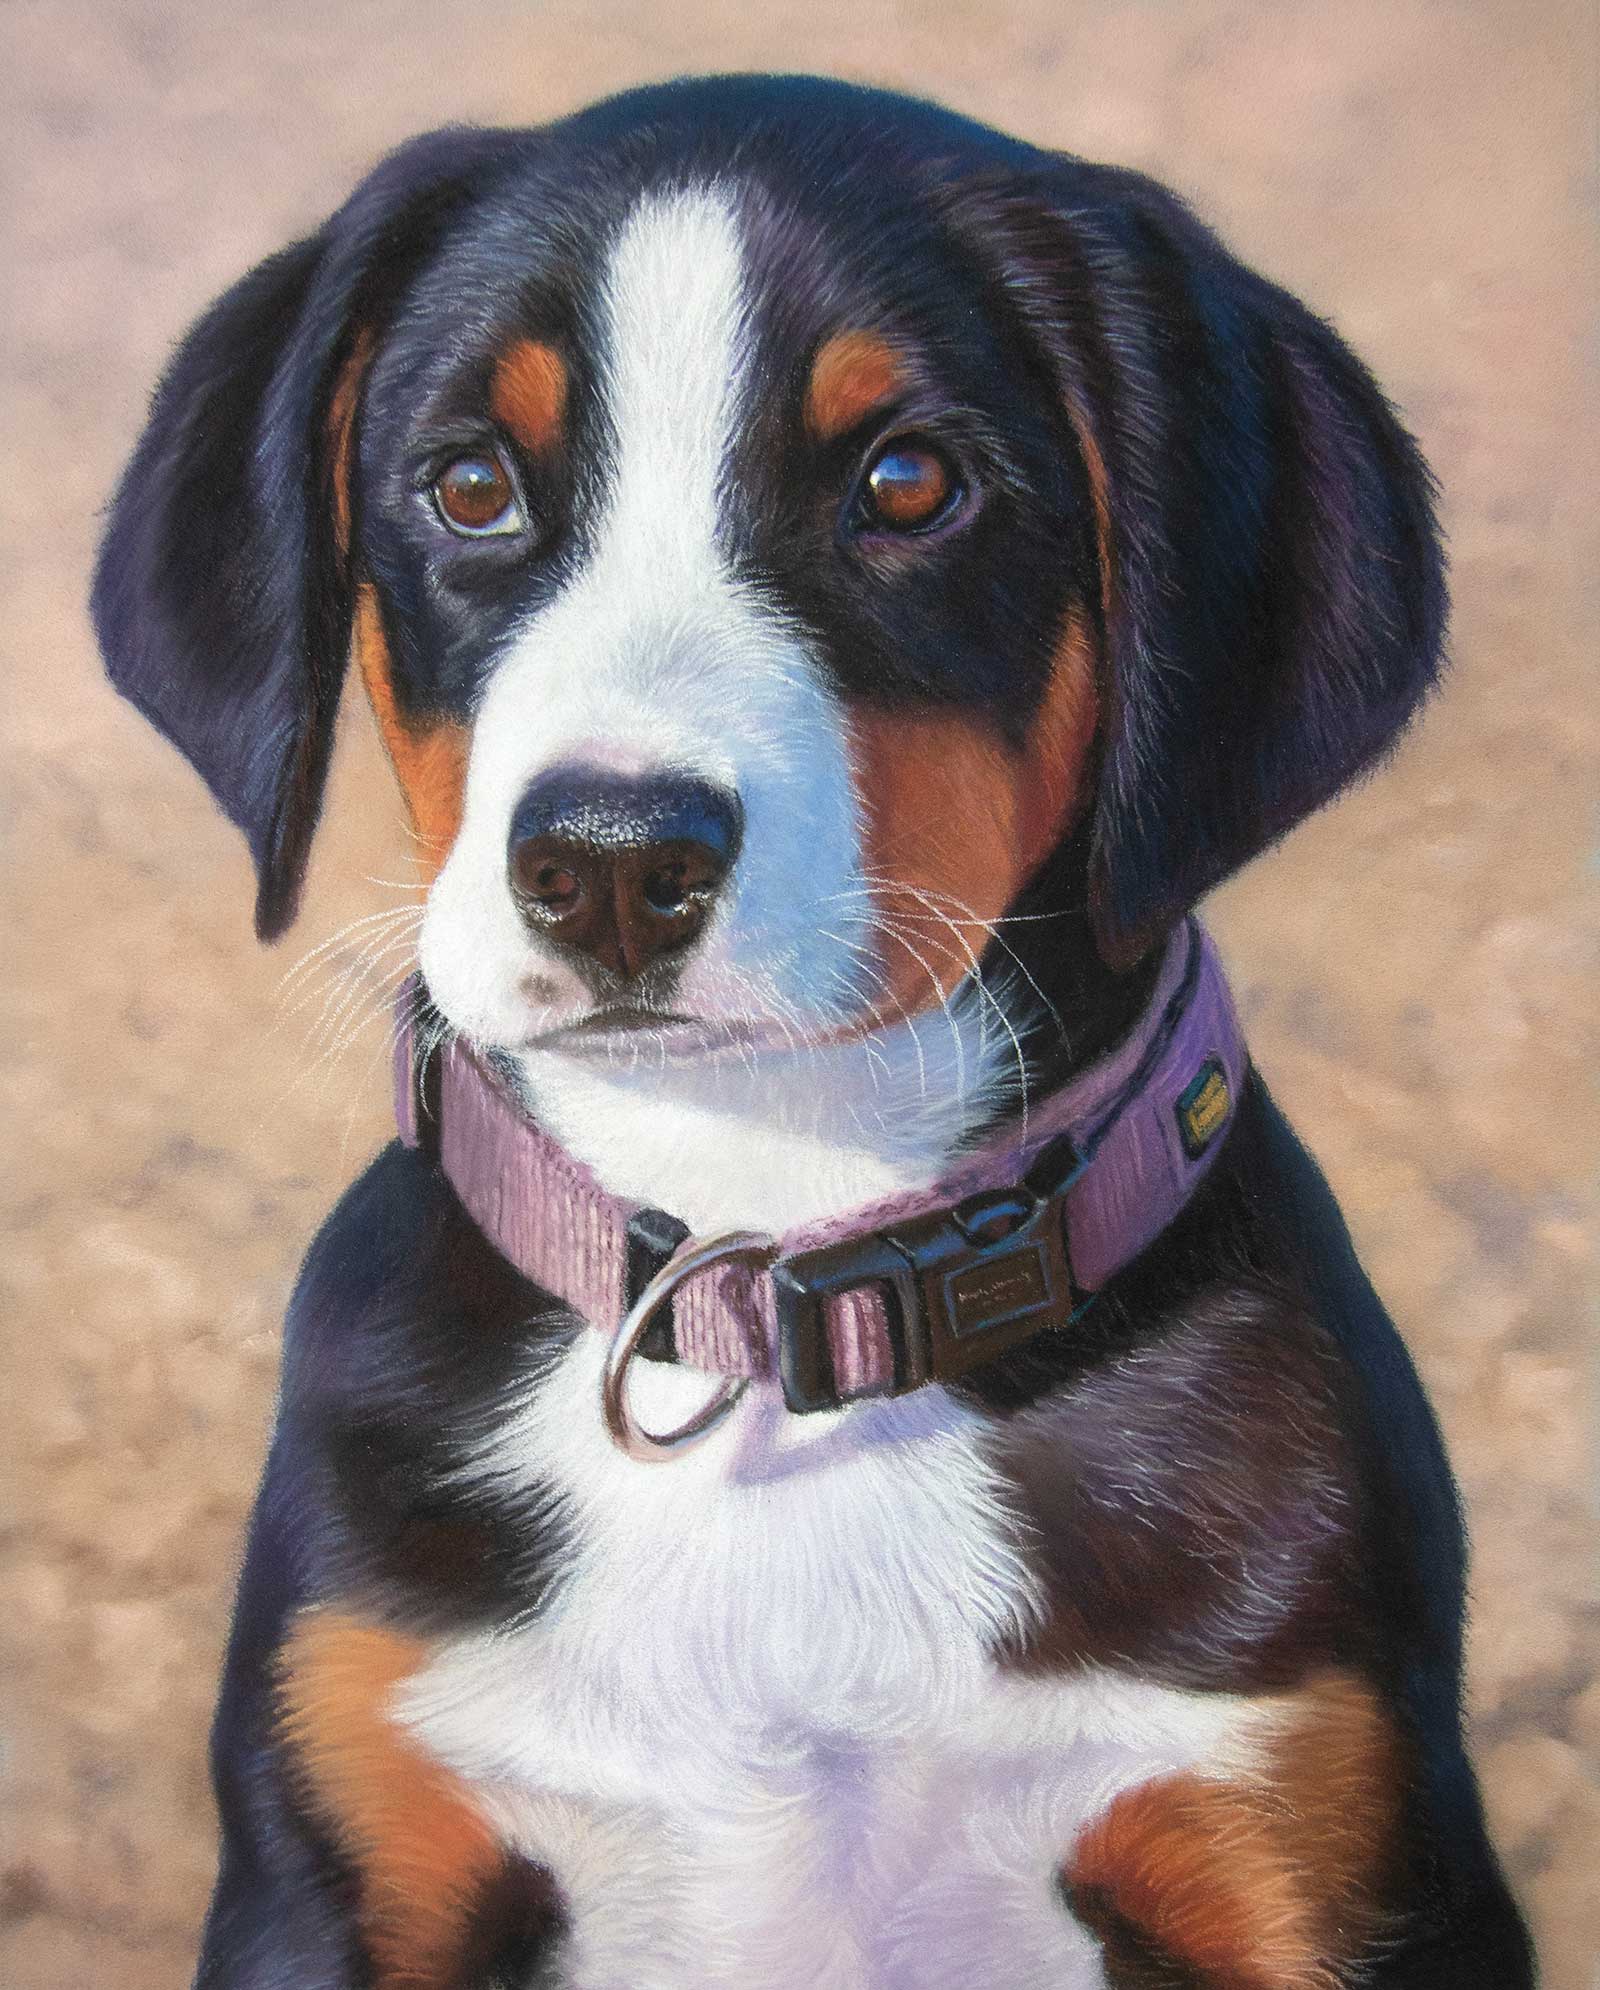 Stage 7
Stage 7 Finished Artwork
Pastel Puppy, soft pastels on Clairefontaine Pastelmat, 10 x 8” (25 x 20 cm)
Once the dog was finished, I completed the collar using pastel pencils, which gave me greater control in that small area. With everything else done, I added the background using PanPastels and tidied up the edges around the dog for a polished, final look.
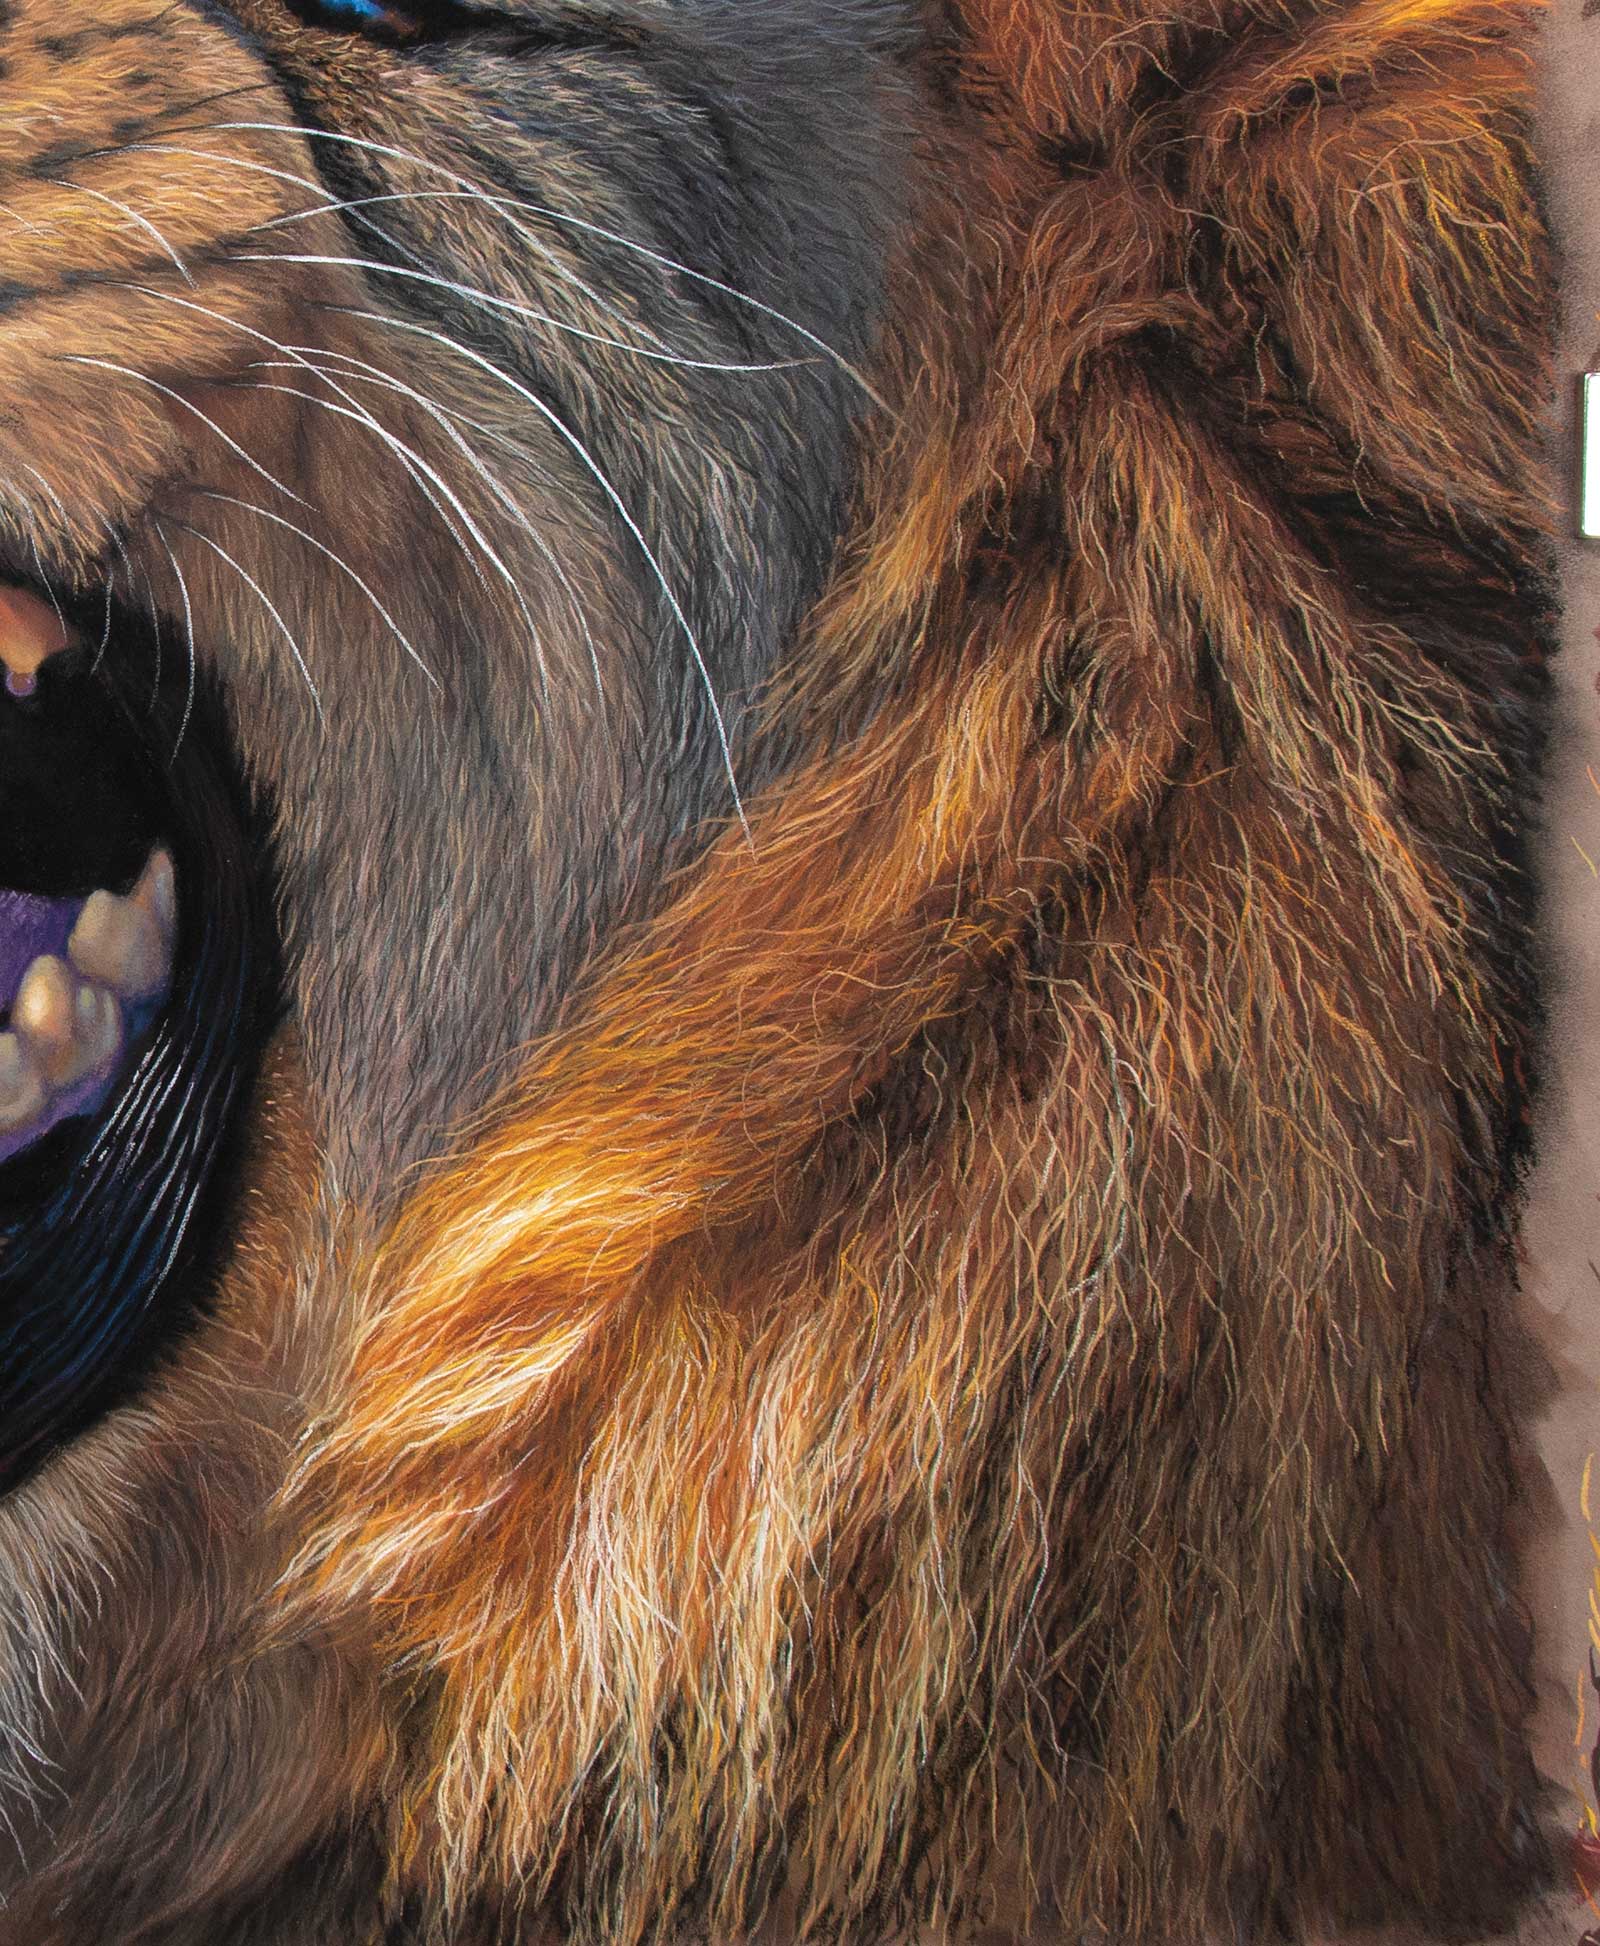
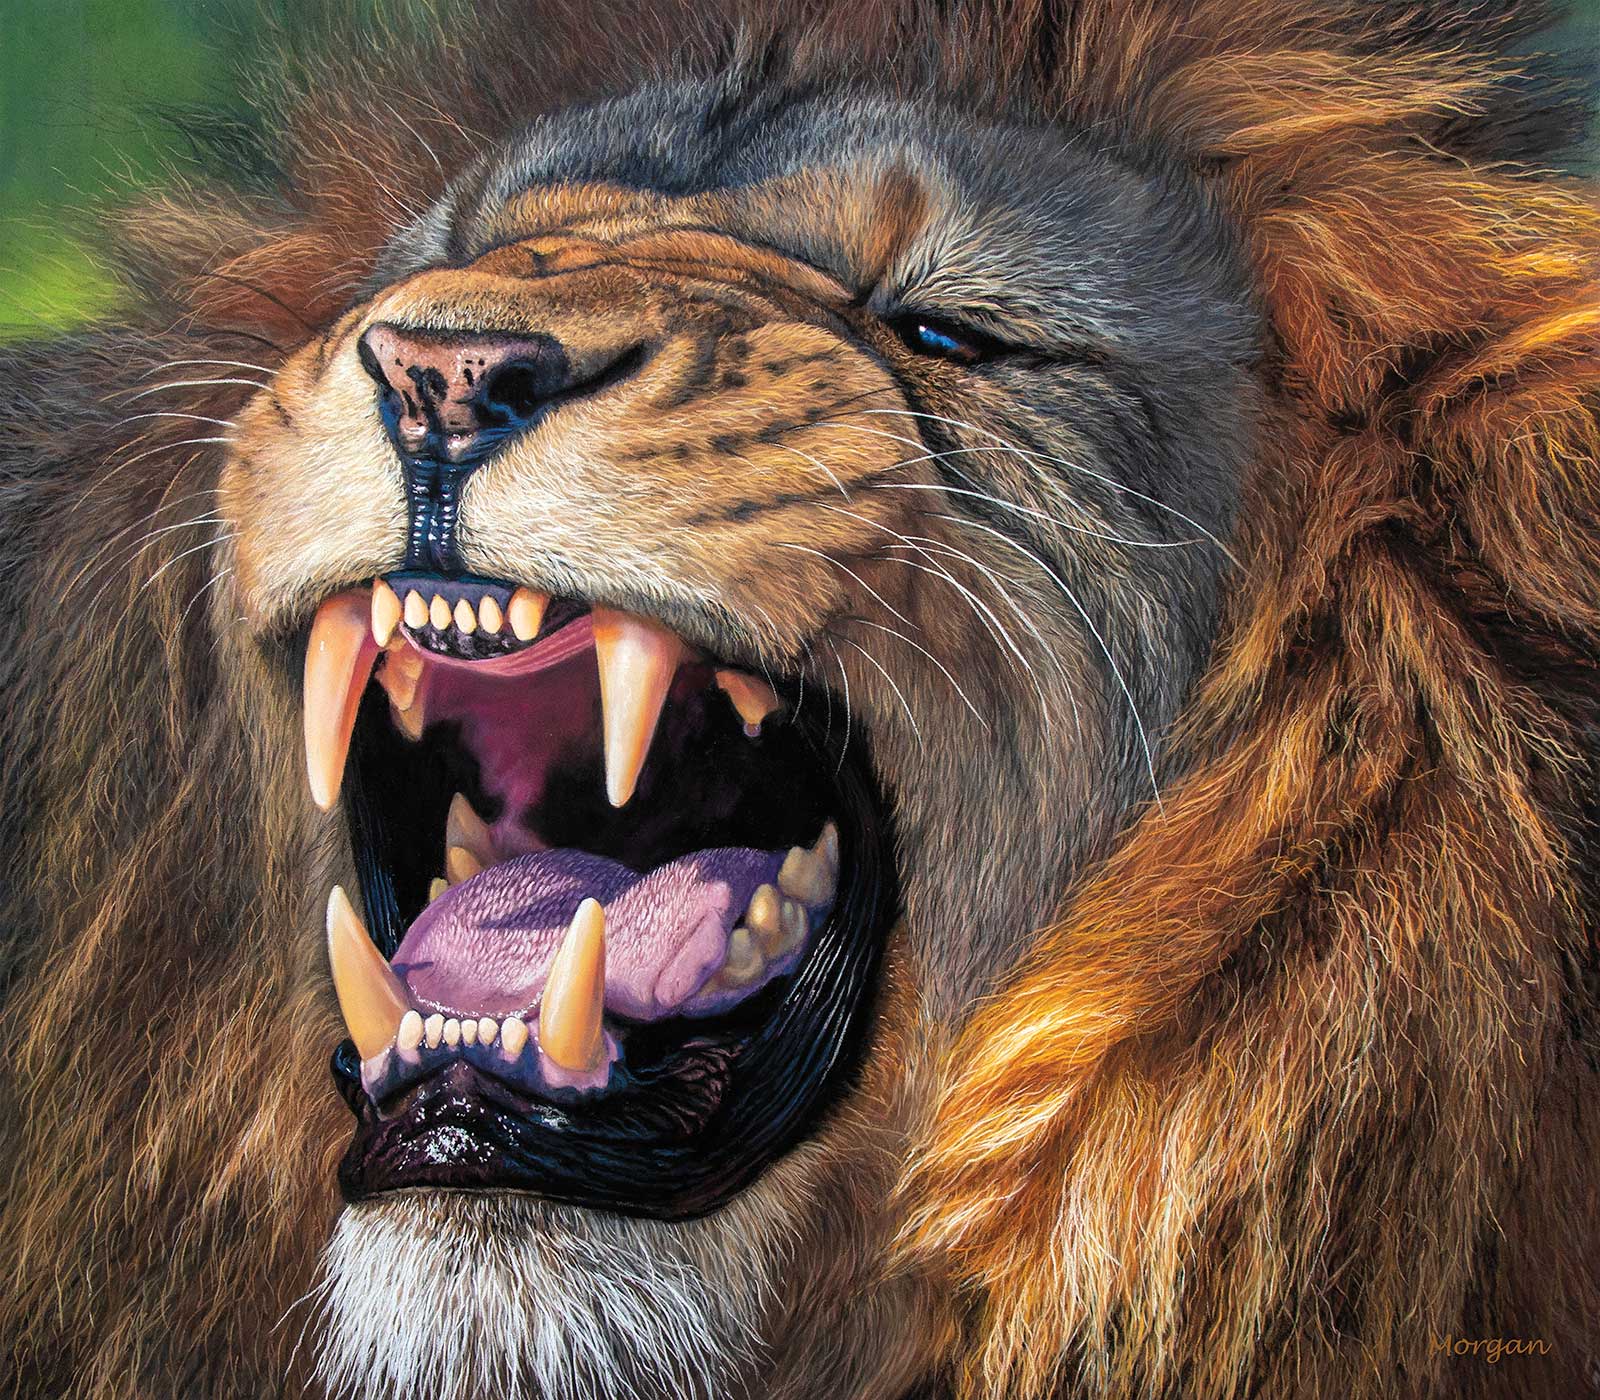
Capturing Complex Fur
For my dramatic Lion Roaring drawing, I set out to capture a powerful sense of impact and intricate detail. Working on a large scale—this piece measures 20 by 17”—highlights one of pastel’s greatest advantages. This medium not only allows you to cover large areas with ease, but also enables you to build up layers of details over underlayers, streamlining the creative process. This freedom makes large-scale projects both exciting and rewarding.
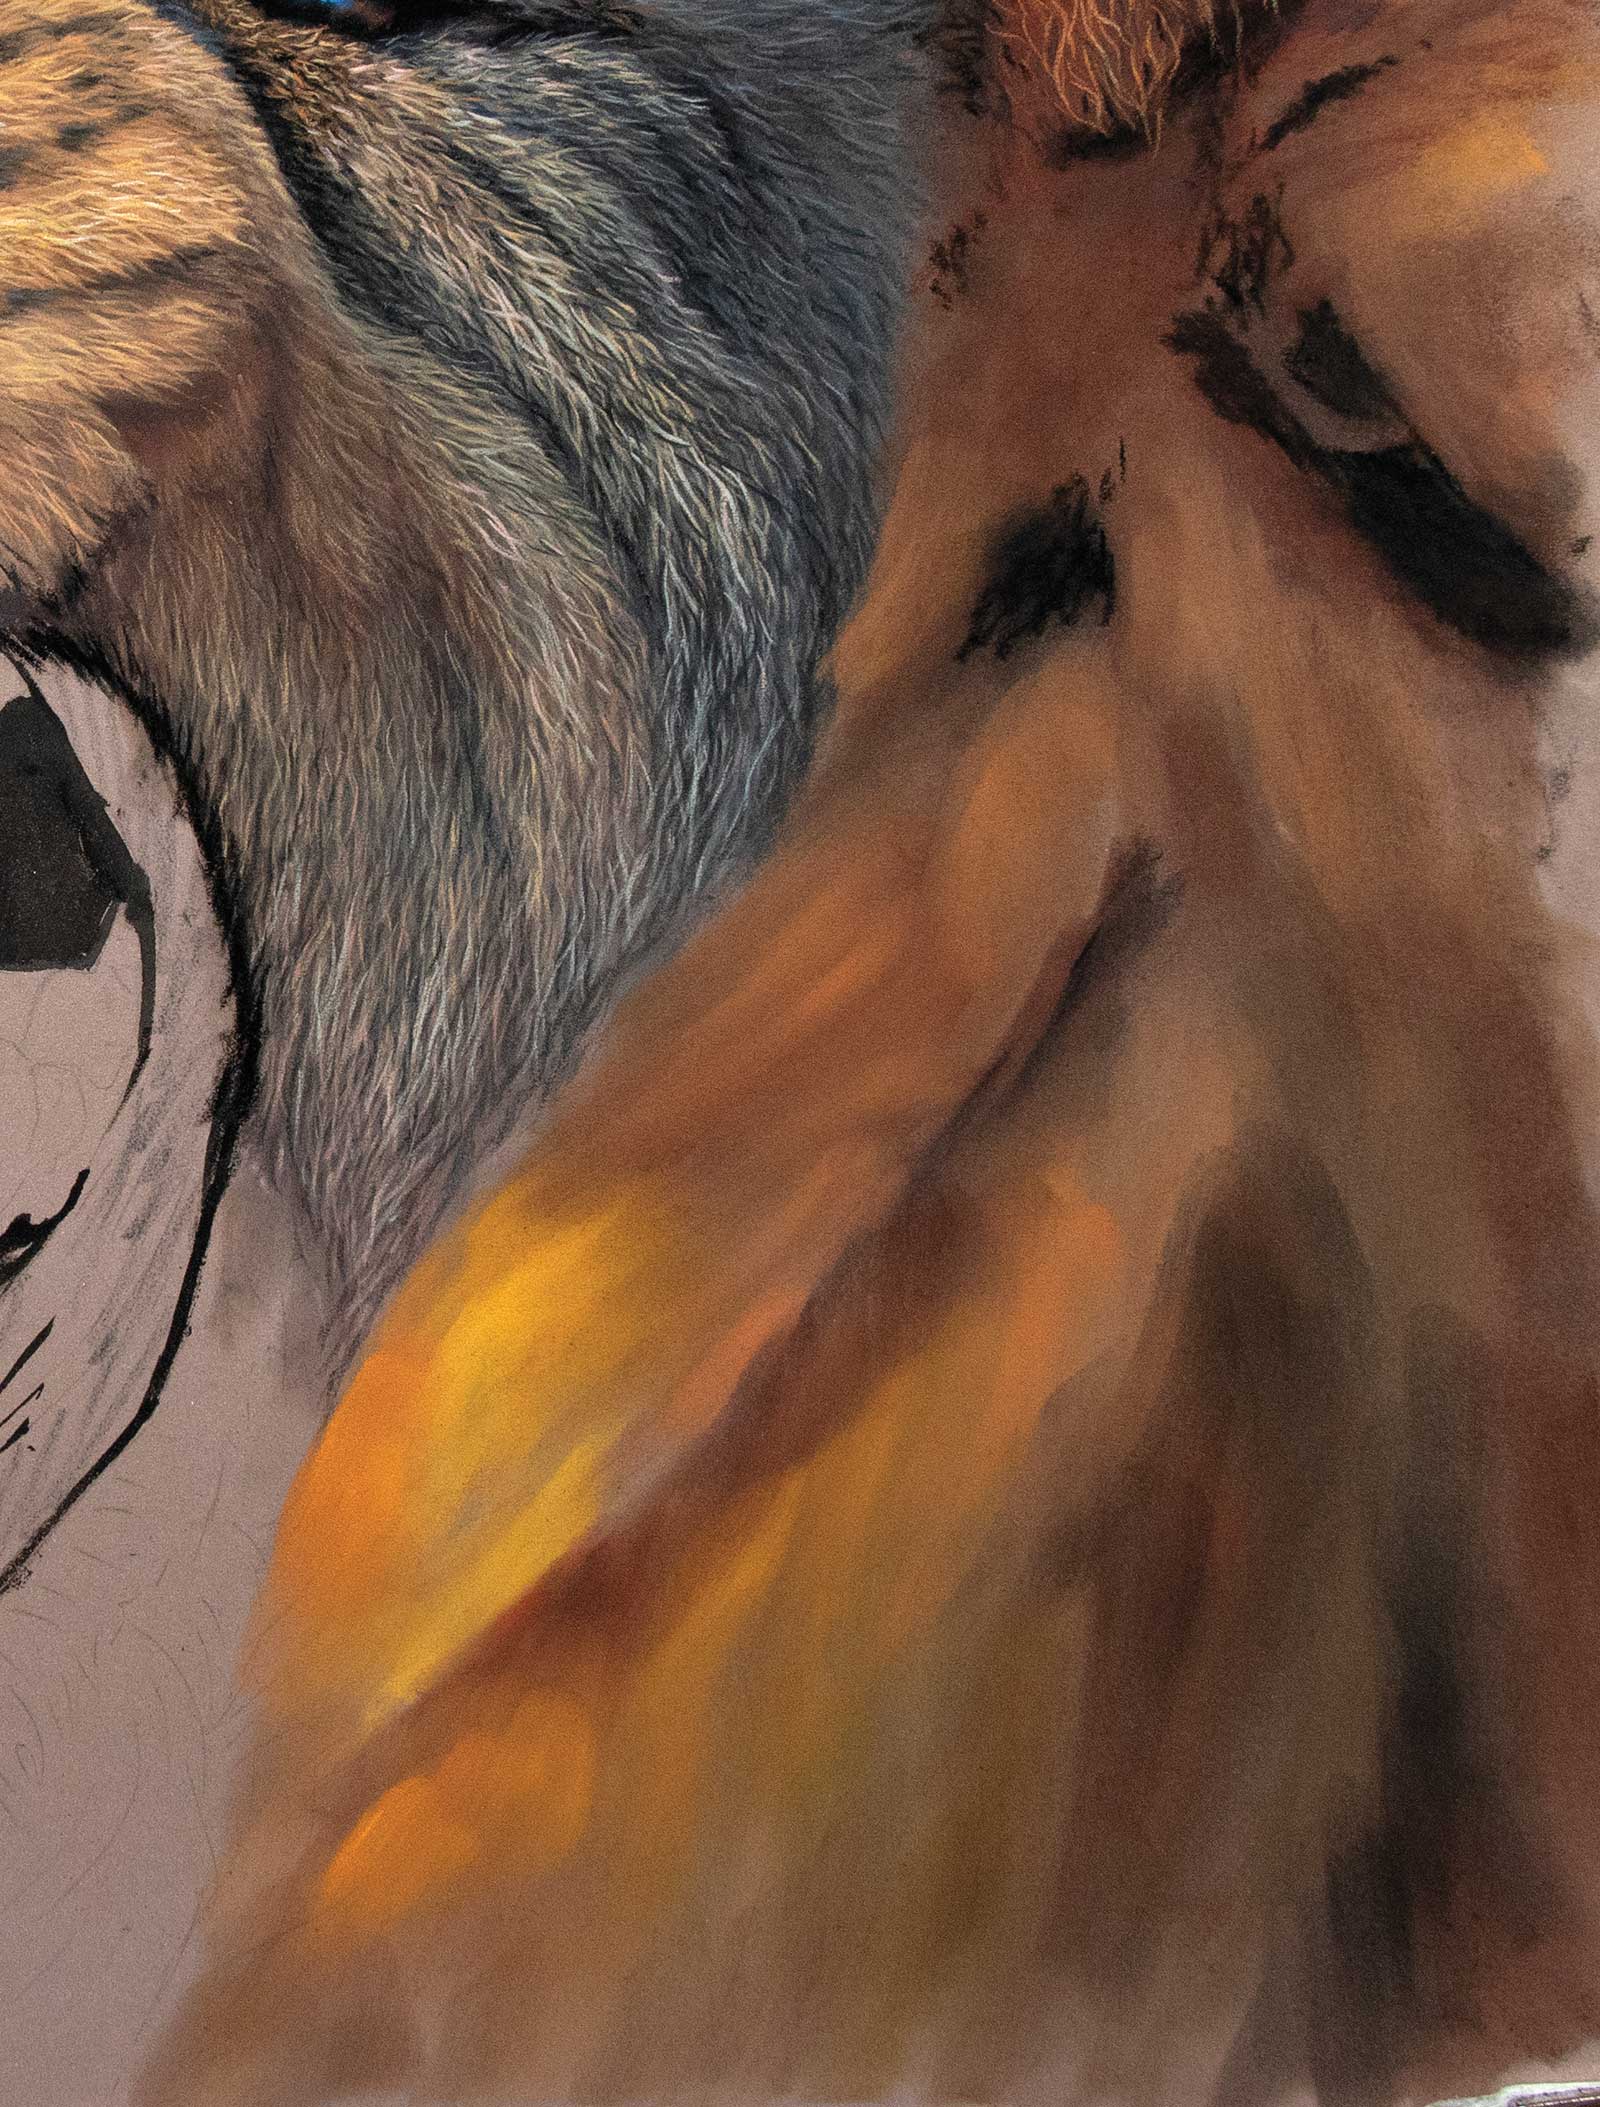 Stage 1
Stage 1 Building Depth Through Layered Fur
Animal fur, especially when it’s thick and richly textured, naturally exudes depth because of the interplay between dense layers of hair and the space filled with air. To mimic this effect on a flat surface, a multi-layered approach is essential. I begin by using PanPastels to lay down the initial base: blocking in both the general hues and the vibrant flashes of color that catch the light. This foundational step is critical. If the bright areas become muddied early on, it can be a real challenge to restore that vibrancy later.
 Stage 2
Stage 2 Establishing Texture with Underlayer Hues
Once the base is firmly in place, the next step is to introduce texture. I start by carefully applying the darkest shadows in the areas where the fur naturally recedes—these are the spaces that will eventually frame the highlights. This stage requires a keen eye for detail, and by studying the subject closely, I ensure that every mark follows the natural flow and direction of the fur. Incorporating subtle variations in tone at this stage not only enhances realism but also sets the stage for more intricate details later on.
 Stage 3
Stage 3 Enhancing Detail with Lighter Pastel Pencil Layers
With the underlying dark textures in place, I transition to building up the finer details using pastel pencils. Working on top of the established underlayer, I add successive layers of lighter marks. This gradual lightening process creates a smooth transition from deep shadows to bright highlights. I make sure to twist and turn the pencil during application; this technique produces natural, varied fur marks rather than rigid, uniform strokes that might look more like a fence than a flowing mane. The cumulative effect is a dynamic texture that brings the drawing to life, imbuing it with both energy and realism.
 Stage 4
Stage 4 Finished Artwork
Lion Roaring, pastel, 20 x 17” (50 x 43 cm)
About the artist
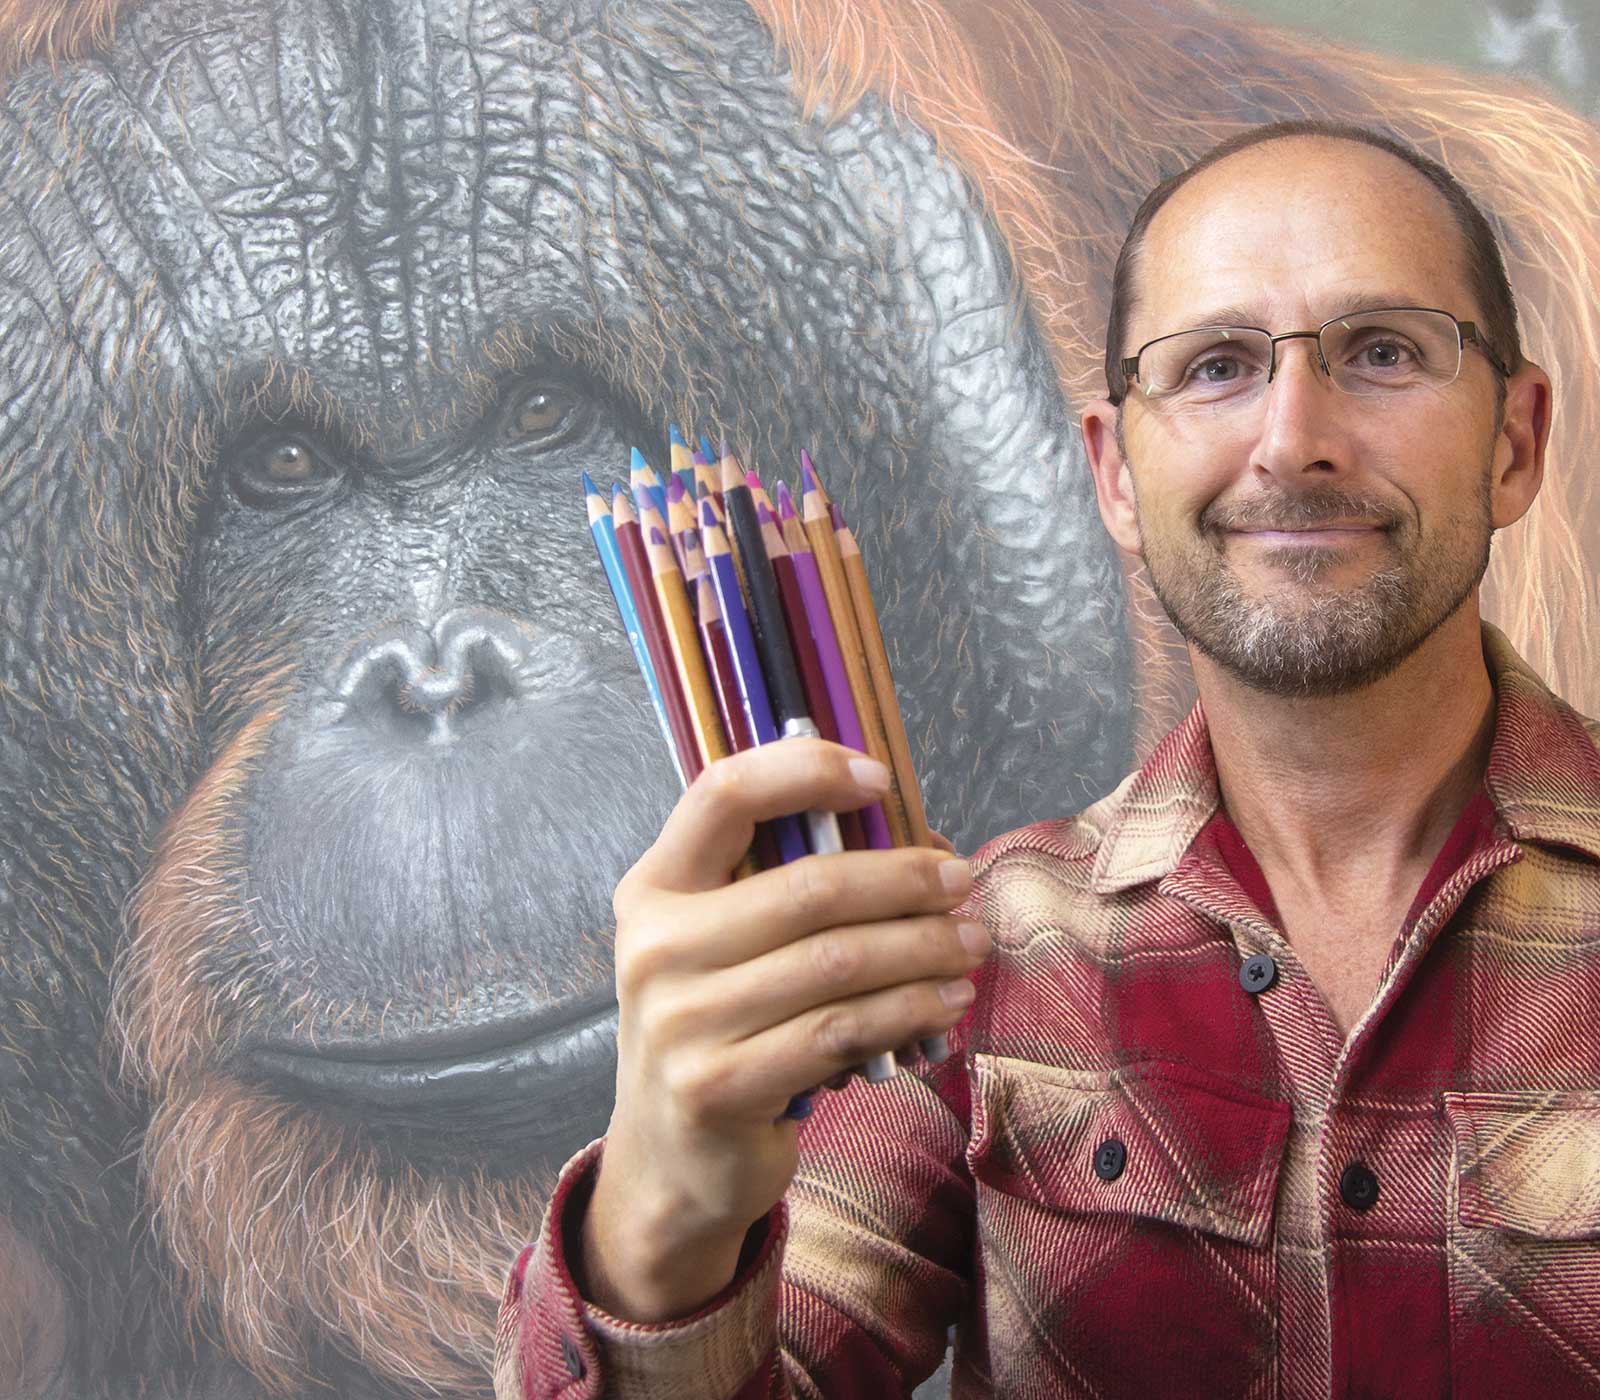 Jason Morgan
Jason Morgan is a professional wildlife artist and art tutor, best known for his ability to bring animals to life through pastels and oils. With a passion for both painting and teaching, he has spent over 25 years helping artists master their craft, guiding them past years of trial and error with his step-by-step lessons. His Patreon art channel, which has grown to over 1,700 members, is at the heart of his teaching. Through detailed tutorials, a vibrant and active online community, and copyright-free reference materials, Morgan provides a supportive space where artists of all levels can improve their skills and confidence.
Morgan’s artwork has been featured on numerous covers of leading art magazines, but for him, the true reward is seeing his students’ progress. He believes that anyone can learn to paint with the right guidance and is dedicated to making the process as enjoyable and accessible as possible.
Based in Wales, UK, Morgan continues to share his passion for wildlife art, inspiring others to create with confidence.