


Why Study From Nature?
Studying nature remains fundamental to creating art. Whether you’re beginning or advanced, sketching plants and animals offers you lessons on shapes, light and proportion. You’ll not only record the beauty before you but also learn about the way the natural world is constructed. Many artists find it more helpful than traditional studio lessons, because the forgiving forms of nature allow for more experimentation and growth. Unlike portrait drawing, nature doesn’t require a strict likeness, meeting you at your skill level.
Mental Benefits
When you face nature with a sketchbook, your senses sharpen and your mind clears. Sketching outdoors brings a sense of tranquility and peace. It fosters a patient, selfless mindset, free from conventional thinking and mannerisms. Patience is key, allowing you to observe and record details, but it’s not always easy to cultivate a quiet mind.
The Mindset to Cultivate
What frame of mind serves you best when working from nature? It helps to set aside the desire for a “pretty picture” and focus on understanding. Observe without expecting to create a masterpiece. John Constable called this objective state of mind the “pure and unaffected manner.” John Ruskin urged artists to “go to Nature in all singleness of heart...rejecting nothing, selecting nothing, and scorning nothing”. If you approach nature with this mindset, you’ll experience the joy that has delighted artists for centuries.
Here are some tips that might help you on your journey:
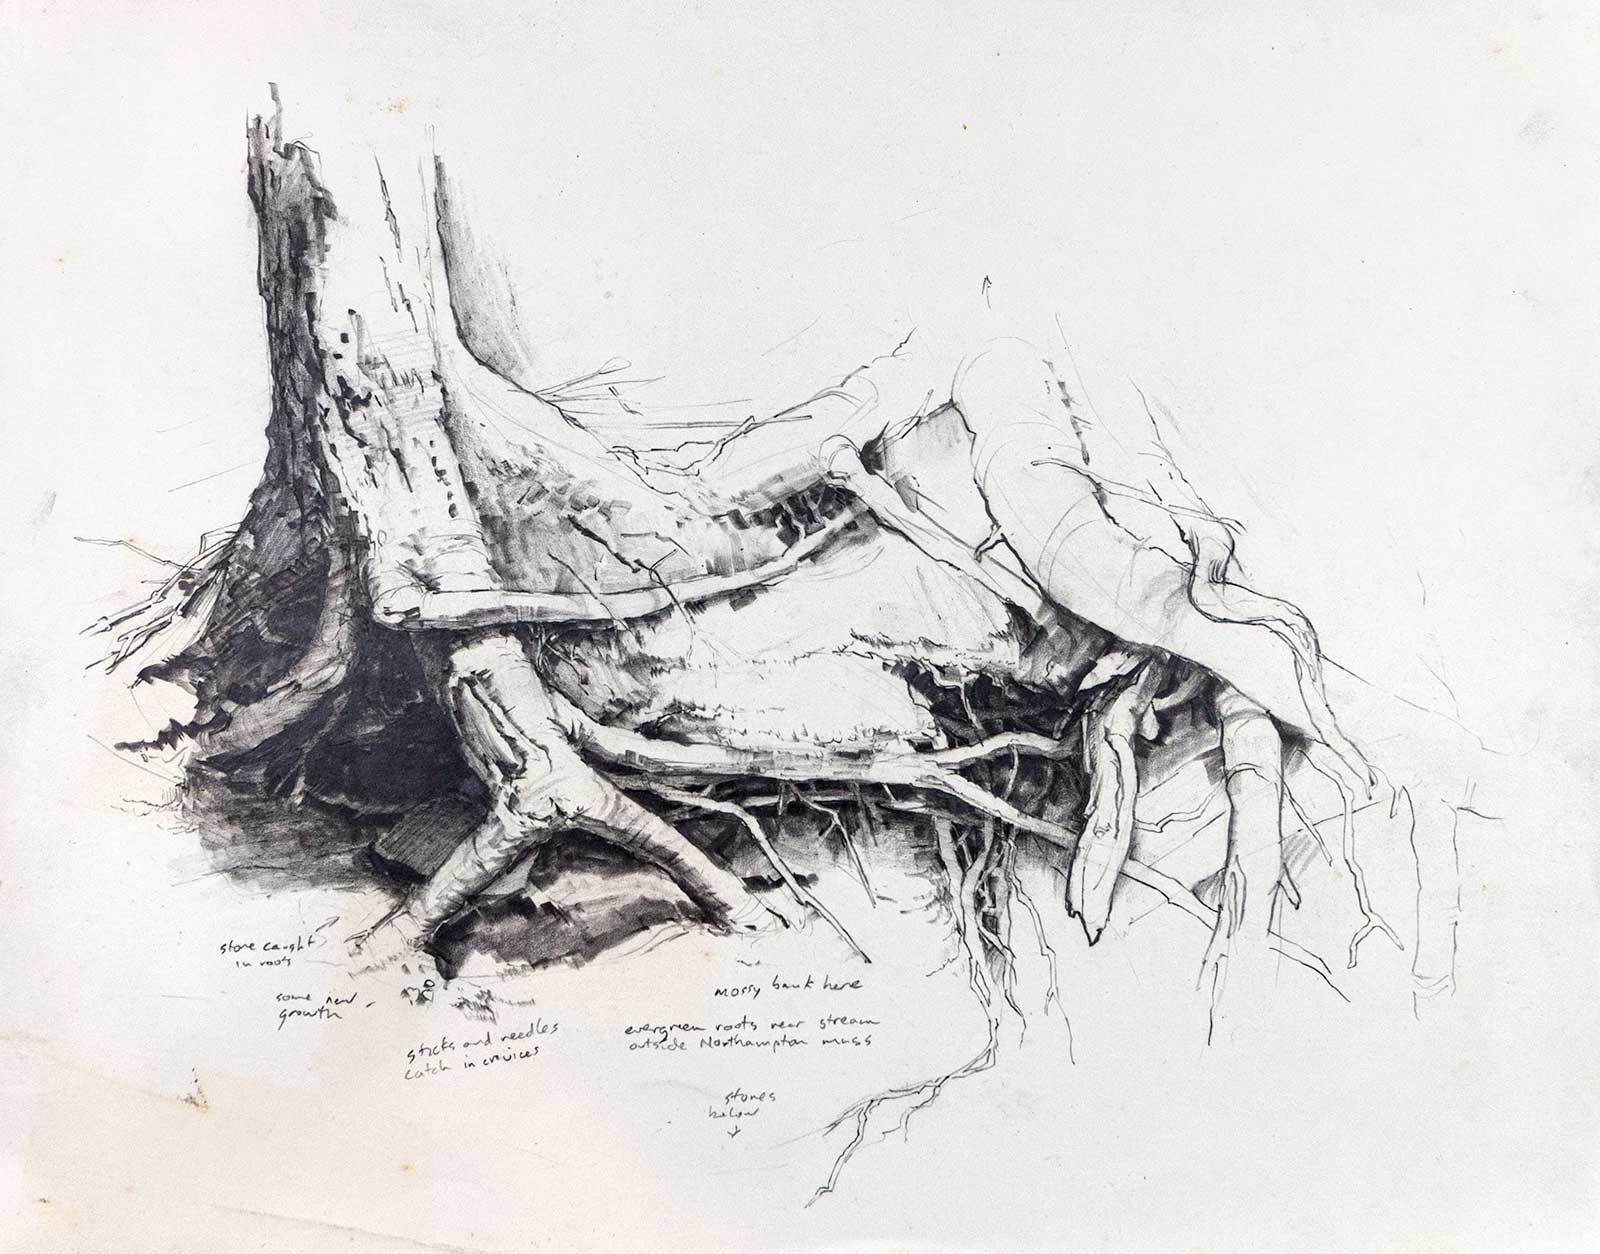
1. Look for Exposed Roots. Hard and soft pencils on smooth paper, 11 x 14” (27 x 35 cm)
Far from the noise and hurry of the city, I wander down a dry stream bed in eastern Massachusetts, where I discover this arrangement of tree roots undercut by the current. For the next two or three hours, I explore the miniature landscape before me, with the overlapping tendrils reaching into the soft shadows under the bank. My goal is to draw what I see objectively while appreciating the beauty of its structure. - JG
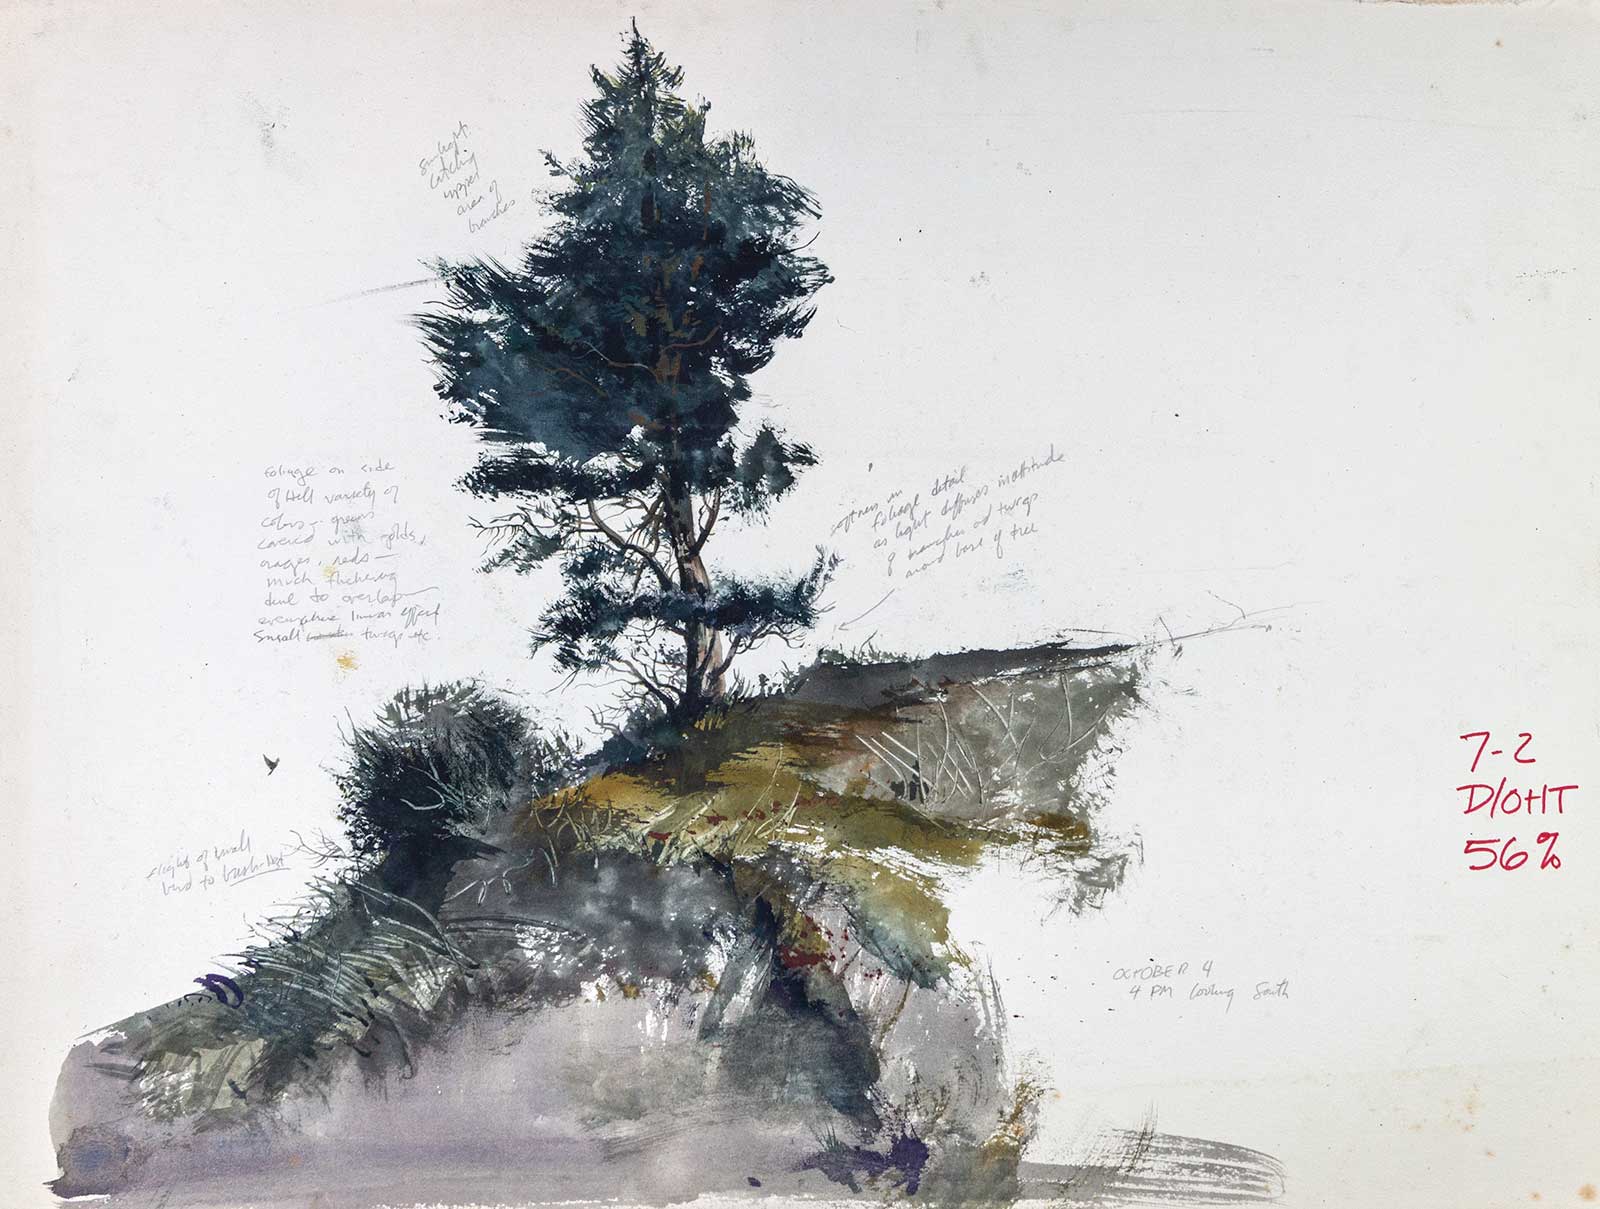
2. Capture a Hillside. Watercolor and wash on illustration board, 15 x 20” (38 x 50 cm)
I focus on a bush and tree on a hillside, eliminating the surrounding forest from my sketch. I start with a minimal pencil underdrawing, then use a large brush to block in the foliage with a medium-value wash. I scratch strands of grass with the end of my brush.When everything is dry, I use a small brush to begin adding tiny details like leaves and small branches. - TK
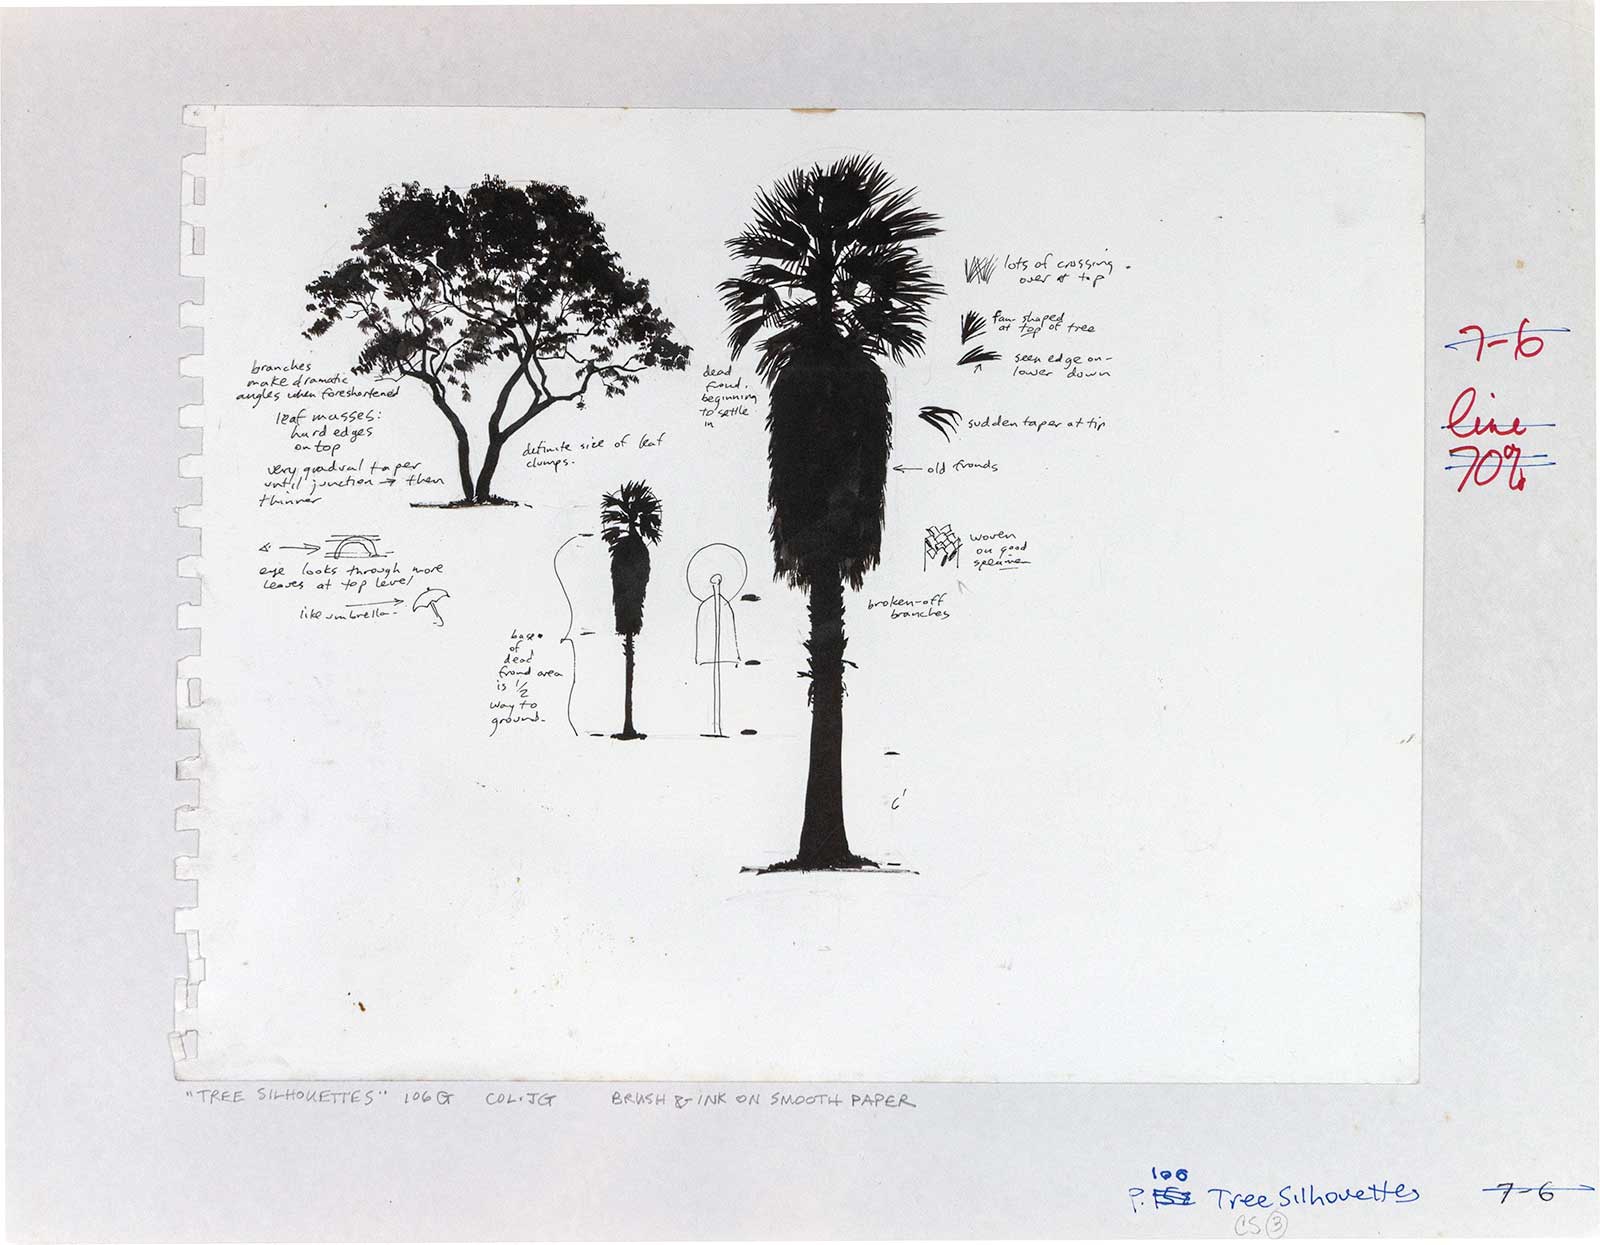
3. Put Trees in Silhouette. Brush and ink on smooth paper, 11 x 14” (27 x 35 cm)
Silhouette is an excellent technique for studying trees, as it eliminates concerns about outline, overlap, and light and shade. I focus on the tree’s identifiable features: primary and secondary branching, and leaf mass shape. Using ink and a #2 round sable watercolor brush, I look for trees that read clearly against the sky, often during twilight when they naturally fall into silhouette. I employ a stipple technique and gentle brushstrokes to suggest leaves and palm fronds. - JG

4. Dig Up a Weed. Pencil and ballpoint pen on smooth paper, 11 x 14½” (27 x 36 cm)
Even a vacant lot can be a treasure trove of natural subjects. I find this fascinating plant, often dismissed as a weed, in a suburban lot. By sketching it, I try to understand its intricate root structure and leaf arrangement. I begin with a simple pencil underdrawing, establishing the plant’s size on the page. I then add key details in pencil and switch to a ballpoint pen, working slowly for accuracy. Finally, I add delicate tones with a 2H pencil. - TK
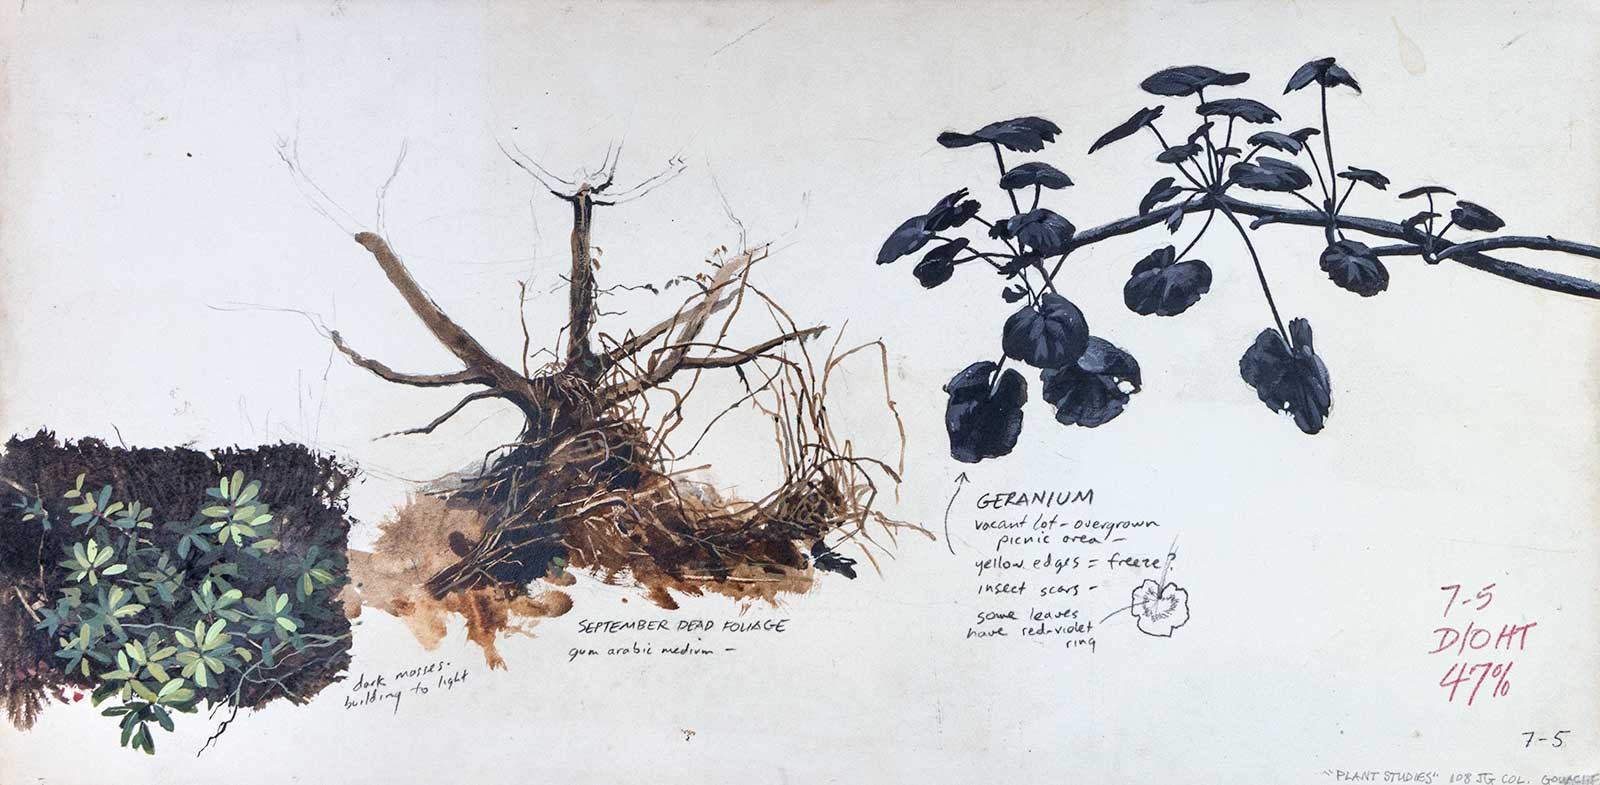
5. Visit a Friend’s Yard. Gouache on illustration board, 11 x 14” (27 x 35 cm)
My most rewarding plant studies often come from ordinary, easily overlooked subjects. I spend three Saturdays sketching plants in a friend’s yard, devoting an hour to each study. To isolate a section of geraniums, I place white cardboard behind it. Through sketching, I feel like I’m observing geraniums for the first time, understanding how new leaflets grow and mature. This intimate study reveals nuances I have previously missed, despite having seen geraniums all my life. - JG
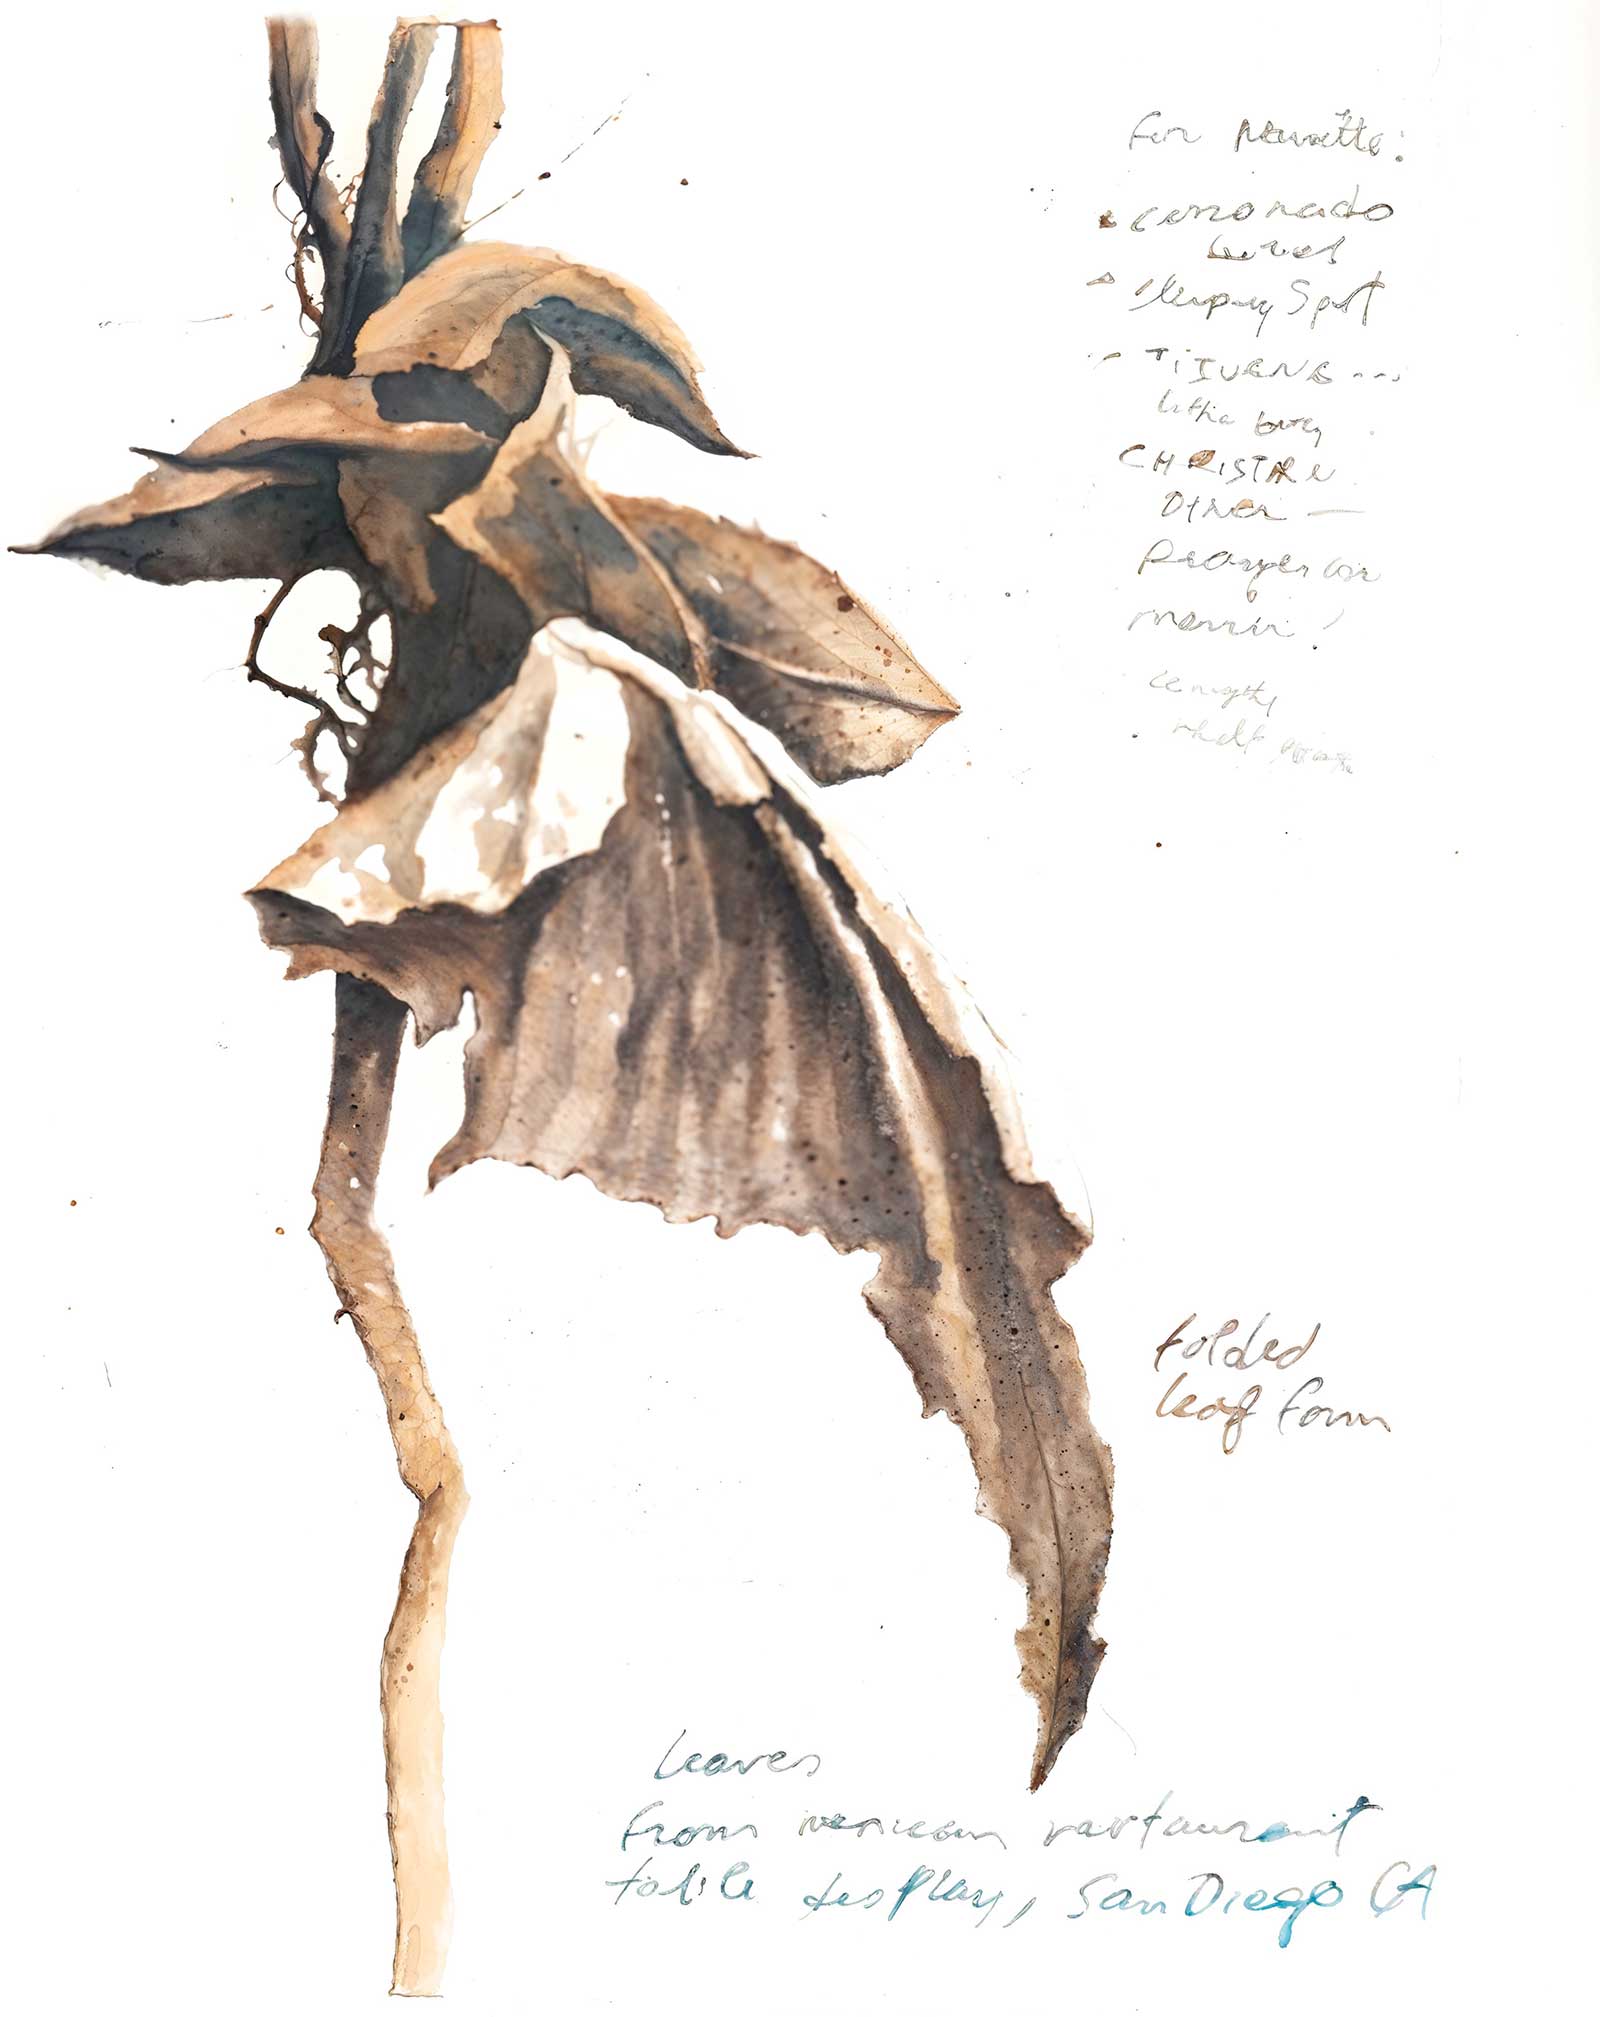
6. Observe Some Leaves. Wash on illustration board, 6½ x 7½” (16 x 19 cm)
At a restaurant after a delicious chile relleno dinner I notice the table setting with dried leaves. Since I have my sketching materials, I decide to relax by drawing. I carefully examine the leaves, turning them, considering each angle. I choose a viewpoint and lightly sketch the forms in pencil. Then, I pick up my watercolor brushes and begin to paint, carefully brushing in the intricate texture of the dried leaves. I find beauty in these small, overlooked forms. - TK
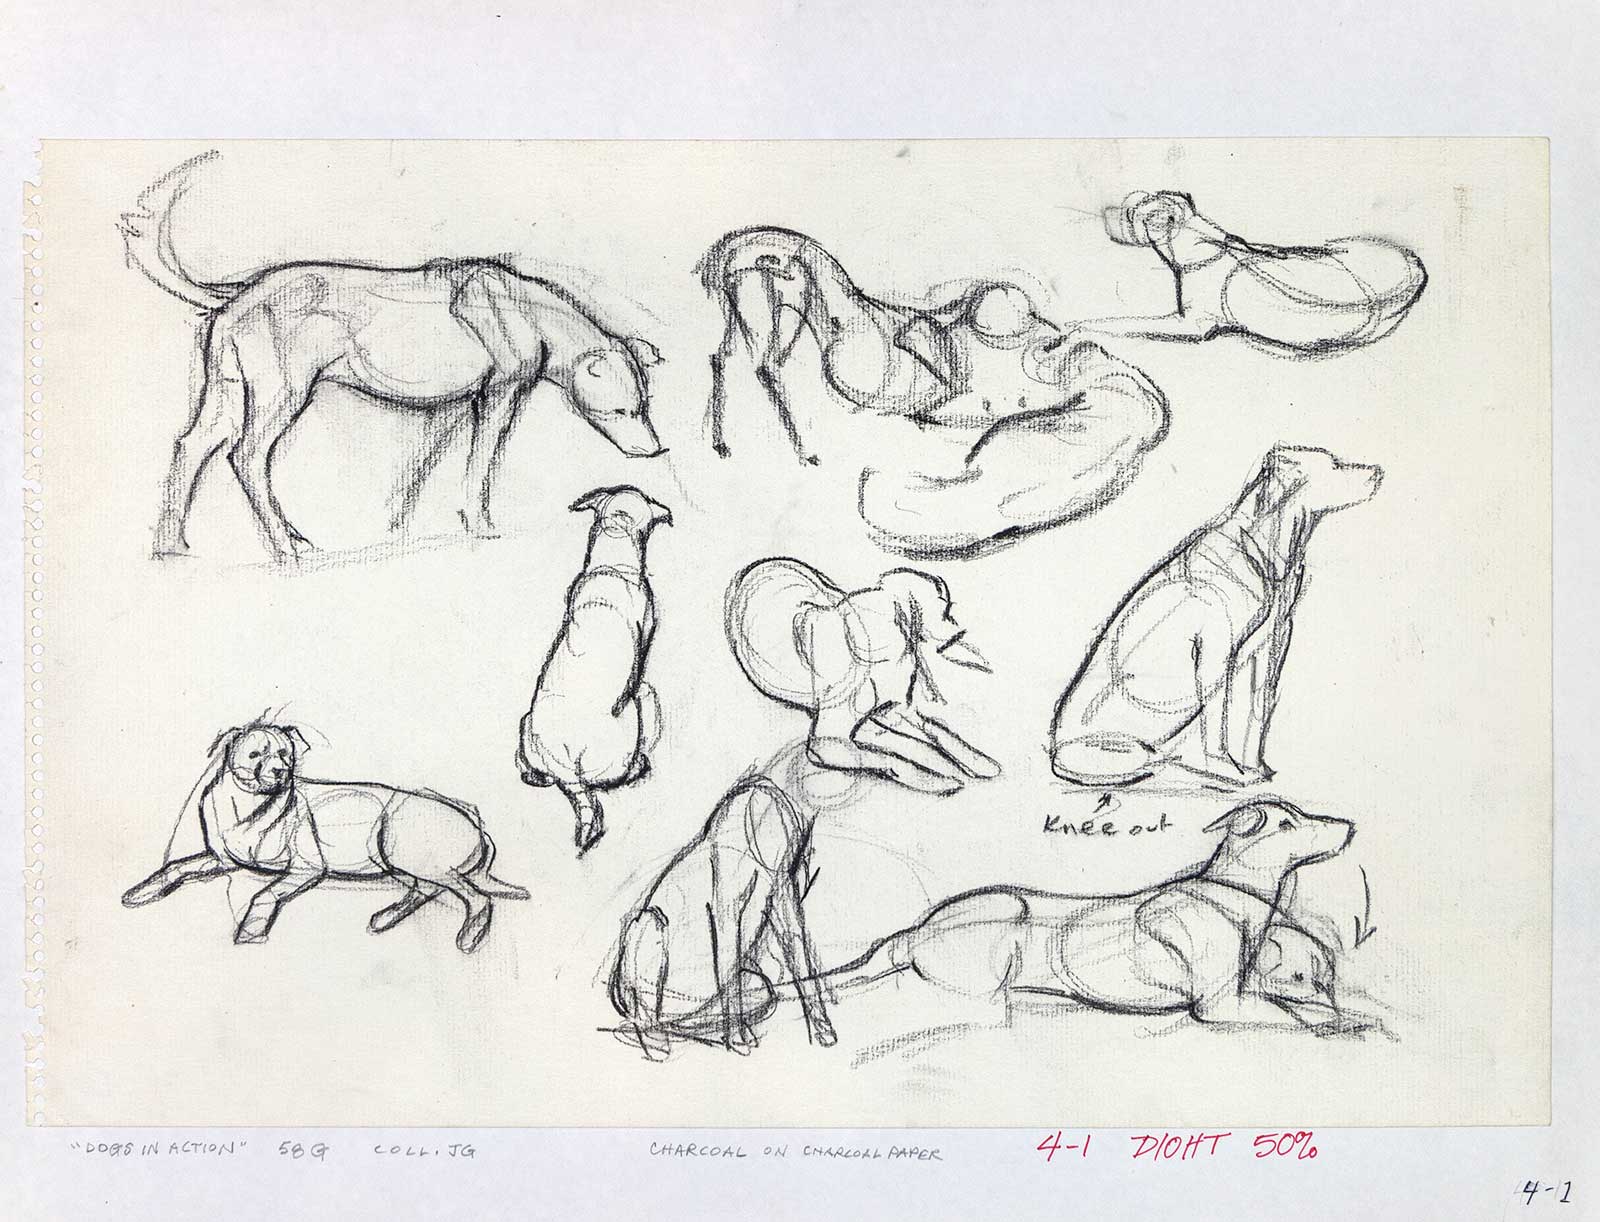
7. Study a Dog’s Head. Pencil on drawing paper, 9 x 12” (22 x 30 cm)
If you own a dog or cat, you have the best opportunity for animal drawing you could possibly ask for. I make dozens of pages of studies of this dog, who seems to enjoy posing for me. On this page I was interested in the overall structure of the head from a variety of angles. A lot of quick two-minute impressions such as these can be as valuable as a single long, involved study, because they solidify your understanding of the simple shapes. - JG
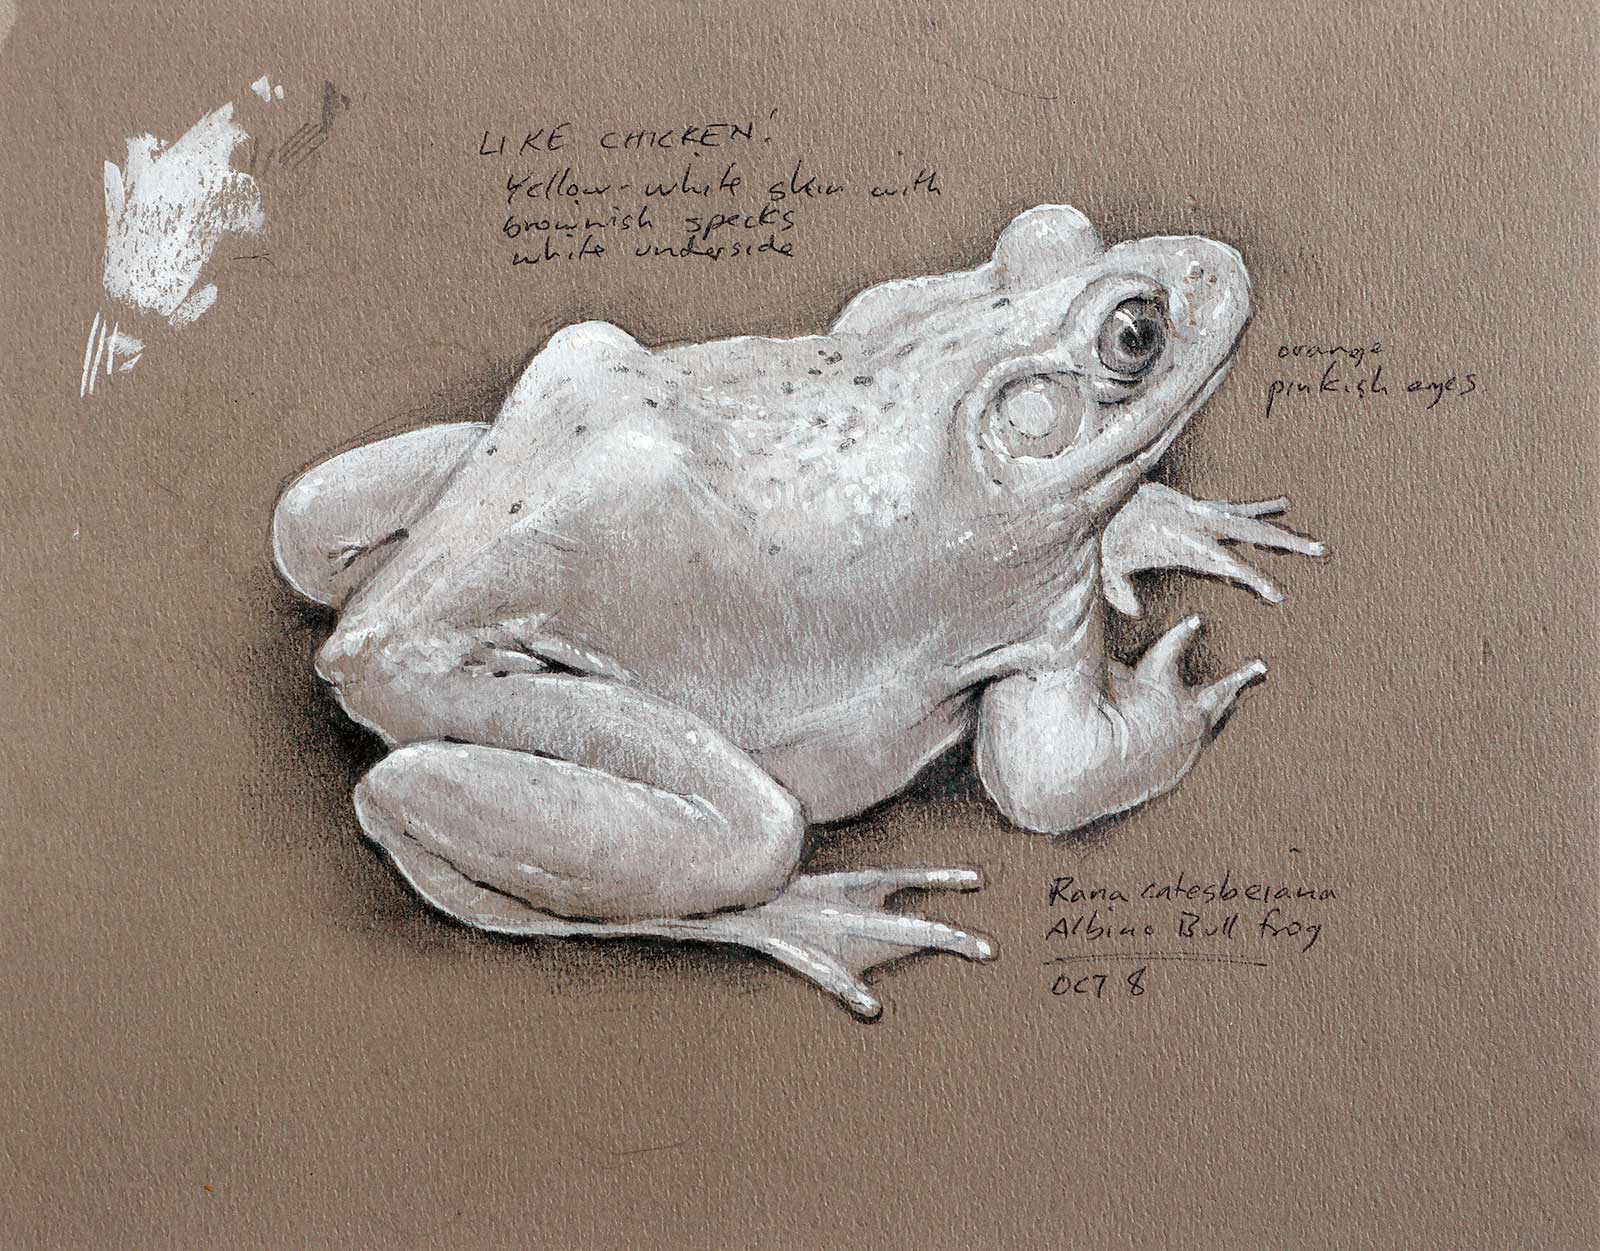
8. Catch a Bullfrog. Pencil and white gouache on gray mat board, 8 x 9½” (20 x 24 cm)
I encounter this living specimen in a museum, alive, but holding still. I draw him in pencil on a spare piece of gray mat board, and then apply a thin layer of semi-opaque white gouache. I save the brightest whites for the accents and highlights. When the gouache is thoroughly dry, I lightly drag a white pastel pencil over the surface to make the texture look bumpy. Then I switch back to darks, using a soft pencil to smudge in shadows, accent the wrinkles or drop a few freckles on his back. After 45 minutes I’m done, and the frog decides to hop away. - JG
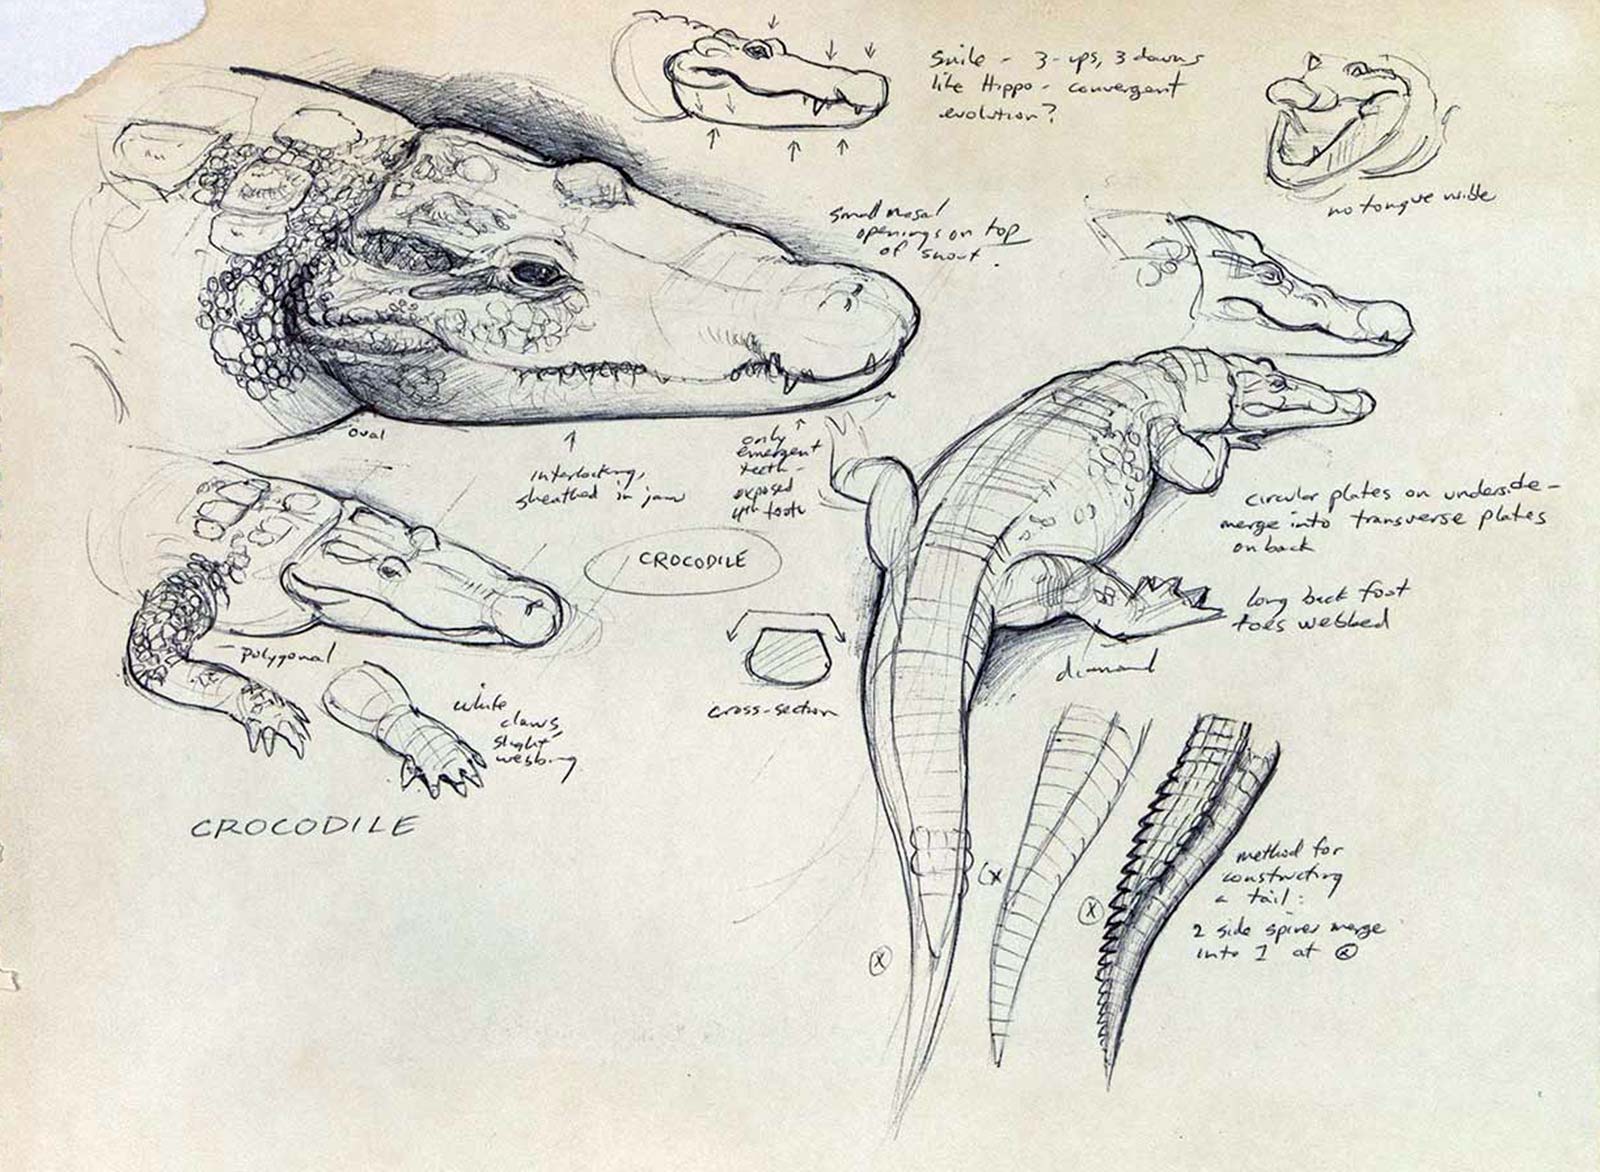
9. Detail a Crocodile. Ballpoint pen on drawing paper, 11 x 14” (27 x 35 cm)
I often rely on ordinary ballpoint pens for detailed studies of line and texture. In this crocodile sketch, the pen proved equally effective for sweeping lines on the tail and capturing scaly skin textures. I also appreciate how easily I can add written notes alongside my drawings. Unlike pencils, ballpoint pens never need sharpening, making them a convenient and versatile tool for nature studies. - JG
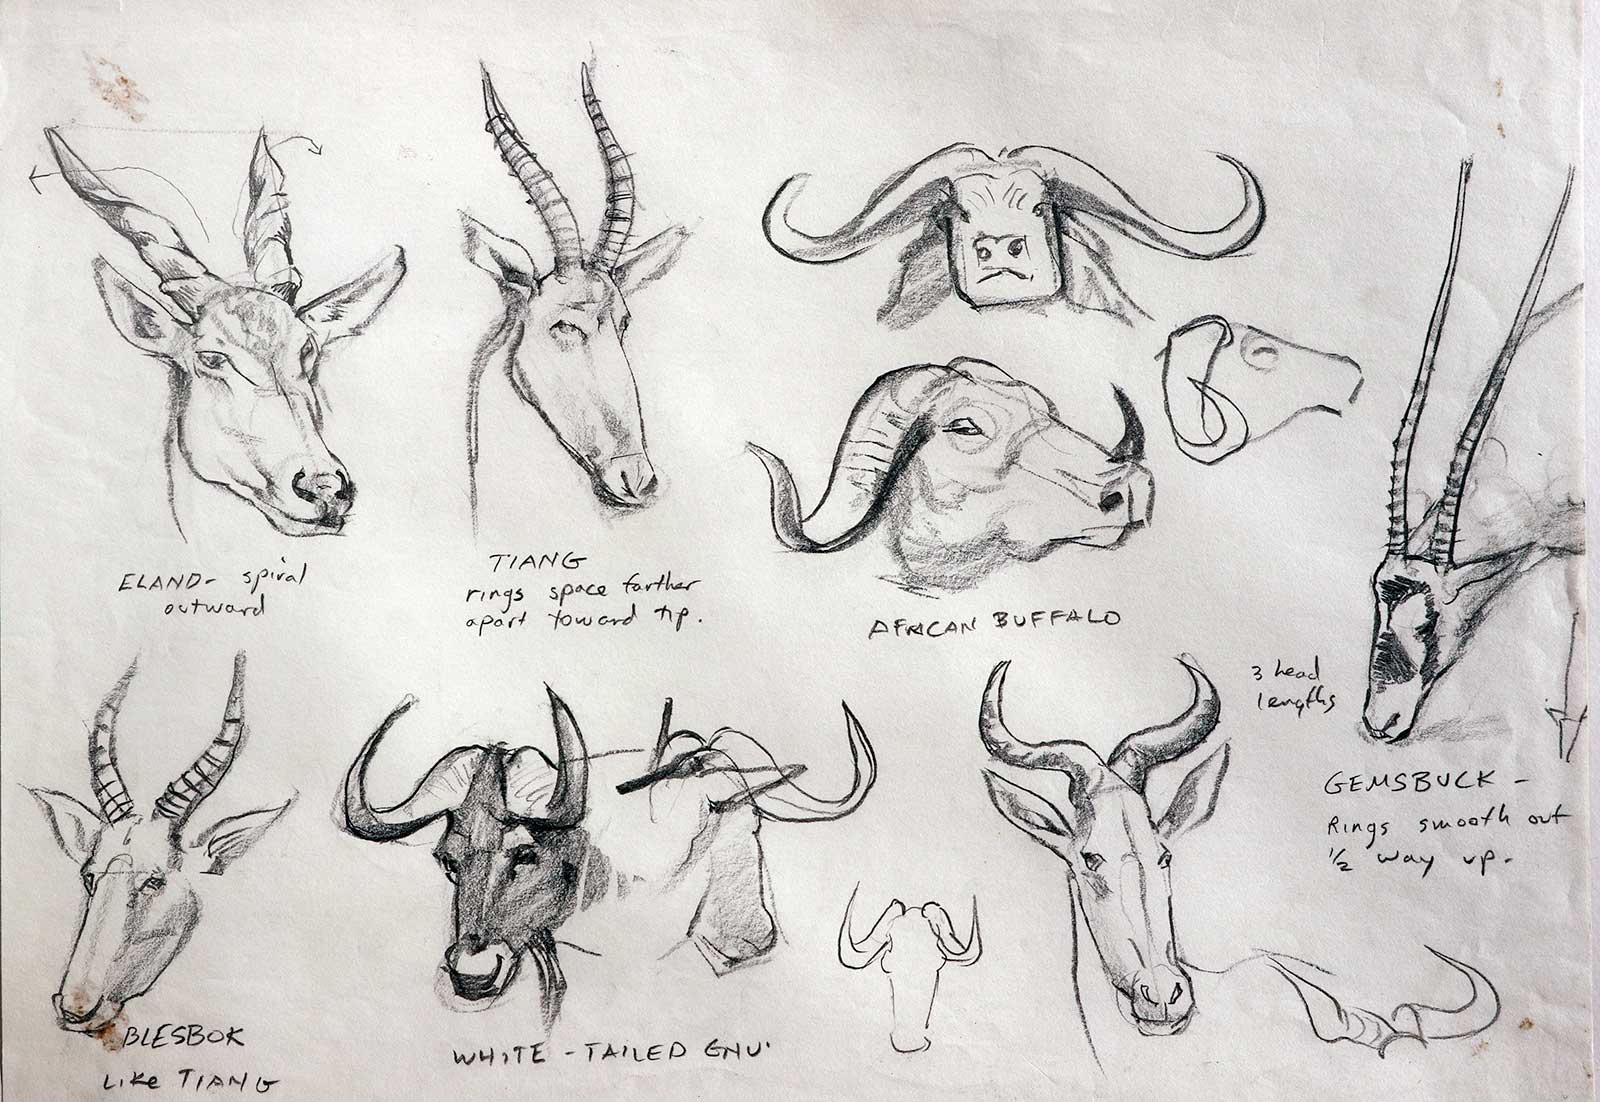
10. Look for Variations. Soft pencil on drawing paper, 12 x 18” (30 x 45 cm)
Whenever I encounter a collection of related species, I enjoy drawing variations of a theme on a single page. Here, I focus on the three-dimensional spiraling of African big game species’ horns. Using a minimal approach, I make quick drawings with a pencil held palm-down, like a screwdriver, allowing for freedom to shift between lines and broad tones. - JG
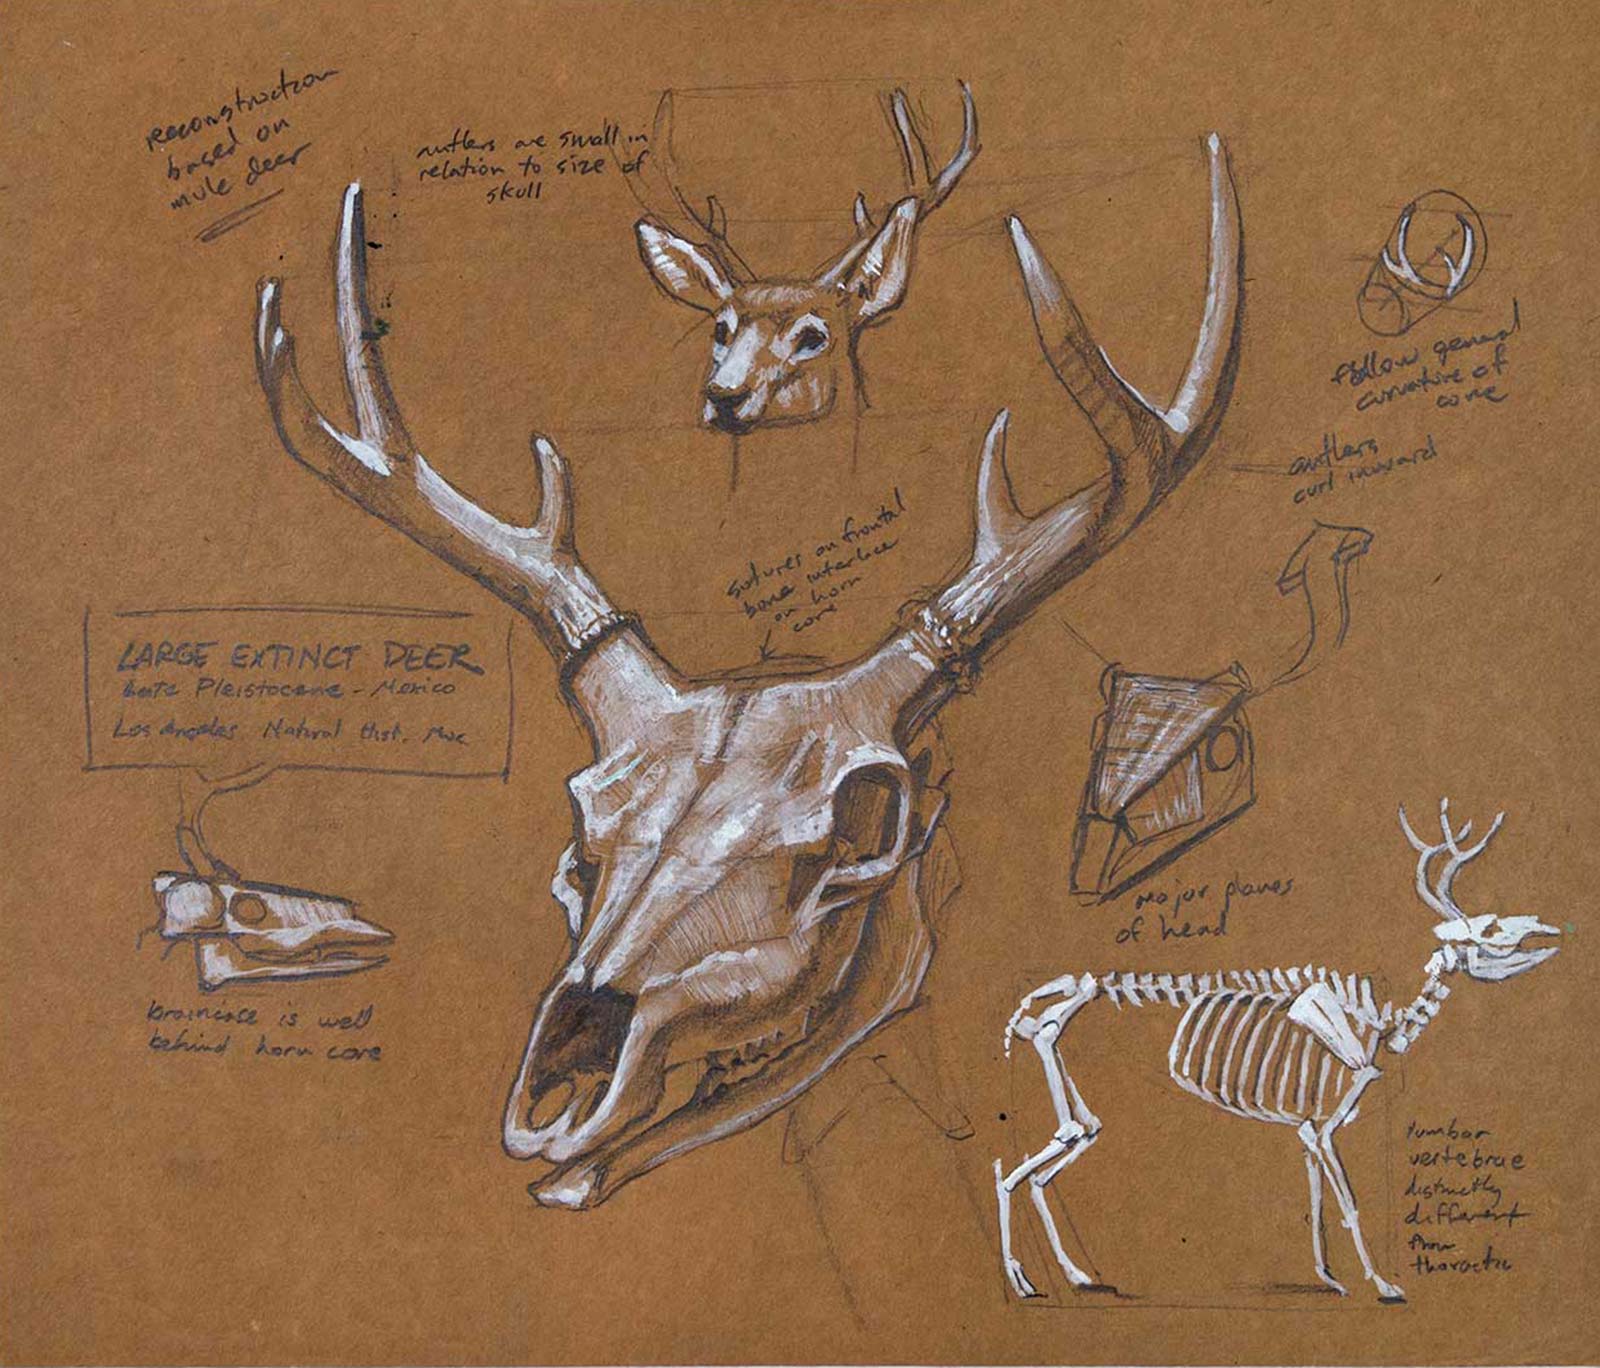
11. Go to the Bones. Pencil and white gouache on brown paper, 11 x 14” (27 x 35 cm)
I’m attracted to a deer skeleton in a museum hallway, dramatically lit by a single strong light source. I focus on the skull, using preliminary pencil stages to master its complex form. I ensure the antlers align in perspective with the rest of the skull. A separate sketch of the complete skeleton helps me capture the animal’s proportions. By studying the bone structure, I gain confidence to sketch the same animal at the zoo with greater authority. - JG
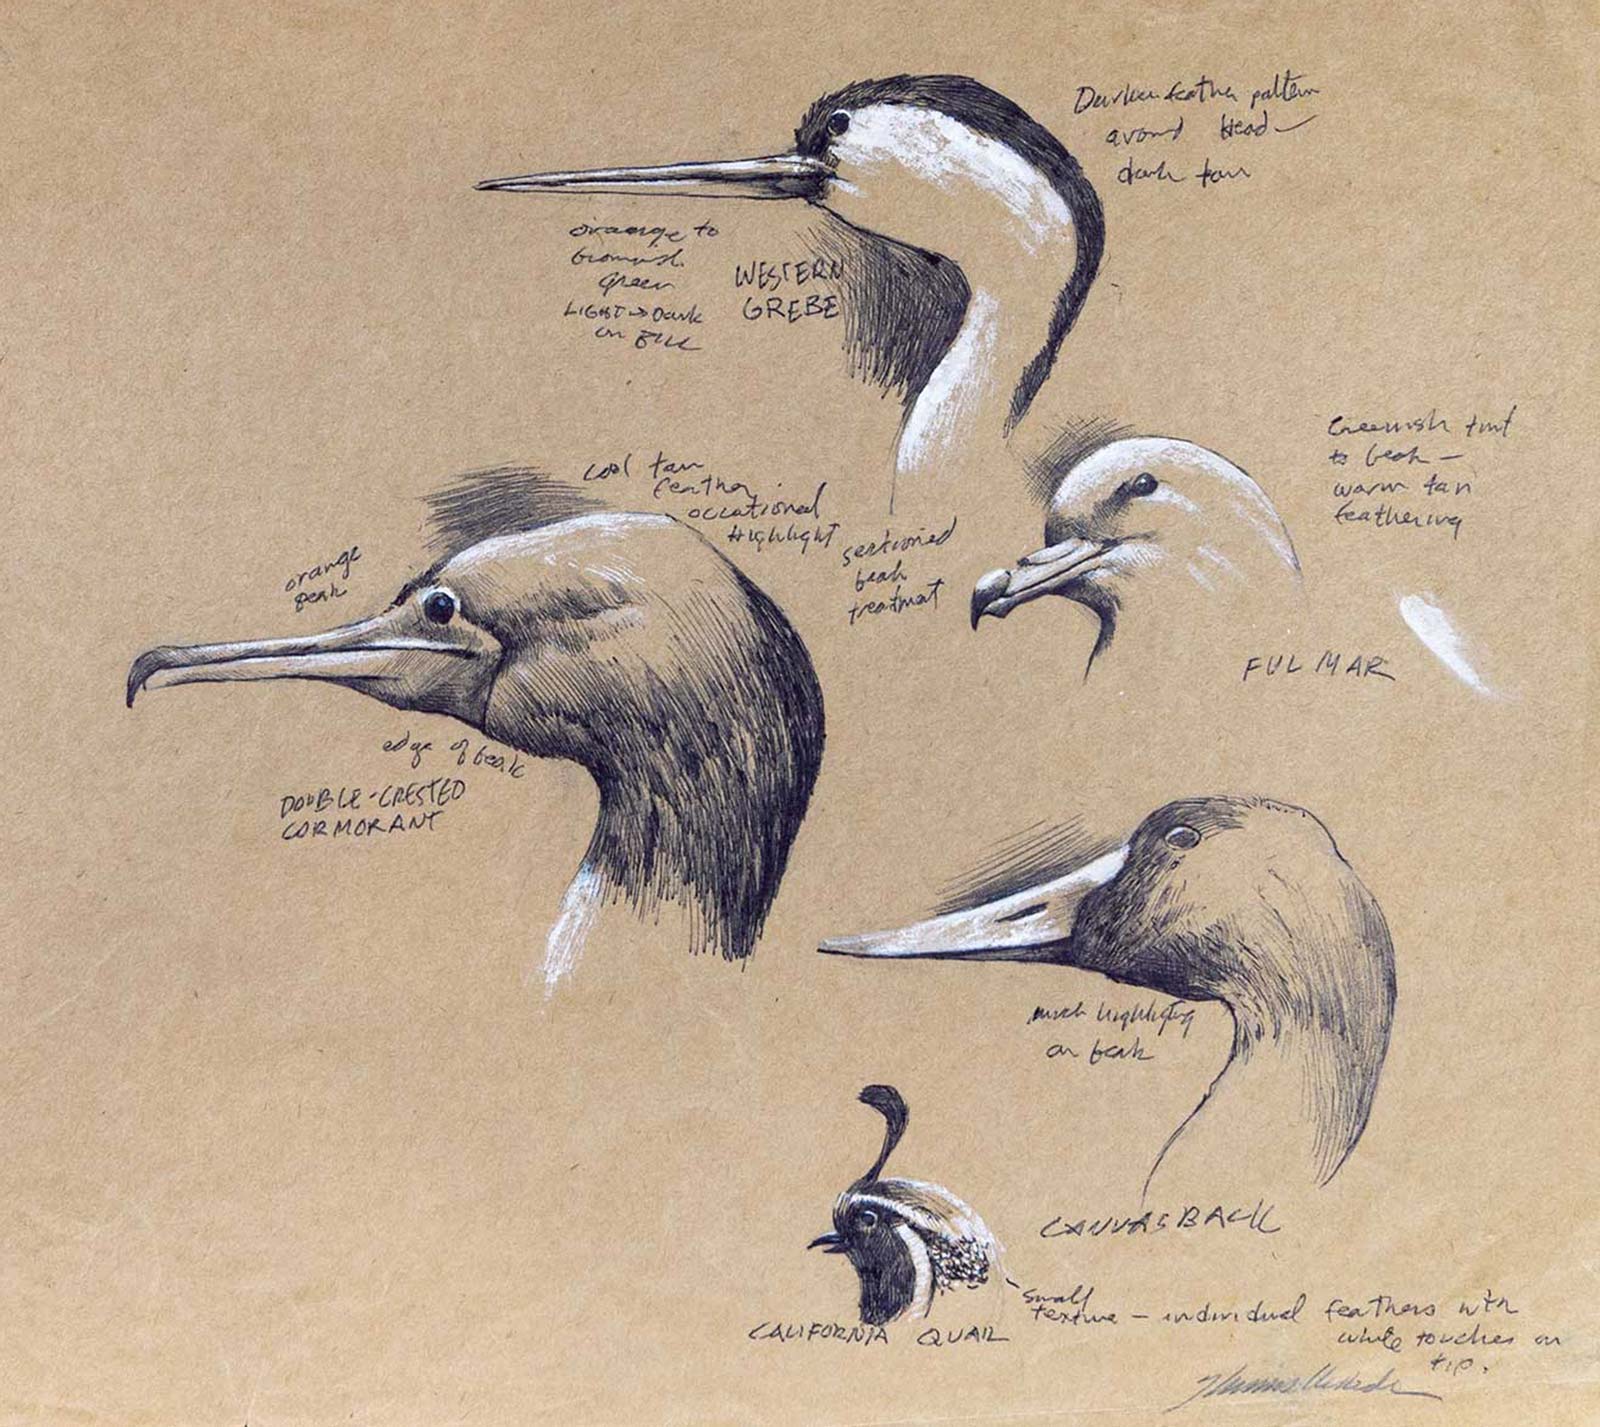
12. Get Close to Birds. Ballpoint pen and white gouache on brown paper, 12 x 15” (30 x 38 cm)
These comparative studies begin as a single study of the cormorant, but as I look around at the other birds on display at the natural history museum, I’m amazed by the variety. I use the ballpoint pen and white gouache to suggest the texture and coloring of the birds. The written notes help me to recall names and features of the birds in case I ever need to refer back to these observations for a personal painting. - TK
This article is based on content in the new edition of The Artist’s Guide to Sketching: The Classic Book about Making Art on Location. We have kept everything as much as possible as it was in the original 1982 edition, but we’ve expanded the book with additional artwork created during the same period, and we rescanned all the artwork and printed it for the first time in full color.
About the Artists
 James Gurney
Thomas Kinkade was an American painter known for his idyllic, pastoral scenes. While they were working on the sketching book, Kinkade and Gurney each painted 600 backgrounds for the animated film Fire and Ice. Kinkade went on to establish a successful art print company as the “Painter of Light.” He and Gurney stayed friends until Kinkade’s death in 2012.
After coauthoring the book on sketching, James Gurney pursued a career in illustration, painting sci-fi paperback covers, National Geographic illustrations, U.S. postage stamps, and the New York Times bestseller Dinotopia.
Contact at
gurneyjourney.blogspot.com