


I have always been fascinated by the impressionistic manner of painting, and I always want to achieve clean and bright colors in my work. While I was trying to master the art of painting wet-on-wet using a brush, I would tend to mix layers of wet paint and create what felt like “dirt.” It was only when I switched to a palette knife that I was able to create the clean colors that I’d always desired to achieve. At the same time, the palette knife allowed me to become more expressive and much looser.
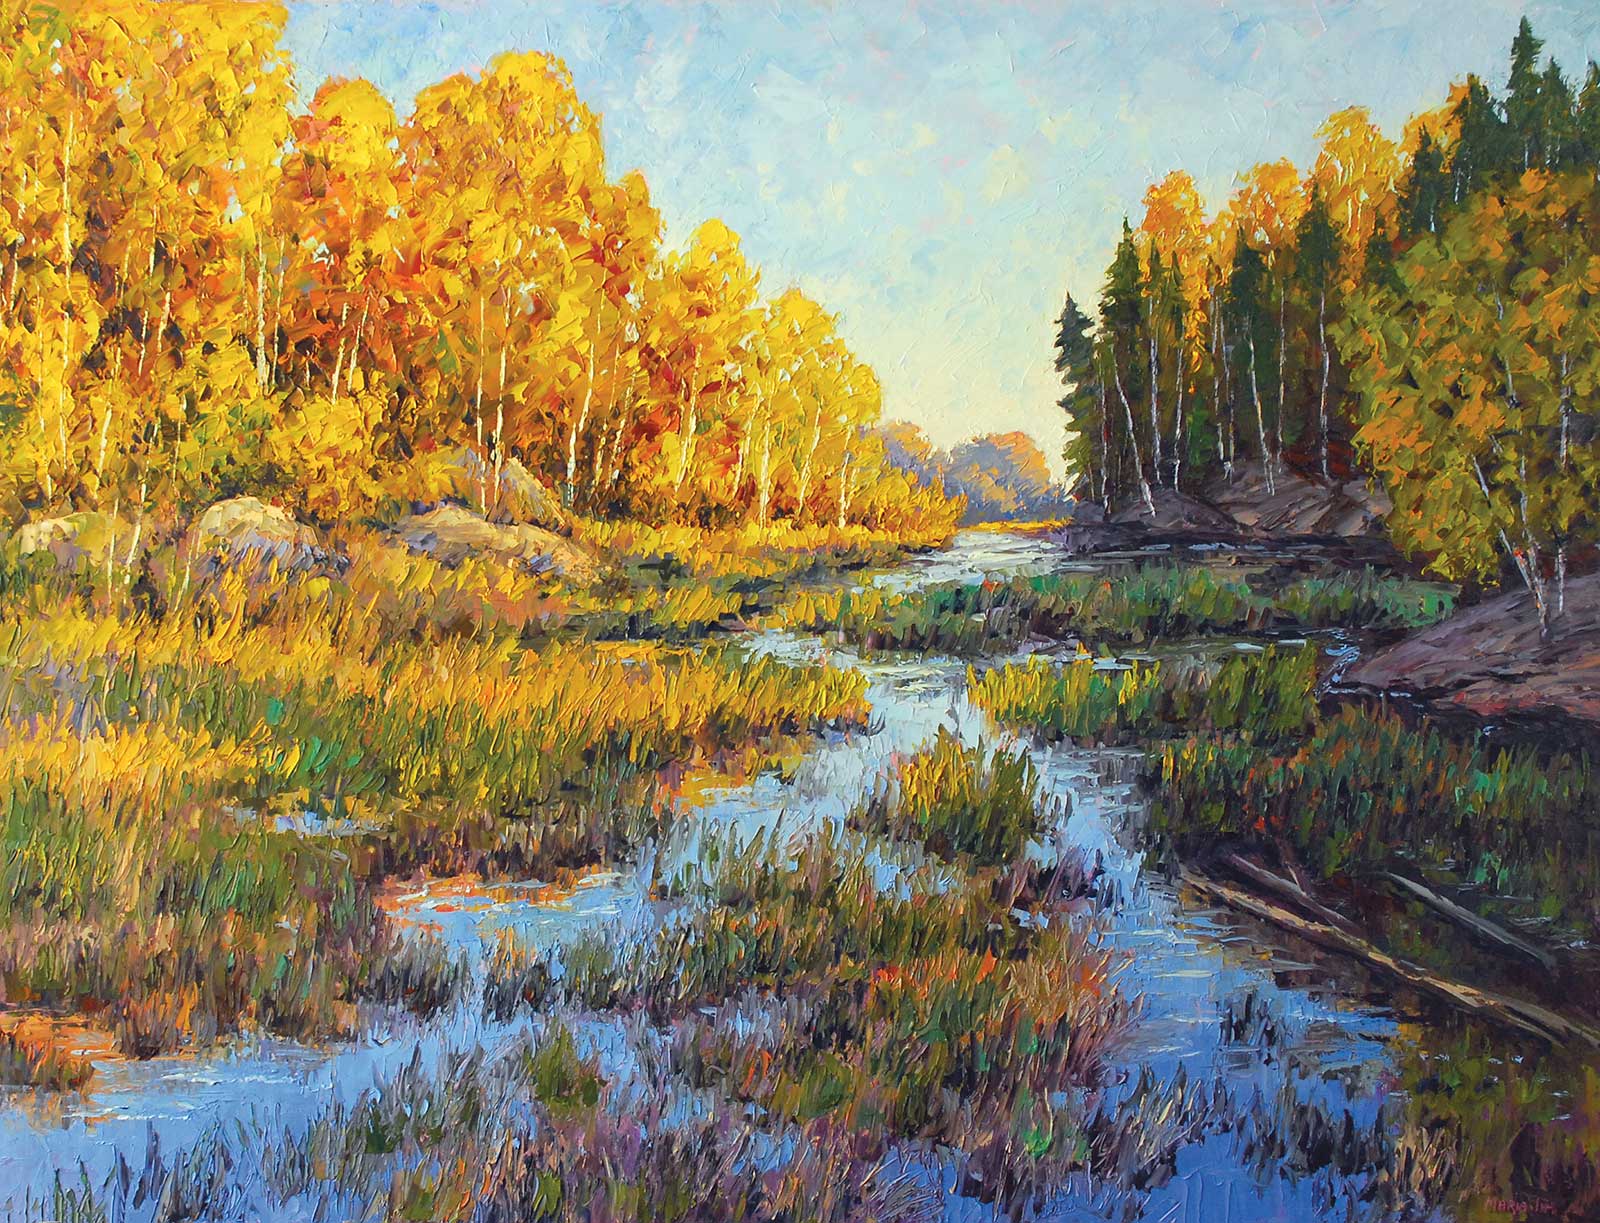
Marsh at Albion Hills, oil with palette knife, 30 x 40" (76 x 101 cm) This painting shows a fall marsh in late afternoon when low sun casts warm light on trees and grass. I was attracted to this scene by a strong contrast between sun-lit hardwood trees and dark evergreens in shade. Dark water in the foreground is painted gradually lighter and warmer towards the horizon in order to create the impression of distance. The trees in the background did not have an opening in real life, but I decided to open them up and added some distant trees in the gap to create an additional layer and to emphasize the vastness of the scene.
I started using a palette knife for the entire painting after I attended a workshop with Susan Sarback many years ago. It was a bit awkward at the beginning, but with practice, I became more and more comfortable and proficient with this tool. Today, I use a palette knife when I work on small plein air paintings as well as on large pieces in my studio. I use four different sizes depending on the size of the painting and whether I work on underpainting or fine details. I have not touched brushes for years.
I divide my process into several stages. I start with a drawing of five to seven simple shapes that represent the composition of the painting. I use a dry pastel stick for the drawing, usually dark pink. After that, I paint each shape with different colors using a palette knife. I make sure that the value of each shape correctly represents different areas of the landscape. At this stage I paint very thin, almost scraping the surface of the canvas. For my underpainting, I use one of the following hues depending on whether the shape represents part of the landscape that is in shade or in full sun. For sunlit areas I use warm colors, and for shaded areas I use cool colors.
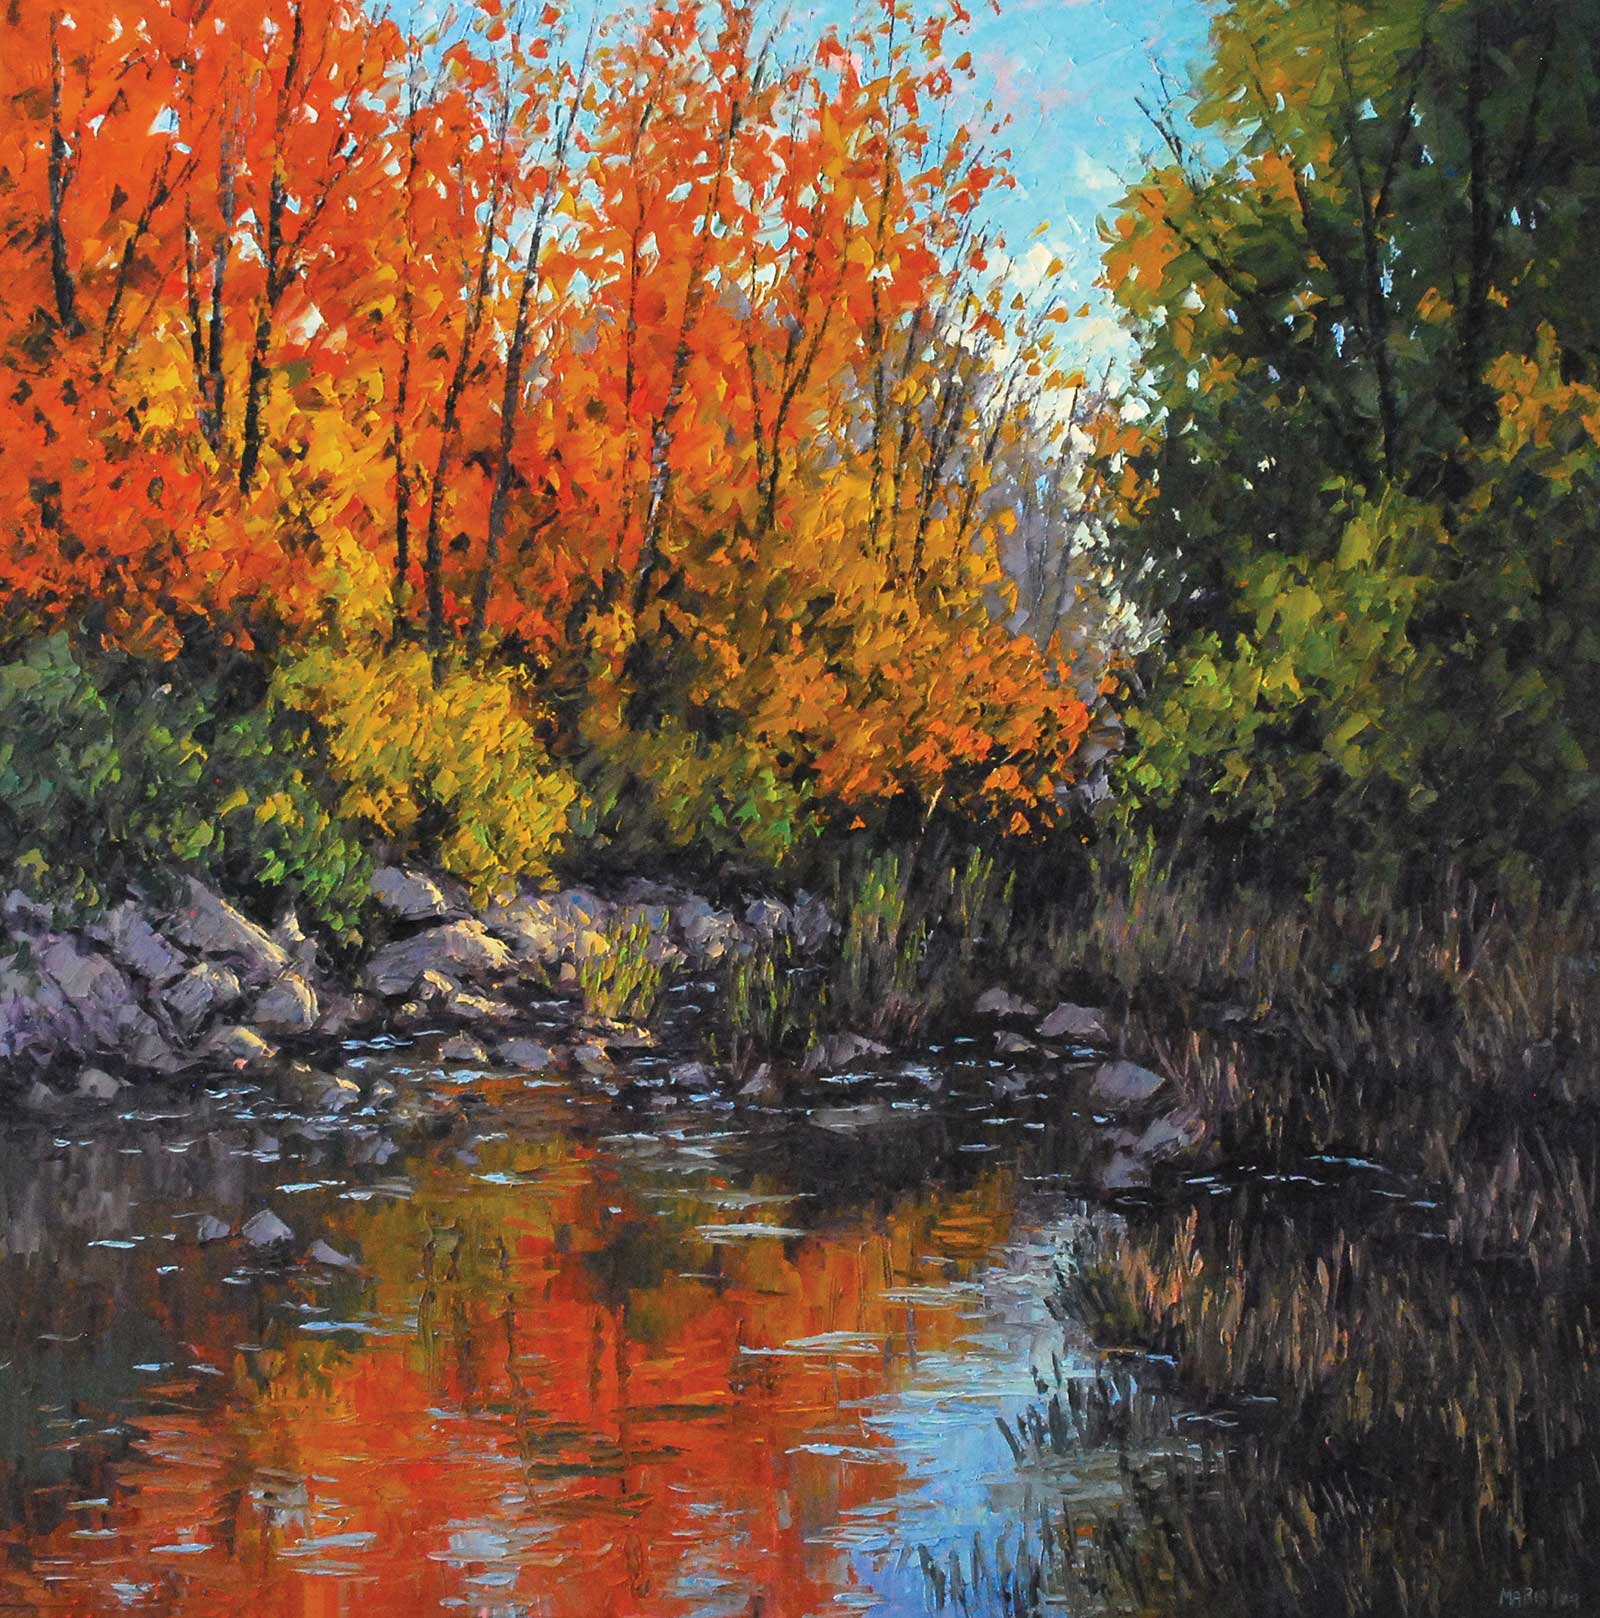
Etobicoke Creek, oil with palette knife, 30 x 30" (76 x 76 cm) I chose this scene because of the colorful foliage and its reflection in the water. I painted reflections with smooth vertical strokes of the palette knife. Foam was added with feather light horizontal strokes of the knife. The opening between shrubs and light gray-purple trees in the background create depth and invite the viewer to guess what’s behind the trees.
At the third stage I start putting local colors on each shape and make sure that I keep the original value of the shape. Dark shapes stay dark and light shapes stay light. I allow the underpainting to peek through and use a palette knife to slide the paint on top of the underpainting and make sure that I do not mix layers of paint. At this stage I use more paint and start creating texture.
During the fourth stage I work on making value changes in each individual shape in order to create volume and depth. I add more layers of paint, and again, allow the underpainting to show through in some places. Tree and grass masses start looking three-dimensional, and the sky and water start displaying perspective.
During the last two stages, I work on details like tree trunks, branches, sky holes and grasses. I improve shapes (line of trees, shoreline) and make sure I have no straight lines where they should not be. I get rid of all white canvas showing through. I sometimes look at my painting through a mirror to get a fresh view and to see if I have any geometric forms and objects of the same size and shape (“clones”).
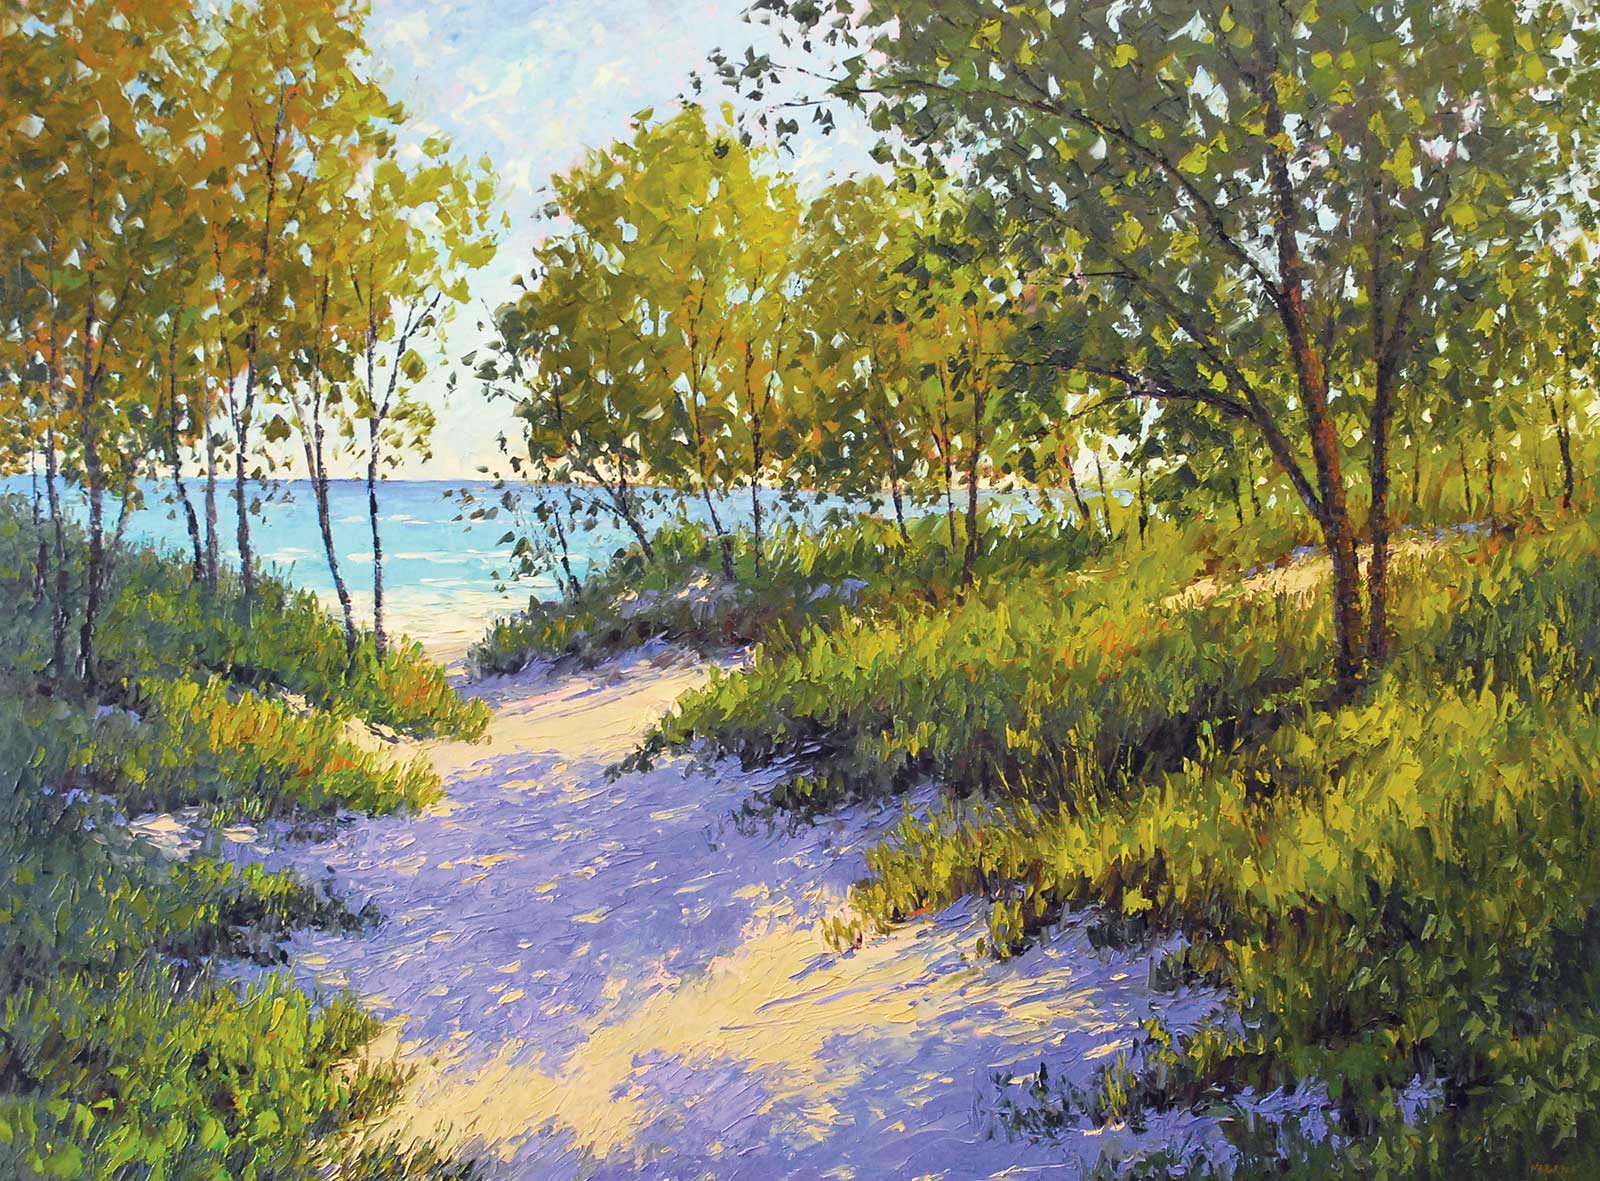
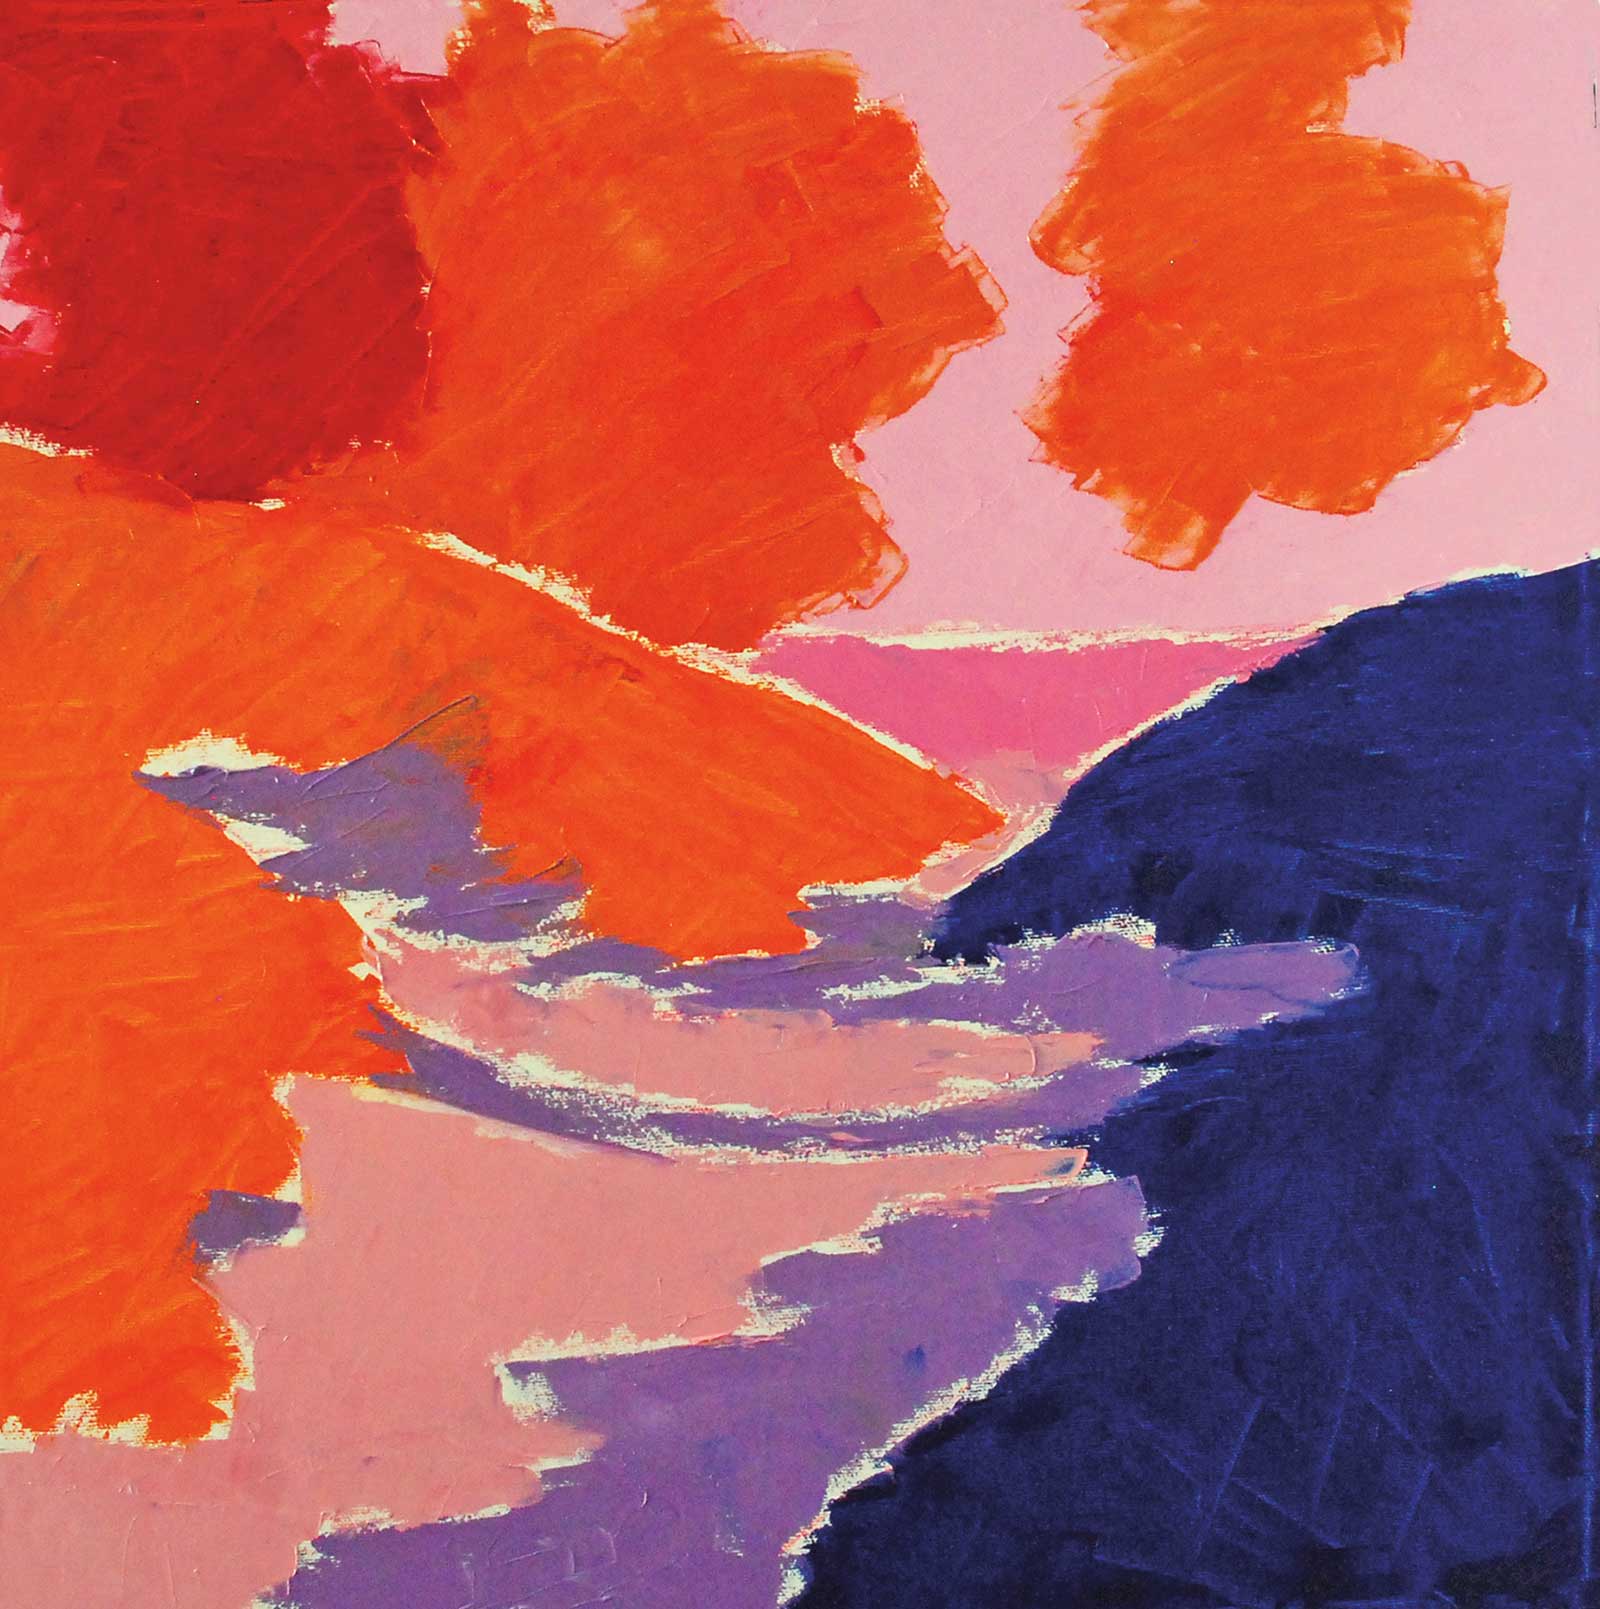
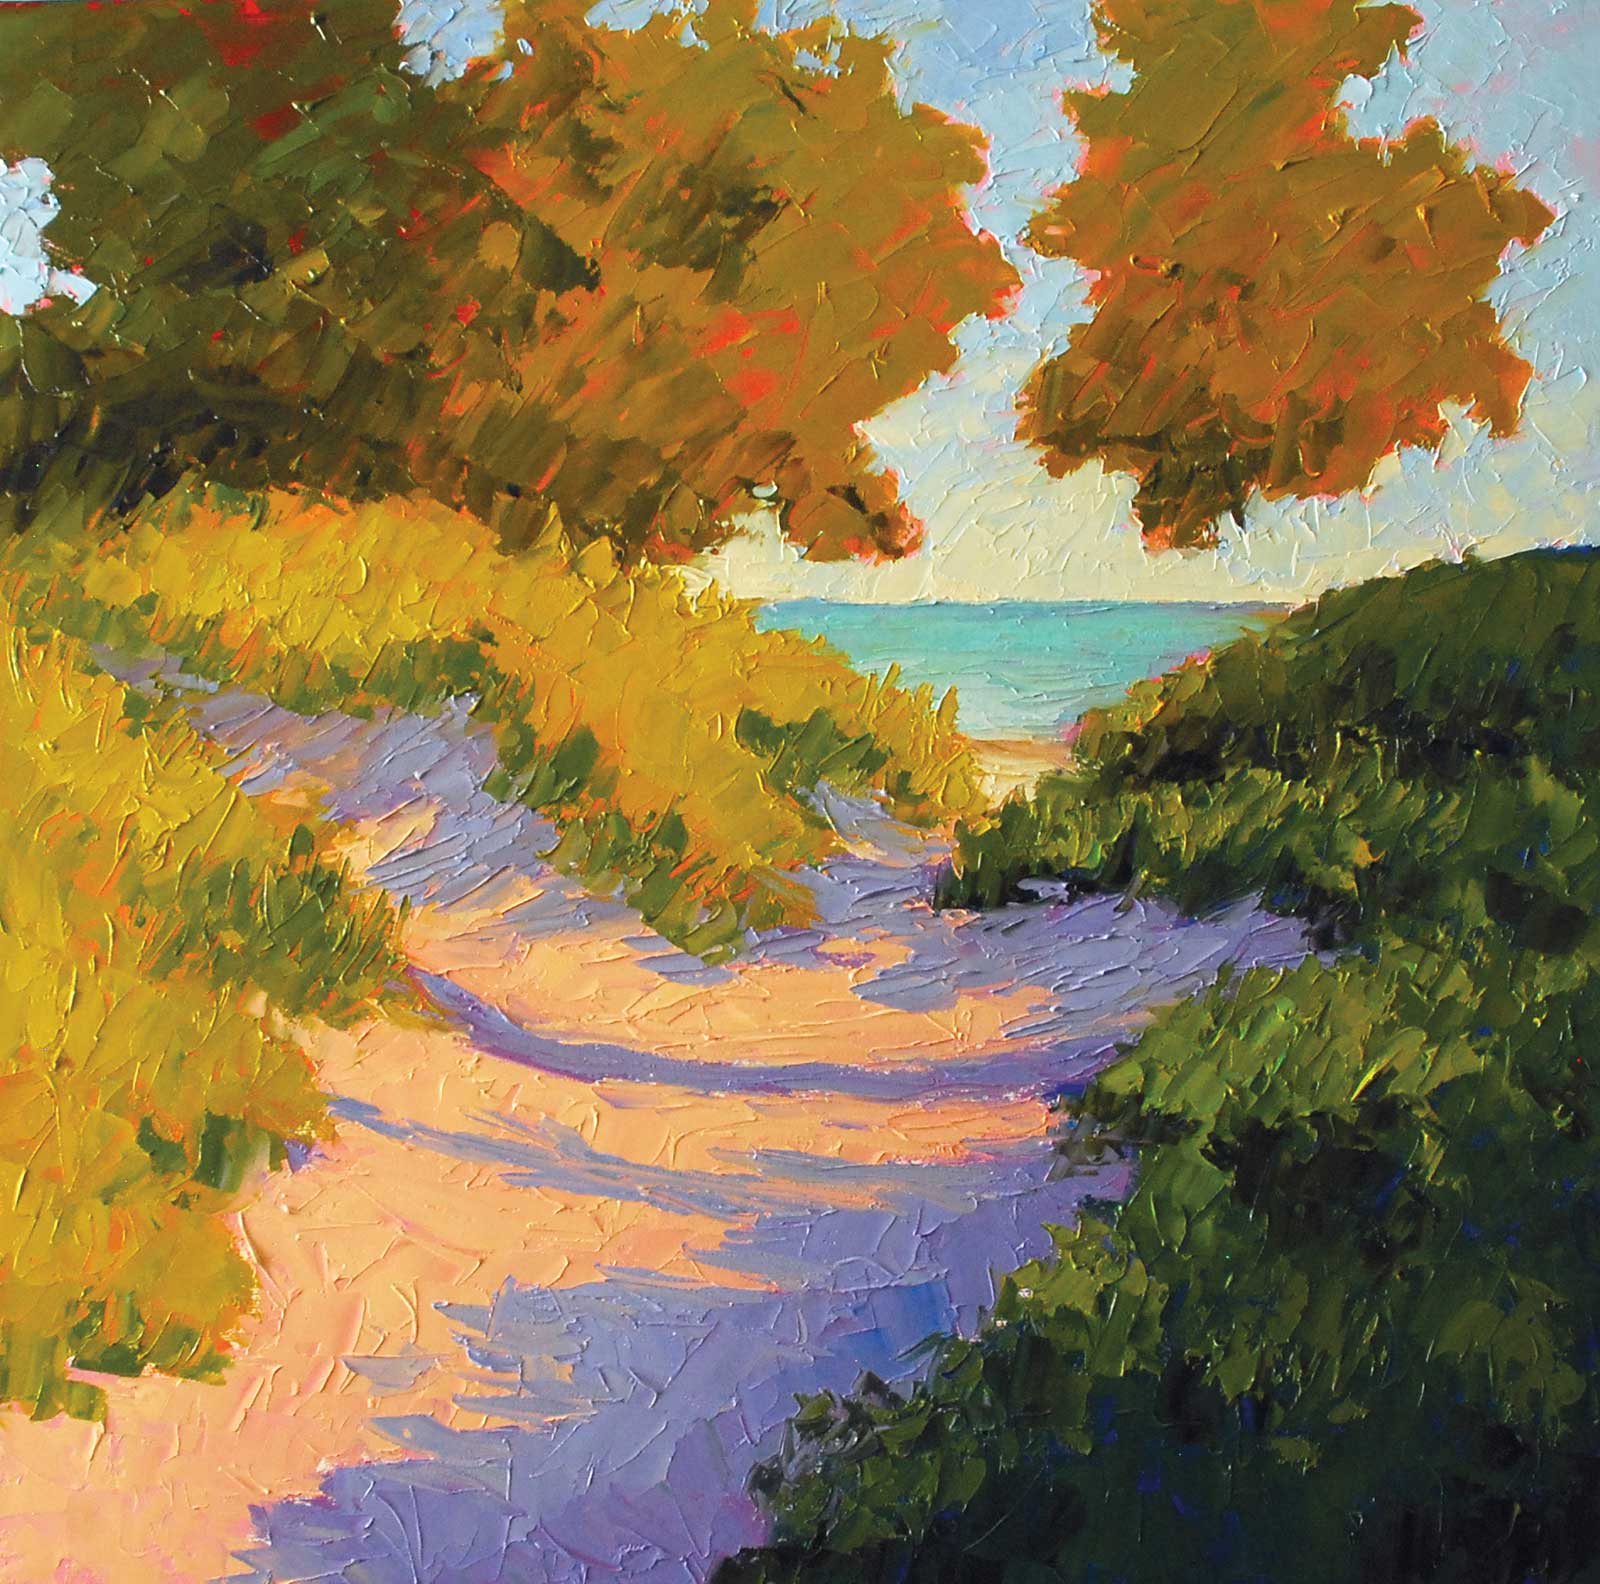
Path to the Beach, oil with palette knife, 30 x 40" (76 x 101 cm) This painting was inspired by dunes in the Sandbanks Provincial Park. The afternoon sun that casts light from the left side creates long bold shadows. It is this contrast between shadows on the sand and areas lit by the sun that makes this scene interesting.
I usually go through the first four stages very fast. I am not focusing on strictly following the lines of my drawing. The last stages take much more time, as I do a lot of thinking when putting each stroke on the canvas. Each tree trunk, each branch, each sky hole has to be strategically positioned for a pleasing appearance and to emphasize the focal area.
As I mentioned earlier, using a palette knife allows me to create clean colors, beautiful texture and give my paintings an impressionistic appearance. Another (non-artistic) benefit of using a palette knife is convenience—cleaning a palette knife is very easy. One important thing to remember when using this technique: the painting has to be completed within three to four days while it is still wet. After it dries, it is impossible to use a palette knife because of the textured hard surface. Imagine spreading butter with a knife on a slice of dry bread. It would not apply smoothly.
My Art in the Making Sandbanks Dunes
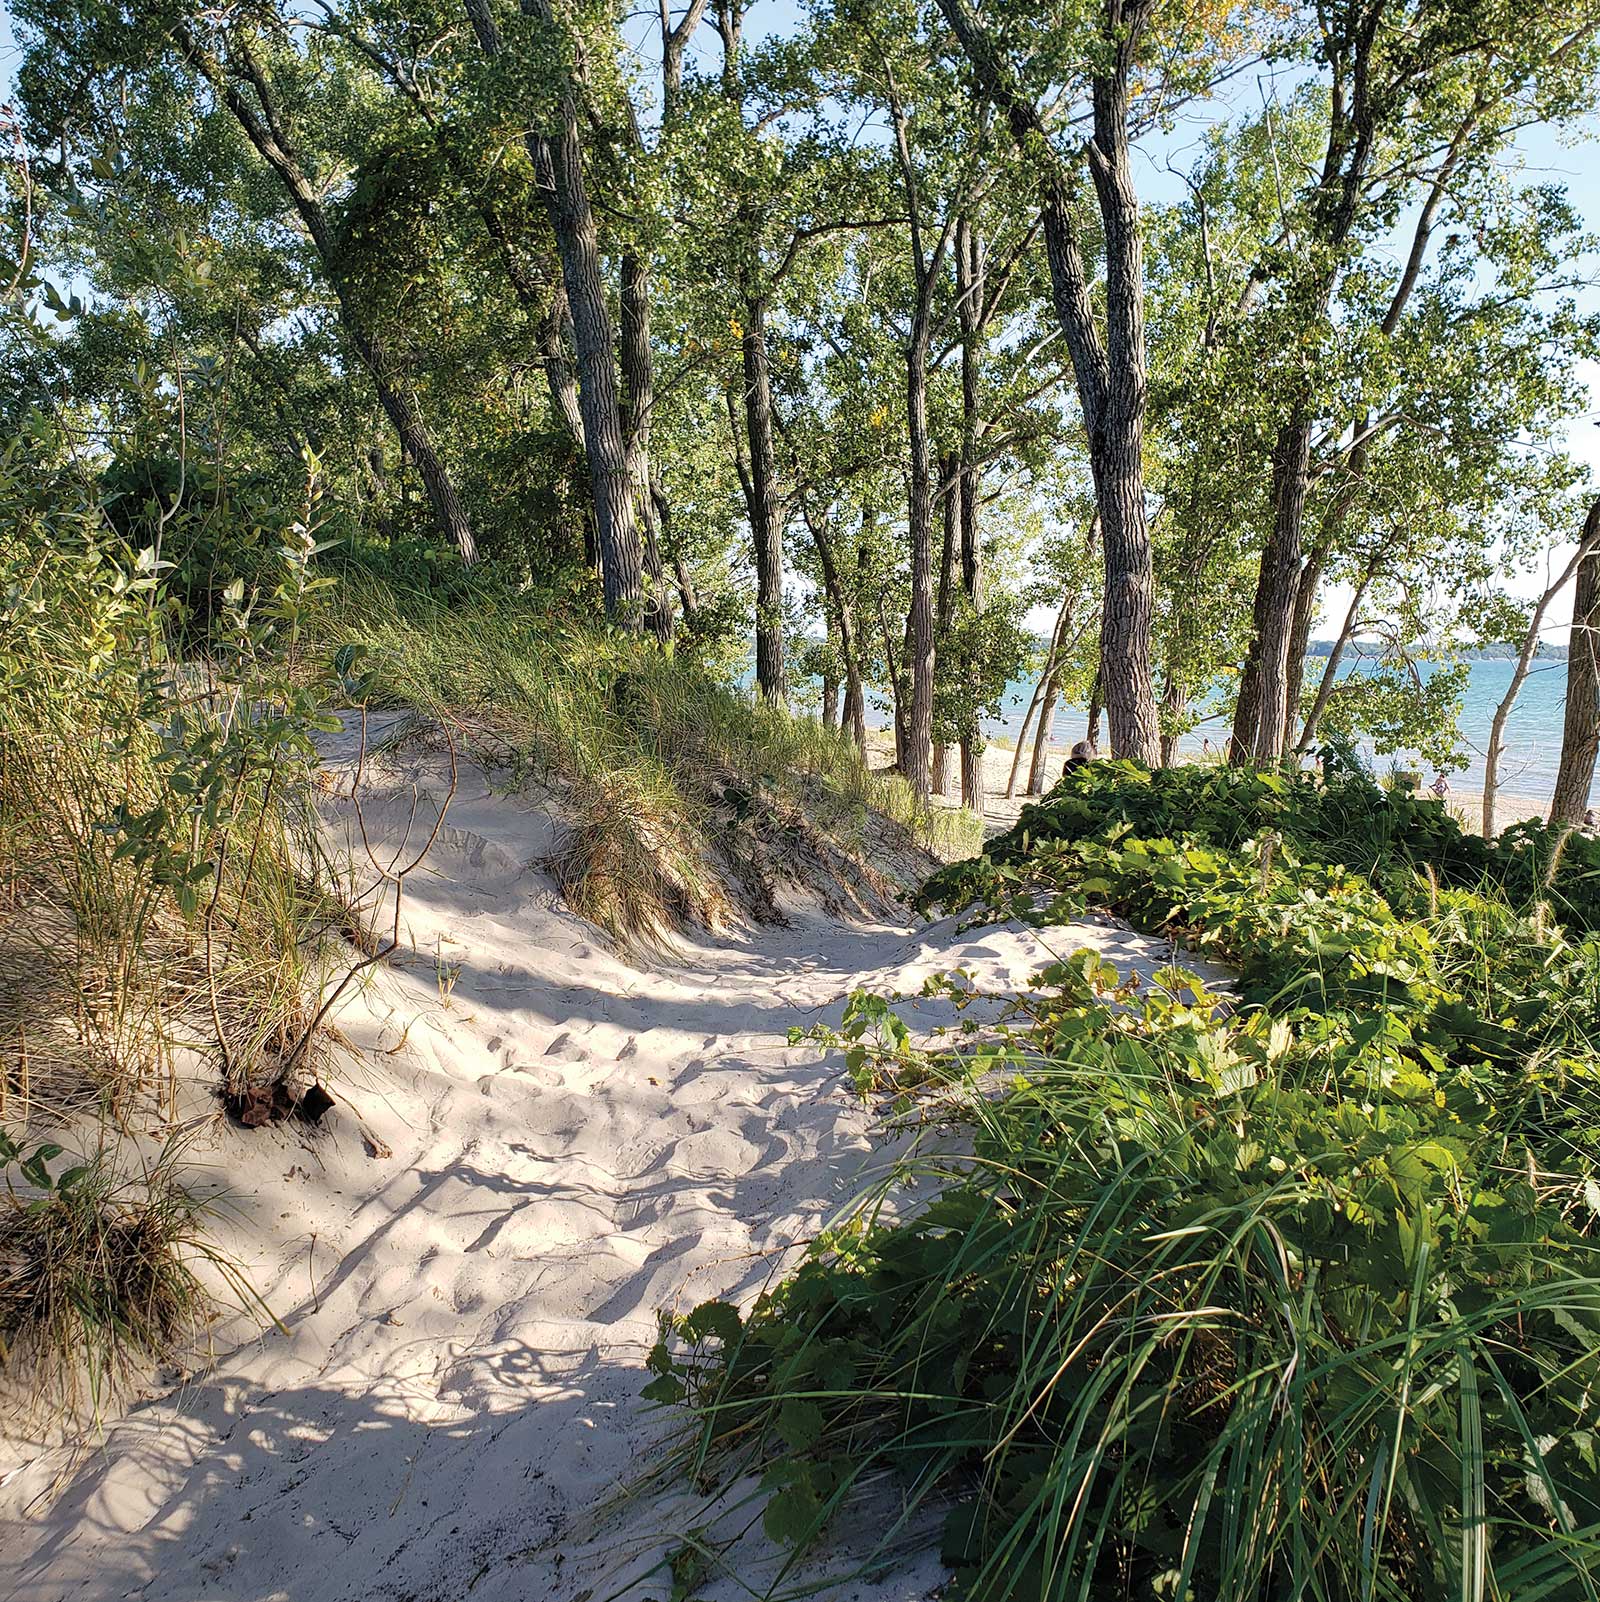
Reference Photo
I enjoy painting all kinds of natural scenes and seasons, but one subject that is especially dear to my heart is dunes and beaches. We have several provincial parks in Canada’s Southern Ontario that have beautiful dunes, and Sandbanks is probably the most famous. The reference photo that I will use for this demonstration was taken in Sandbanks during one of my many hikes there. I loved the beautiful shade on the sand as well as the light and dark grass and trees. The demo painting was done on an 18-by-18-inch canvas. I did not tone my canvas, as I believe that a toned canvas changes the colors of the painting. On a white canvas, colors stay clean and bright.
 Stage 1
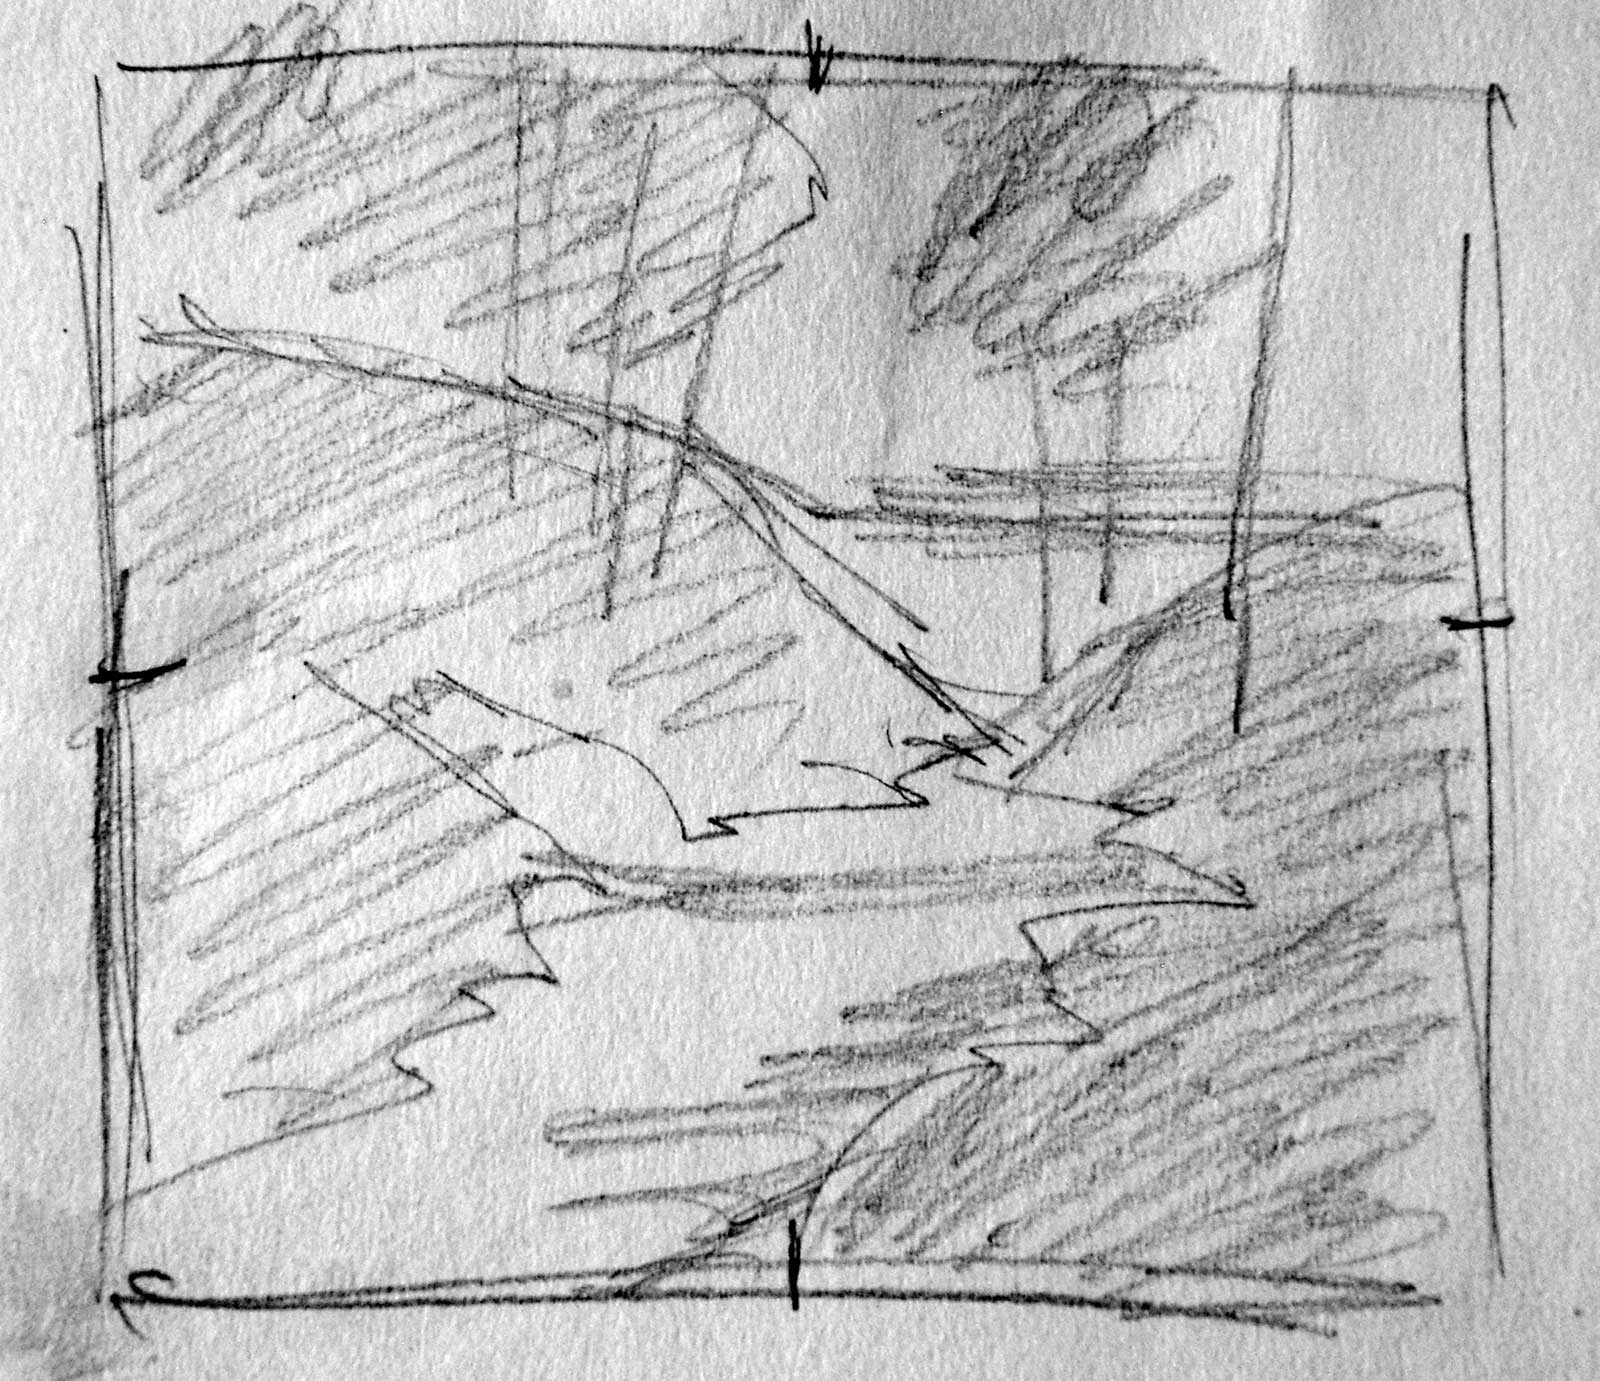
Stage 1 Creating a Value Sketch
Before I start working on my painting, I study the photo. I try to remember what drew me to the scene. I think about the composition. Is it good? Do I need to make any changes? I decide on what needs to be changed before I start to draw, then I think about shapes. I try to divide the scene into five to seven shapes and decide on the value of each of the shapes. I think about what side the sun is on. How does it affect the scene? Where are the shadows? Then I do a value sketch.
 Stage 2
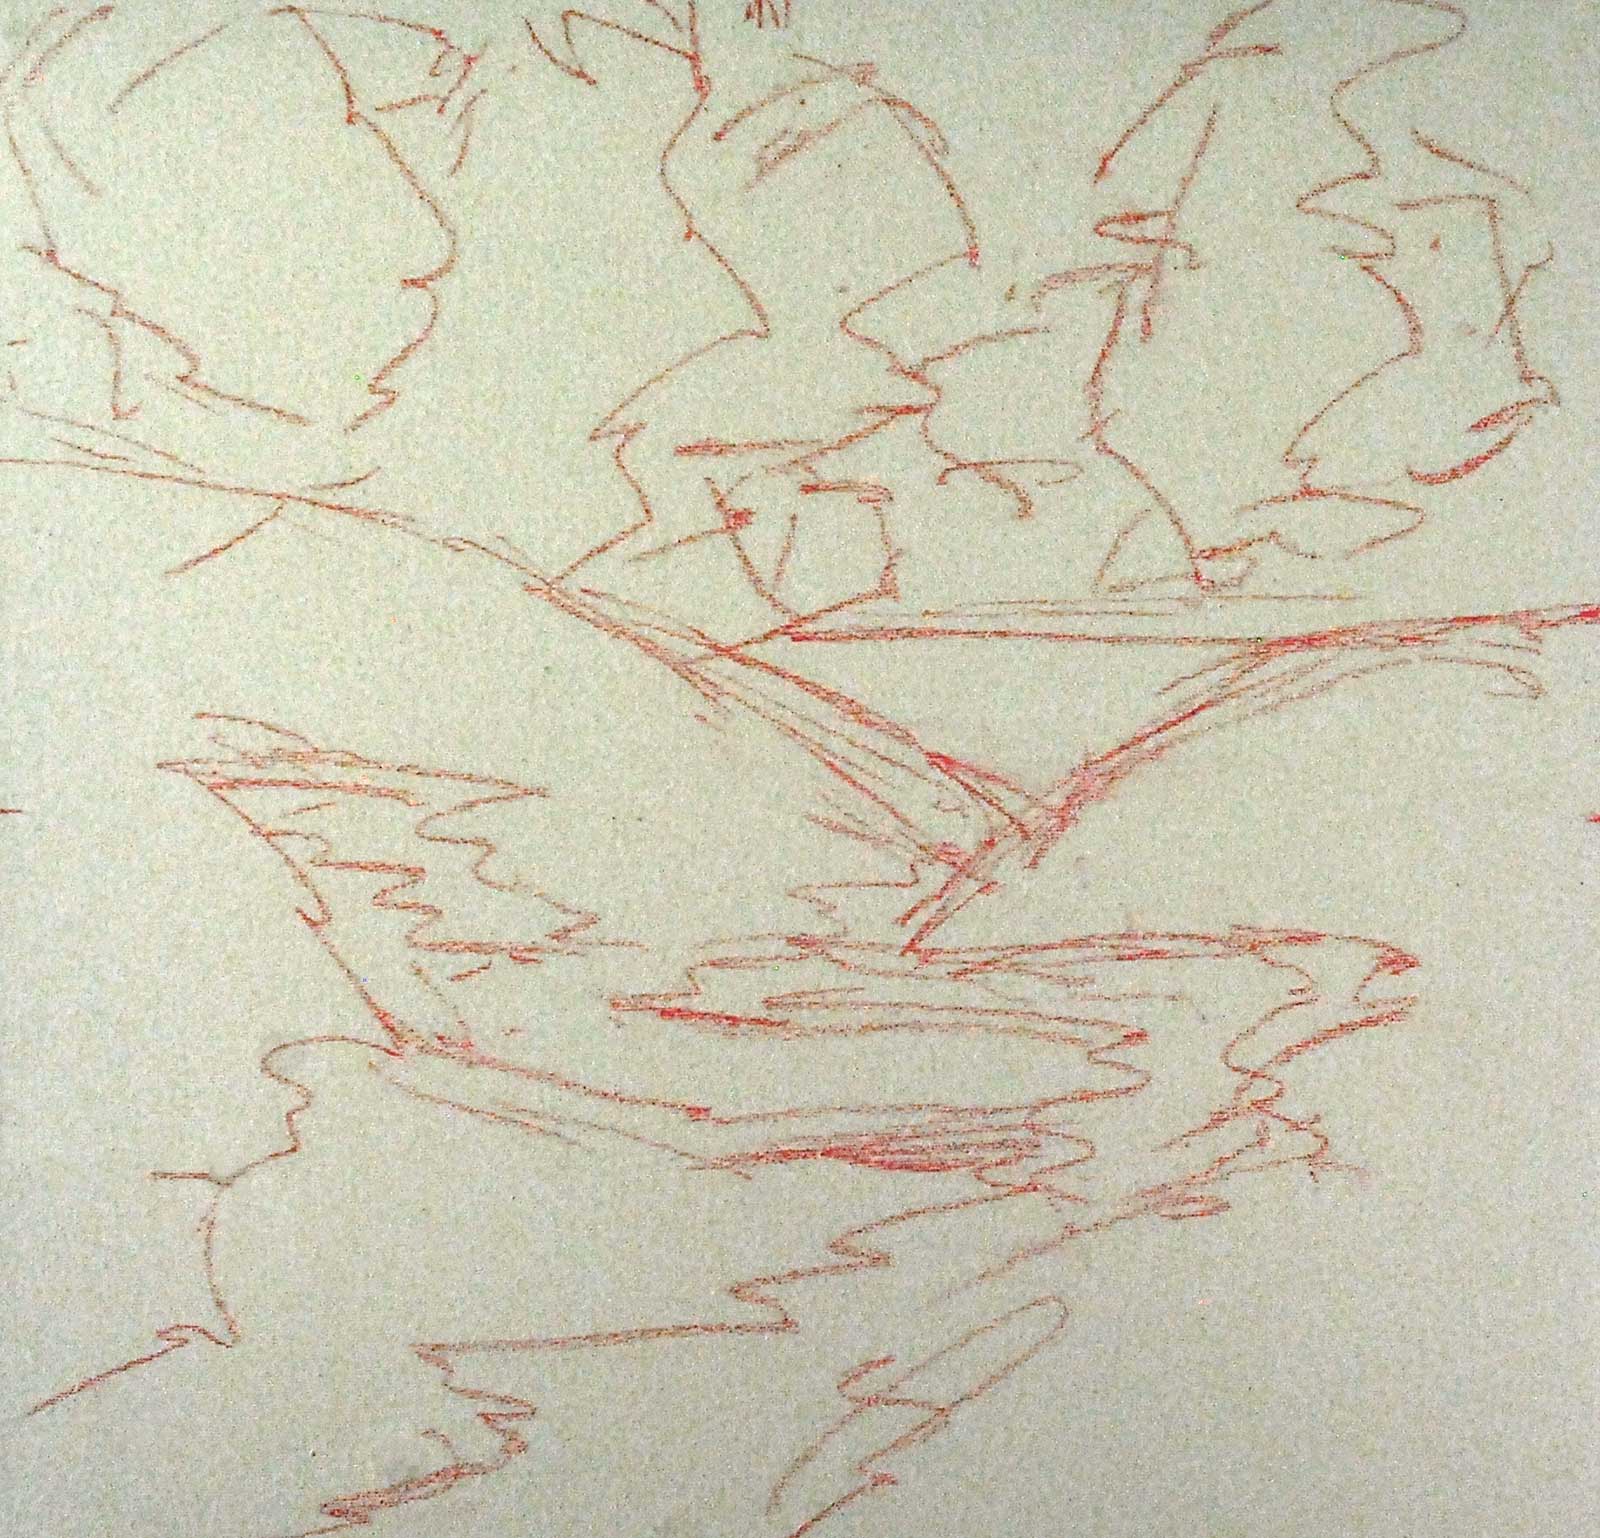
Stage 2 Drawing a Scene on Canvas
I create a drawing with a dark pink dry pastel stick. I continue to look at my value sketch when I draw. I am not putting any details (no tree trunks or branches), only major shapes.
My Design and Composition Tactics
- Start working on a white untoned canvas to create bright and clean colors.
- Paint the first layer (underpainting) very thin.
- Use a lot of paint for further stages; do not try to be economical. It is important to have enough paint on the palette.
- Apply palette knife strokes in various directions when painting sky, sand and trees. Use light vertical strokes of a full palette knife blade when painting grass.
- Complete the painting while it is wet (within two to three days). After the paint dries it will be impossible to put smooth strokes of paint with a palette knife on a textured dry surface.
 Stage 3
Stage 3 Underpainting
I use a larger palette knife (4½ cm blade) to put paint on the canvas. Each shape has its own color. I paint the sky shapes light pink, the shape of dark trees (magenta), grasses in the shade (blue), sunlit grasses (orange), sand in shade (violet), sand in sun (pink) and the water (dark pink). I put paint on the canvas very thinly and leave some white canvas around those shapes. I also make sure that the values of the shapes correspond with the values of each particular area in my thumbnail sketch.
 Stage 4
Stage 4 Local Colors
I then add local colors to each shape, applying paint with light strokes so it does not mix with the underpainting. I use thicker paint and start creating texture. I paint sunlit trees with warm light green, sunlit grasses with cooler light green, darker trees with warm green and grasses in shade with cool dark green. I’m also making sure that I use a variety of warm and cool greens in different areas of the painting. For the sky, I use cerulean blue, for the sunlit sand I use yellow ochre, permanent rose and white, and for the sand in shade I use violet with white. At this point I do not worry about any gradation of values of colors within shapes. All shapes still look flat.
 Stage 5
Stage 5 Working on Values within Shapes
At this stage I work on value variations within each shape. I create darker areas under trees and lighter values in the areas where trees are illuminated by the sun. I add darker paint at the top of the sky and gradually make it warmer and lighter towards the bottom. I paint the top part of the grass lighter and lower layers darker. Sand in shade is painted darker closer to grasses, and it is graded lighter and warmer towards the edge of the shade.
 Stage 6
Stage 6 Variation of Colors and Some Details
At this stage, I add variations of color in the grass, trees, water and sand. I also start putting sky holes in trees, defining grass areas and bunches of leaves.
 Stage 7
Stage 7 Finishing the Details
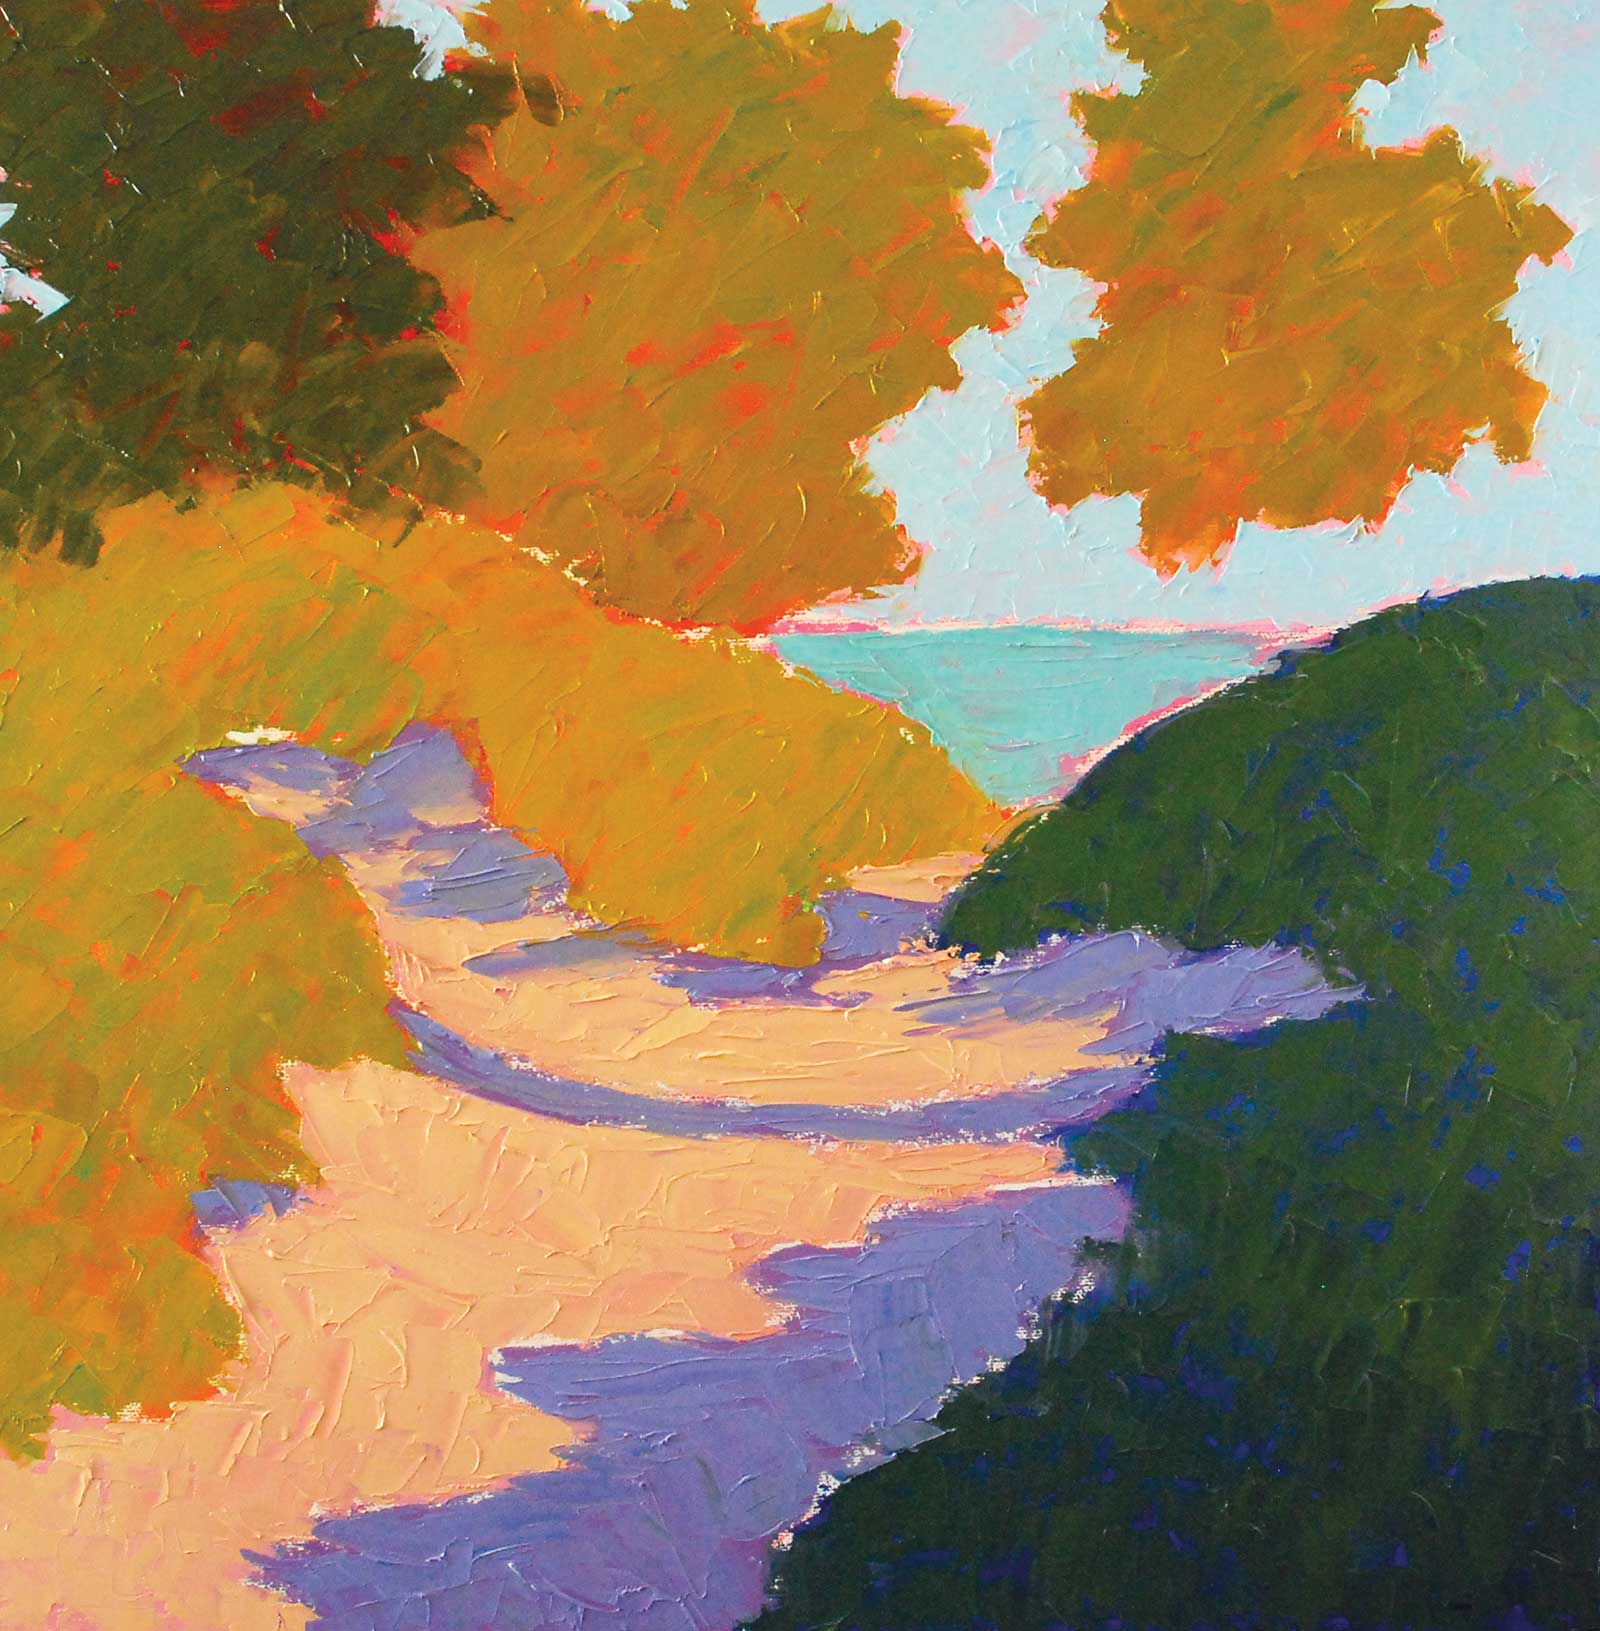
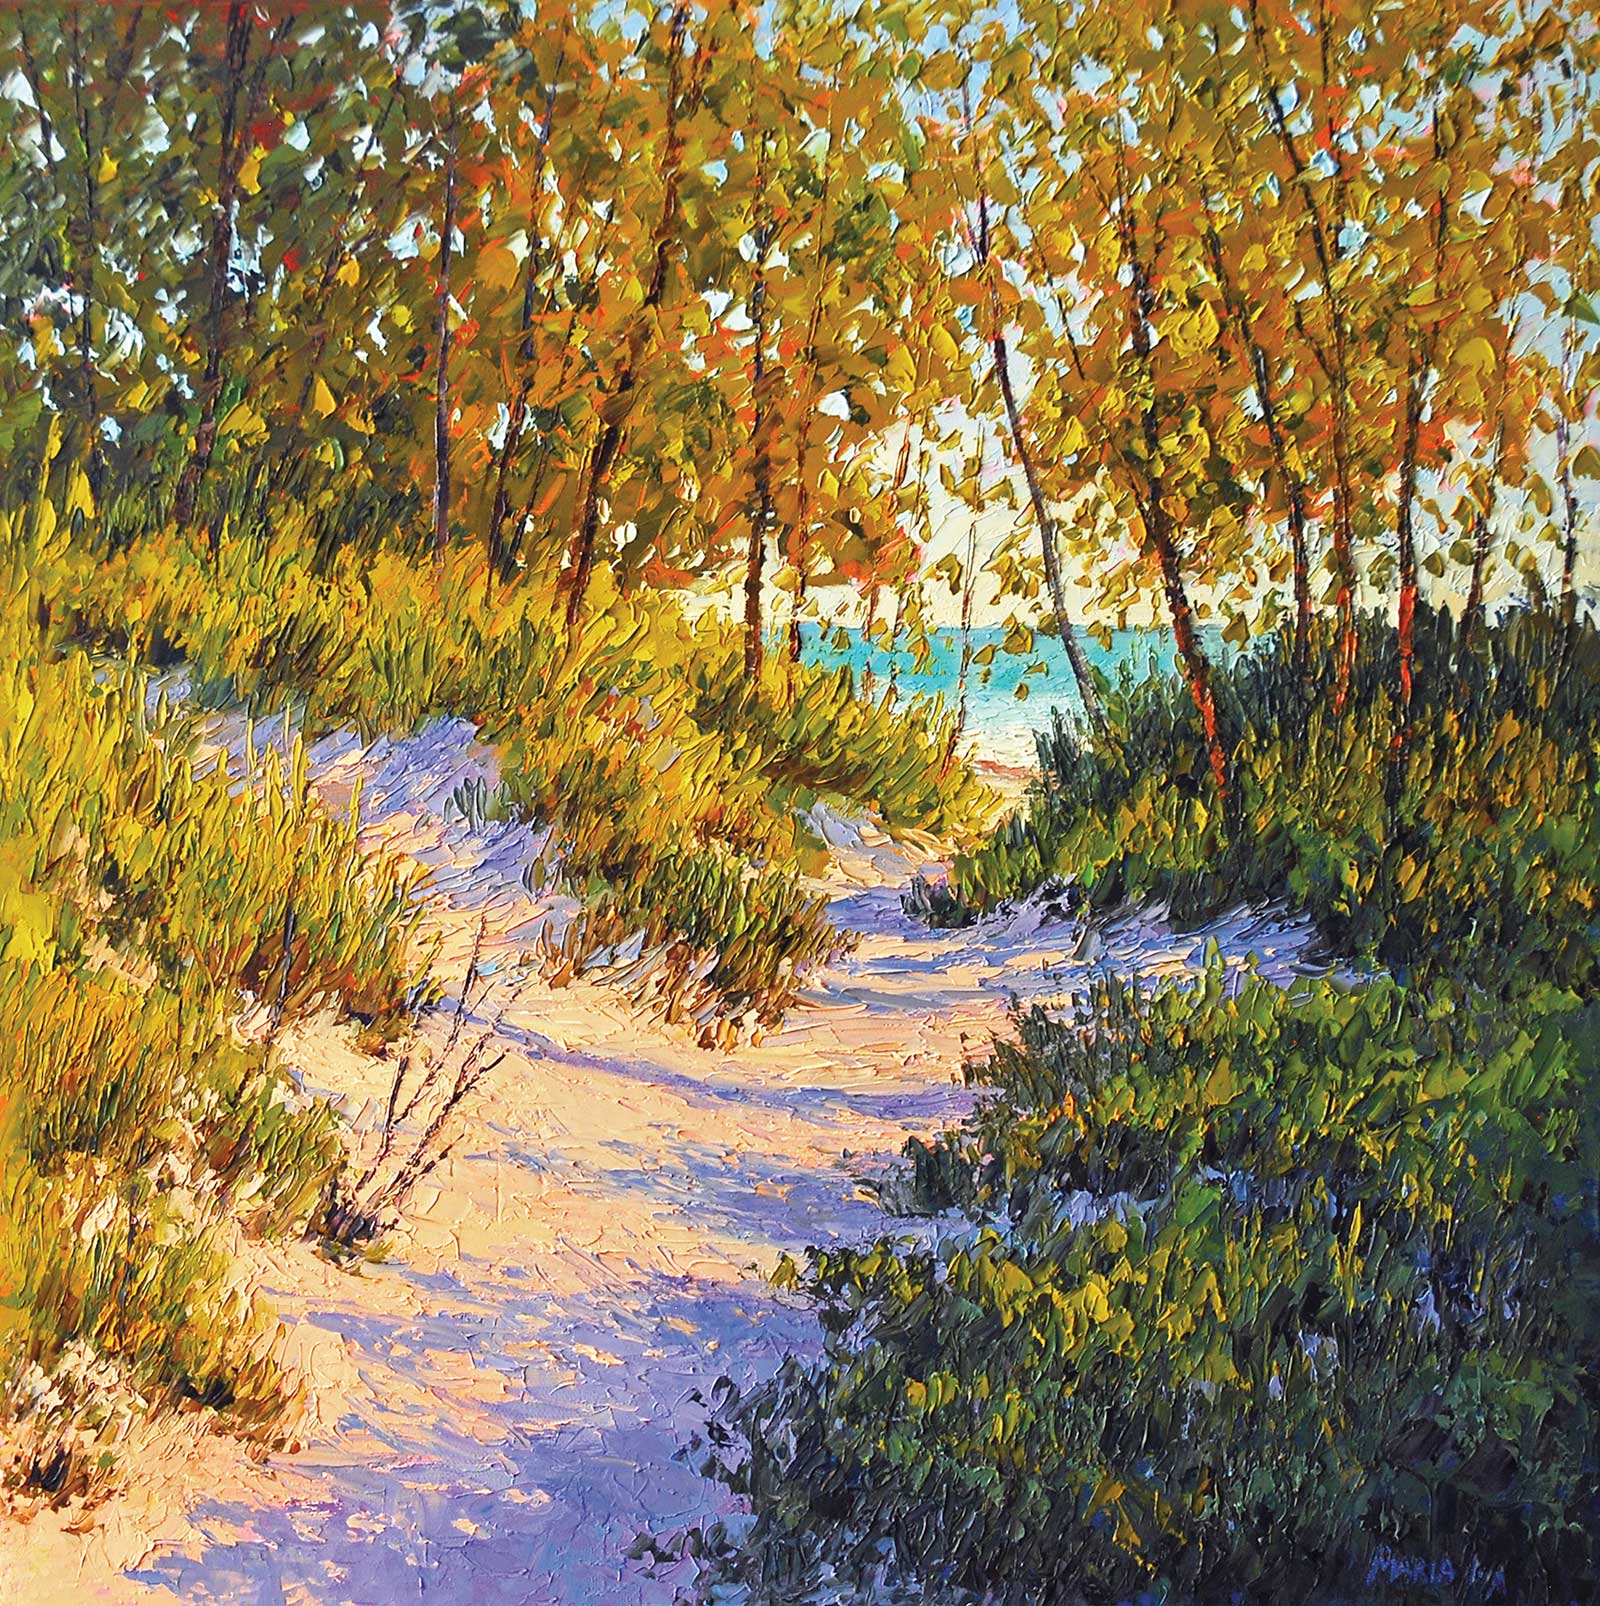
Sandbanks Dunes, oil with palette knife on canvas, 18 x 18" (45 x 45 cm)
I put in tree trunks and branches and more bunches of leaves. Accents and highlights are also added. I make sure there is no white canvas showing anywhere, and I correct shapes that might need more work. I sign the painting by scraping my name at the bottom with a color shaper. The scraped signature shows that the painting was done wet-on-wet.
About the Artist
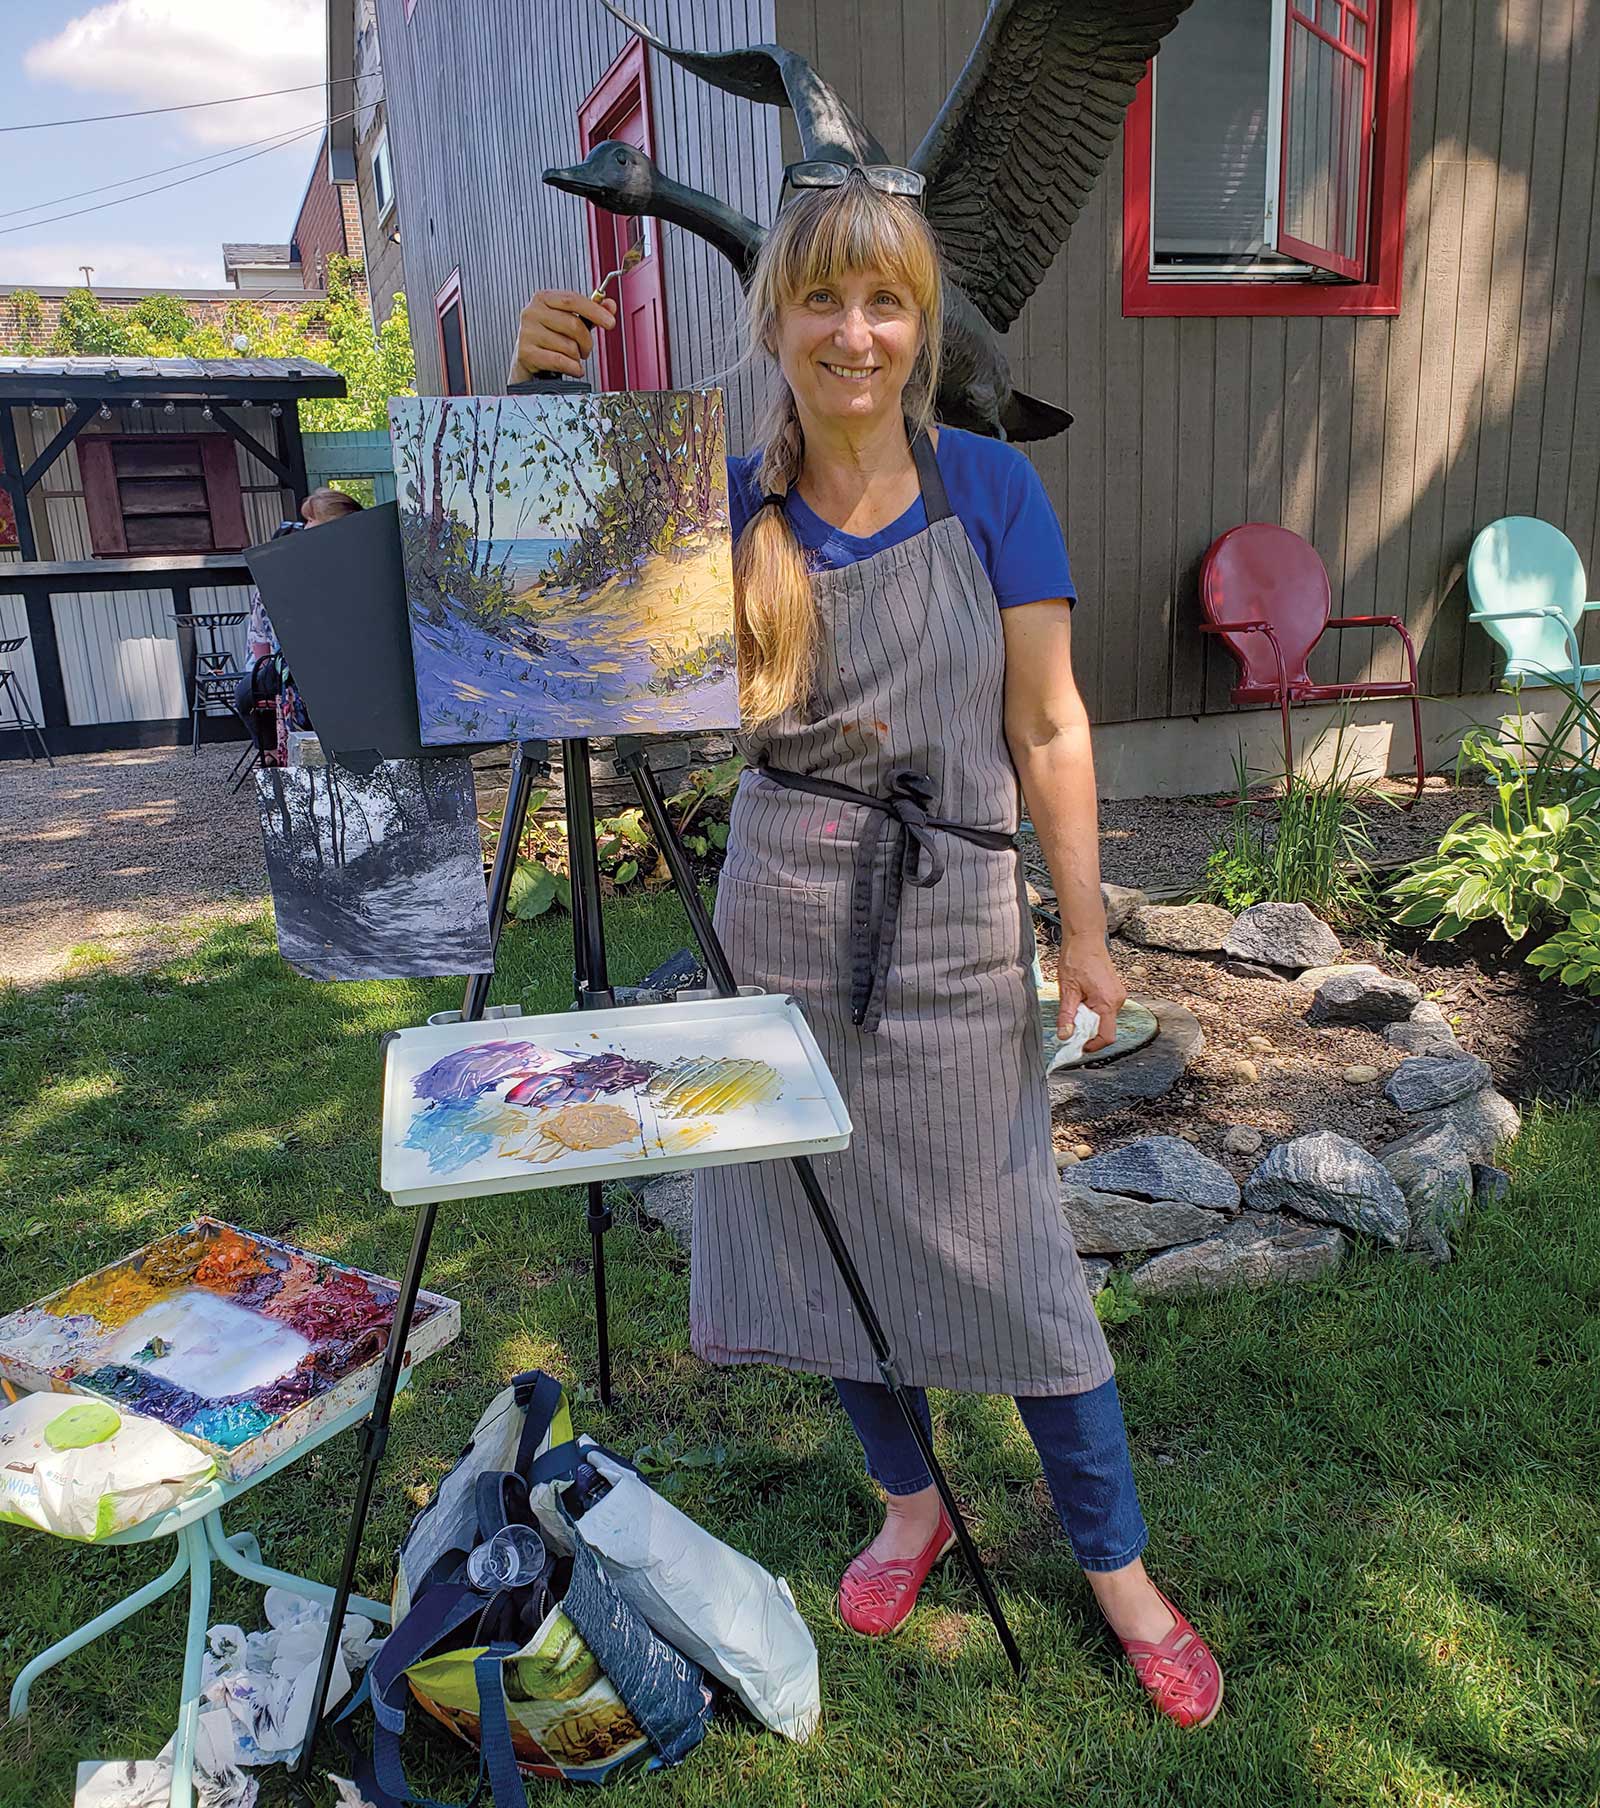 Maria Iva
Maria Iva is a Canadian oil and pastel landscape artist. She is a tireless hiker and plein air painter. She started painting late in life after a successful career in education. She studied landscape painting for five years with Johannes Vloothuis in his studio in Hamilton, Ontario, and after that she took workshops with several American oil and pastel artists. Susan Sarbak, Richard McKinley, Lana Ballot and Barbara Jaenicke were the ones who influenced her the most. She was mostly interested in learning how to create color and texture in her paintings, and she loves painting sunny scenes with an interesting combination of sunlit and shaded areas.
Iva widely exhibits her work and has won many awards. She teaches both oil palette knife and dry pastel techniques. She is an elected member of the Society of Canadian Artists and has Signature Master Pastelist status with Pastel Artists Canada. She lives and works in Mississauga, Ontario.
Contact at
artistmariaiva@gmail.com
www.mariaiva.com