


When I think about the course of my art career, I’m reminded of that scene in Friends when Ross is trying to move a couch up a winding staircase. At each turn he screams at Chandler, “PIVOT!” My path has also been determined by a series of pivotal moments.
Since childhood I’ve known I wanted to be an artist. My first pivotal moment came at the age of 18 when I left home due to a bad family situation. Suddenly on my own, and dreams of art school on hold, I took a job as a nursing assistant at an institution for the mentally disabled. Years later some of the nurses I worked with convinced me to go to nursing school. After I had worked a number of years as a registered nurse, my second pivotal moment arrived. The hospital where I worked implemented a new staffing plan where if an RN agreed to work two 12-hour shifts every weekend, they would be paid the equivalent of a 40-hour schedule. I immediately signed up, and it wasn’t long before I had five days off every week.
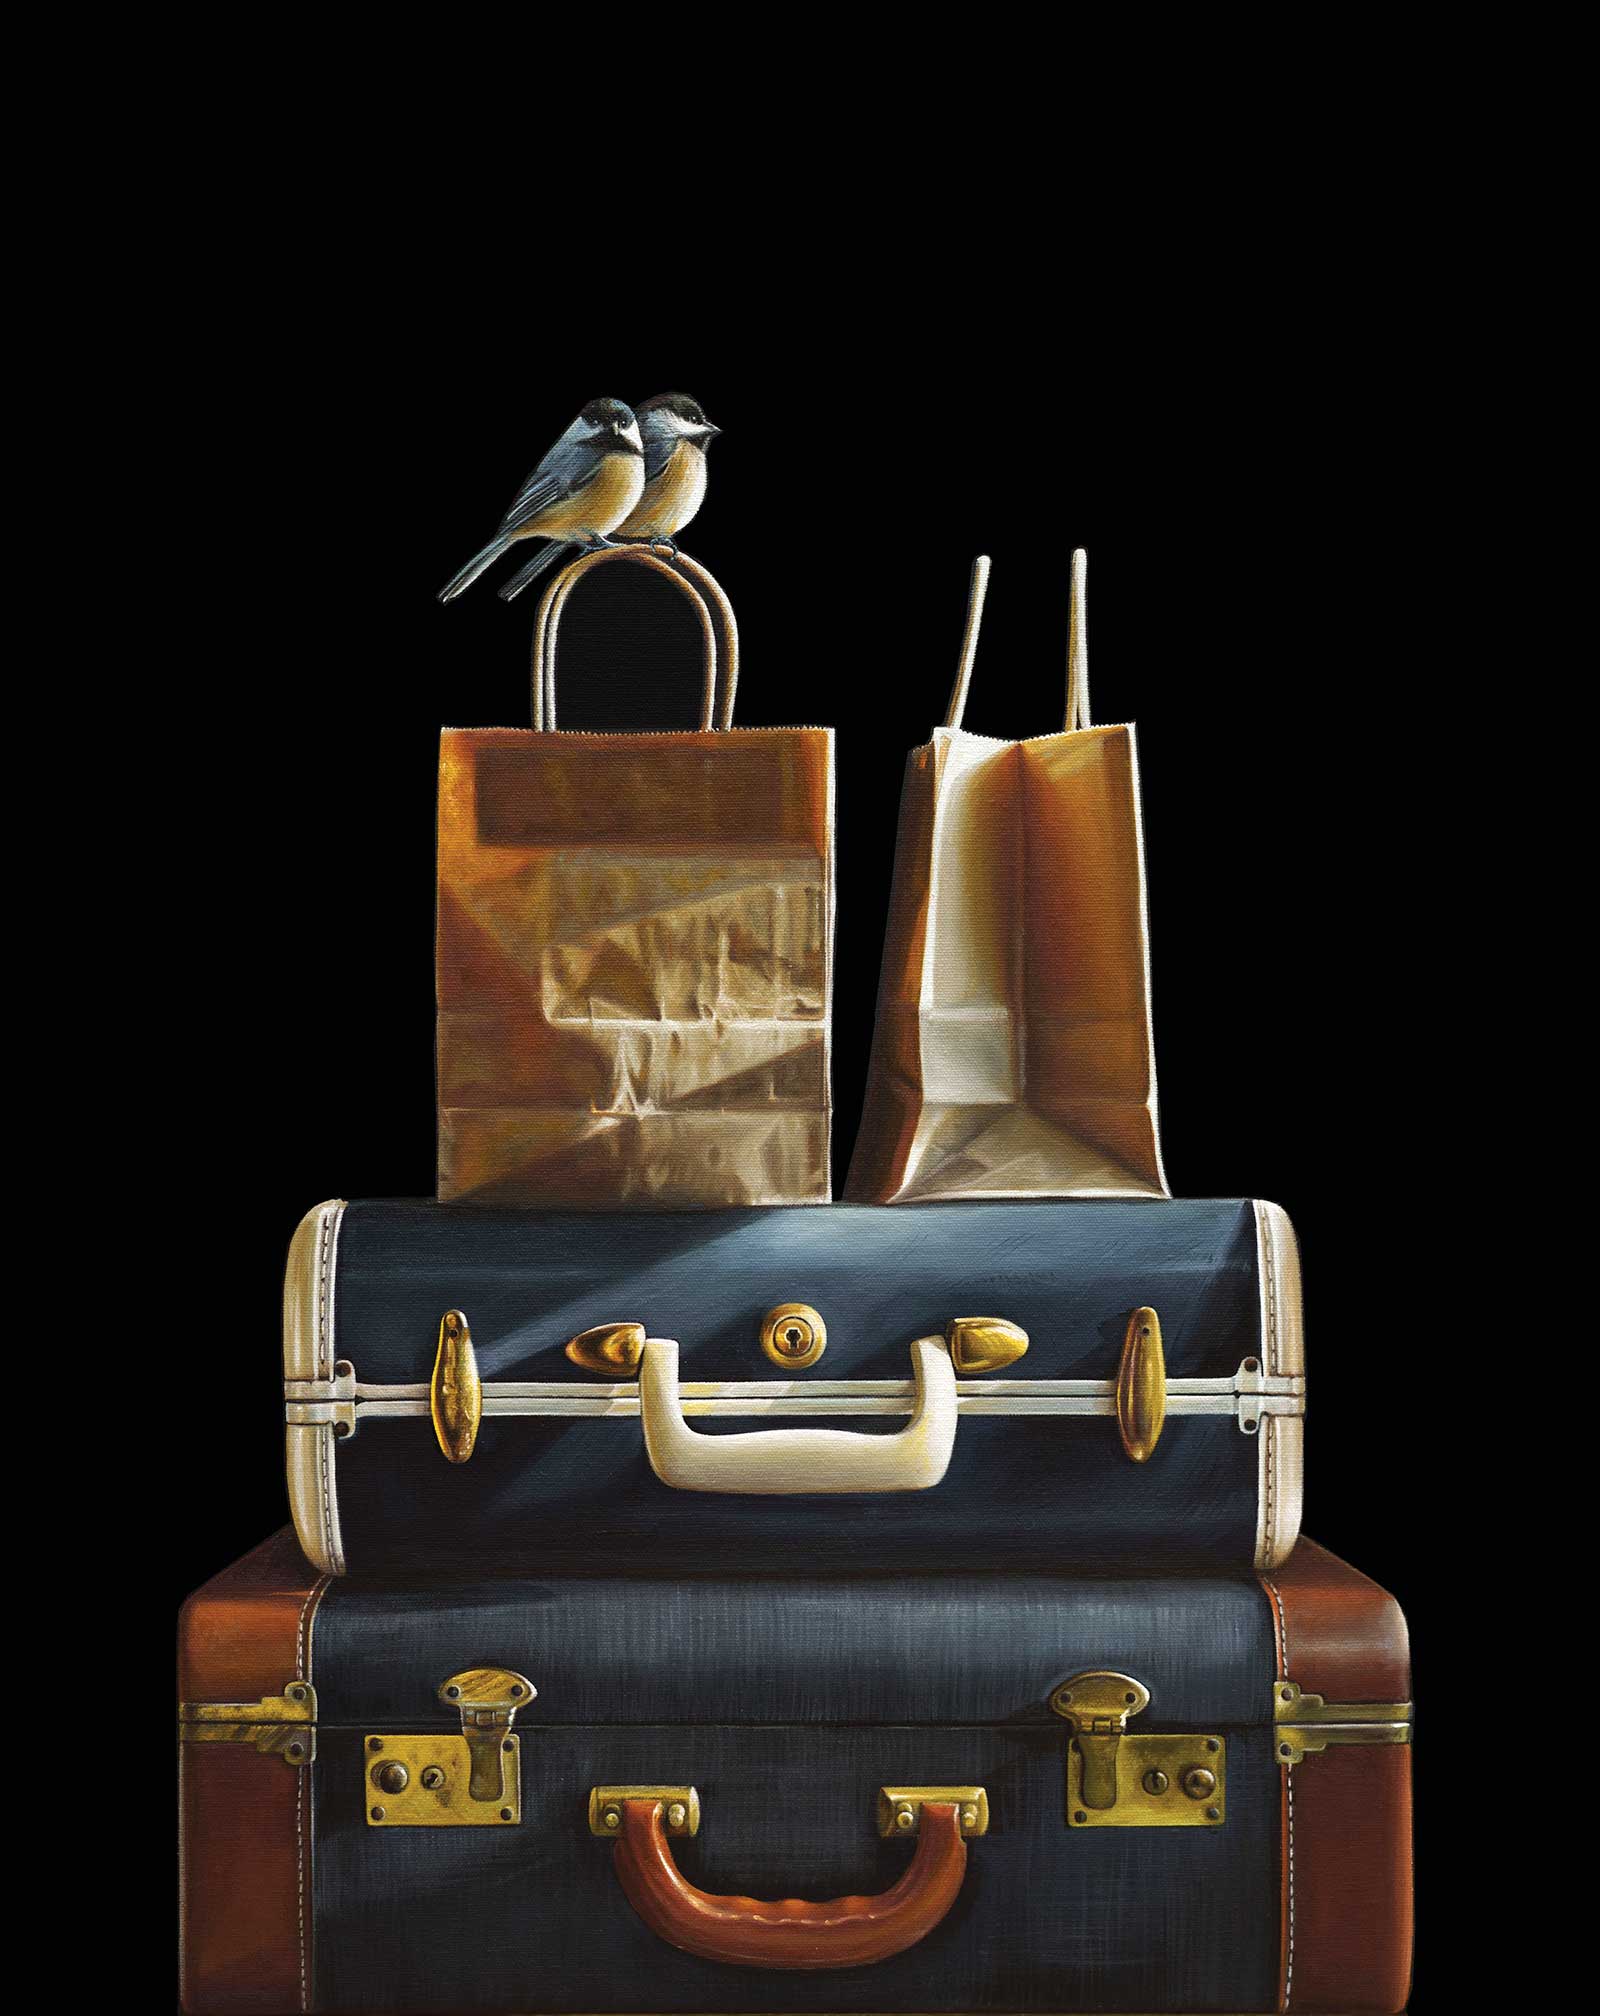
Traveling, oil on canvas, 28 x 22" (71 x 55 cm)
I met my new boyfriend, and future husband, Neil Hollingsworth around this time. One day he discovered a sketchbook of mine. I had never told him about my aspirations to be an artist when he asked me who had done the drawings. I said it was me, and he replied, “You have to follow this, you are really good.” Now with time and encouragement the possibility of working as an artist seemed possible.
I took some art classes and discovered that I really enjoyed painting faces, so I concentrated on portraiture. I had a knack for it and quickly offered my services commercially. I already had a built-in client base at the hospital, and in time I joined the Portrait Society of Atlanta, as well as the Atlanta Artists Guild. Those connections also brought in new clients.
Pivotal moment three came when I discovered the computer and digital cameras. The camera allowed me to shoot hundreds of photos of clients rather than 24 on film, and the computer monitor allowed me to edit the image and enlarge or reduce it to see more detail.
Flying South, oil on canvas, 36 x 36" (91 x 91 cm)
Another benefit of the computer was access to the internet and eBay. A close artist friend of mine had just begun selling his work on eBay, and he told me, “You have to do this!” This venue also gave me the opportunity to try my hand at a world of wonderful new subjects like still life, animals, interiors and landscapes. In time I began to build a following on eBay, and with that my prices, and confidence, began to rise. This is where I come to pivotal moment four. An artist friend of mine and I decided to spend the day cold calling a few galleries. Unbelievably by the end of that day I had been accepted into one of Atlanta’s finest galleries.
I sold well there and my eBay sales were great, so I did the math and calculated that I could make more as an artist than I was as a nurse. Pivotal moment number five, I cut the cord and became a “professional” artist. My husband, following my lead, also quit his job to work as an artist full-time, and from then on we both painted like crazy.
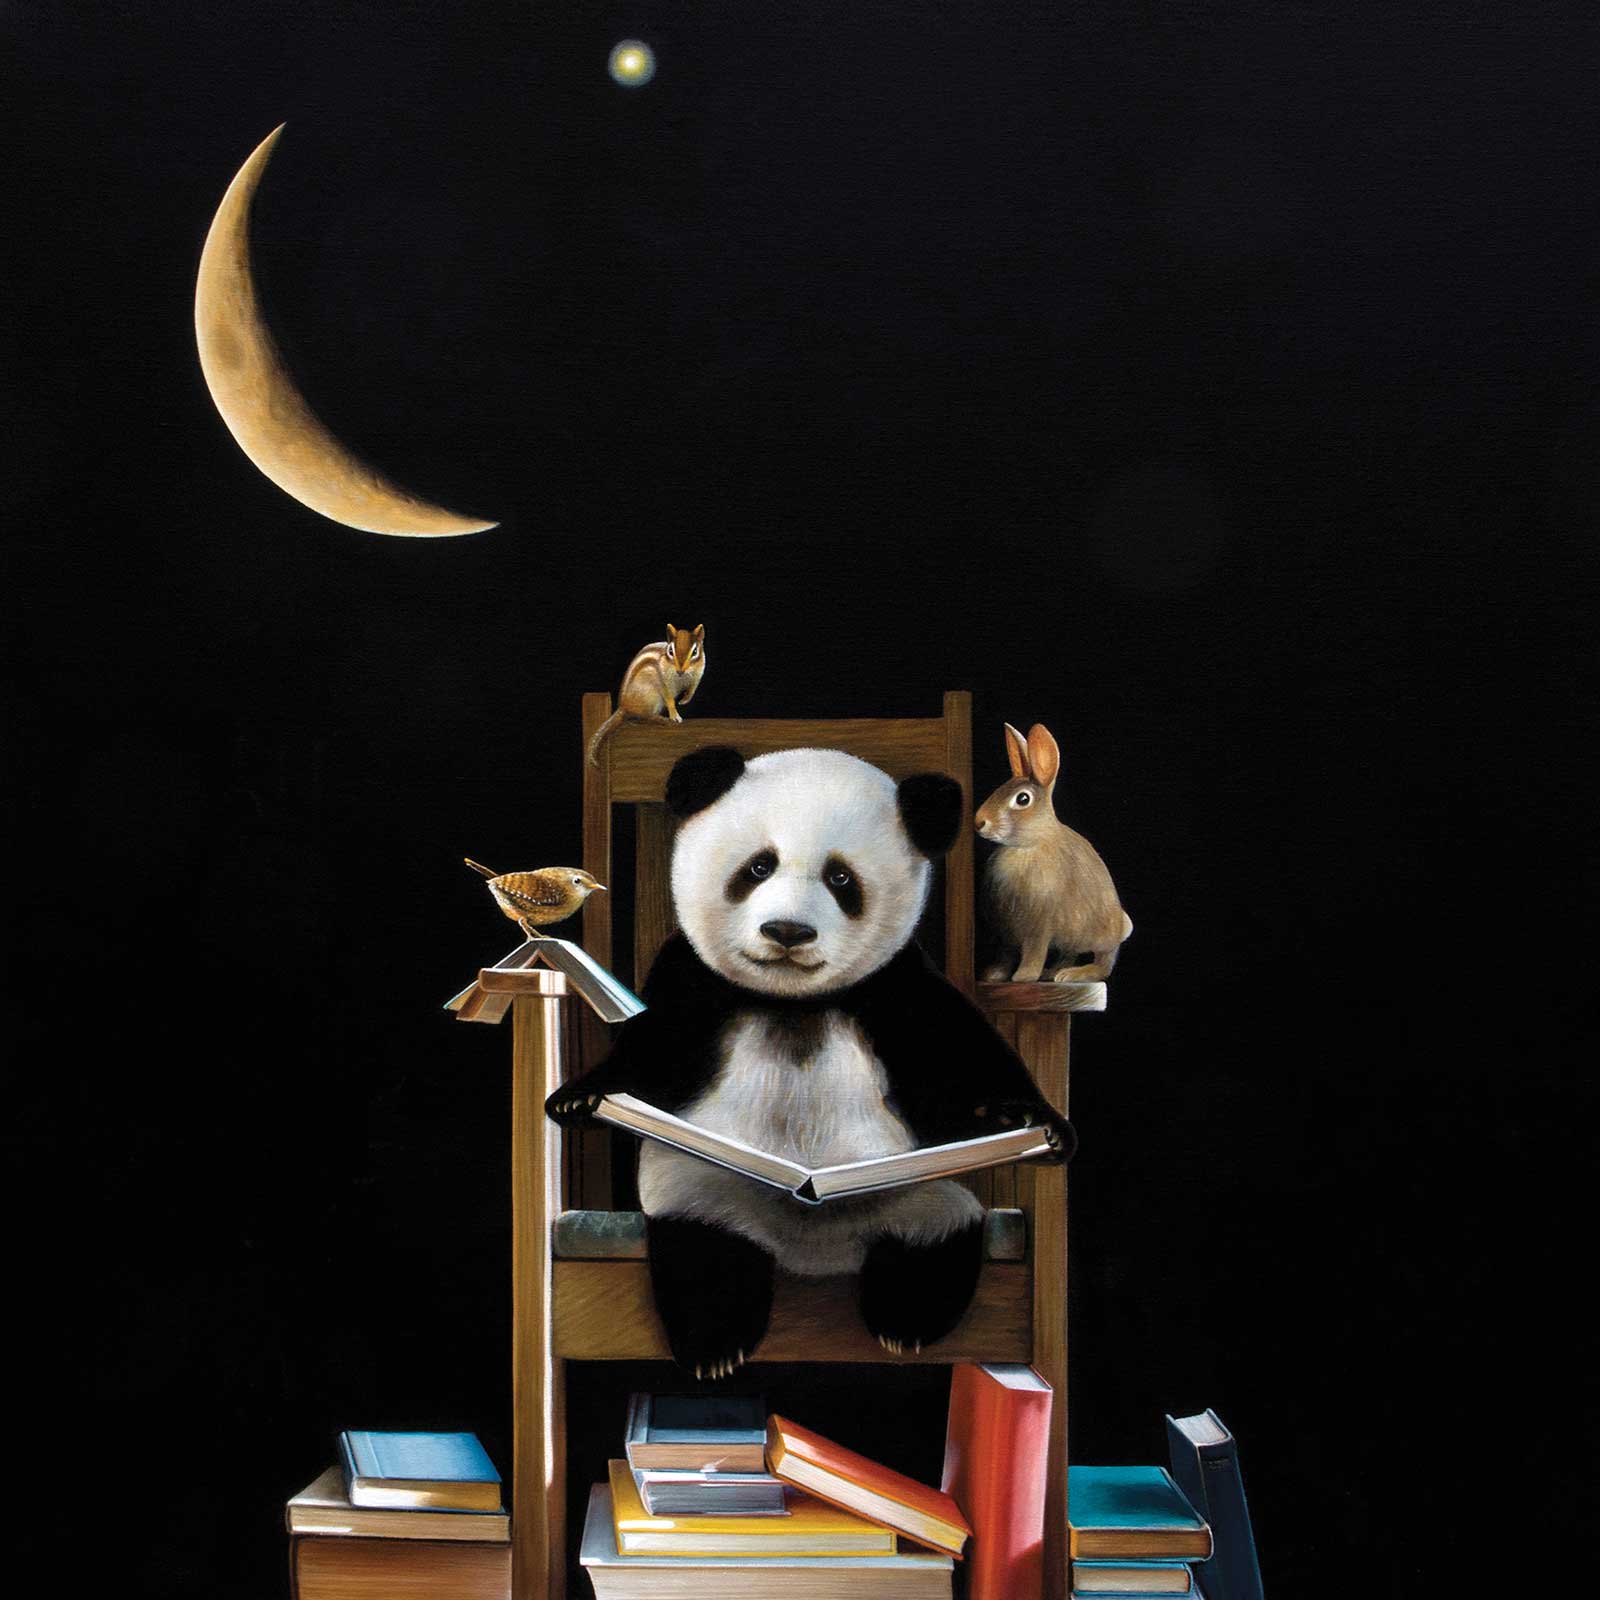
Bedtime Story, 36 x 36" (91 x 91 cm)
It’s now been 25 years since I was first accepted into that Atlanta gallery, and there have been many fine tuning pivots in that time. I’ve learned a lot about how the gallery system works, and sometimes fails. I’ve learned to trust my own instincts when it comes to style and subject matter. I’ve learned how to pace myself, listen to my body and not get caught up in the frenzy that arises with the lure of the “show.” This has also opened up in me a new creativity and growth of imagination. My series Shared Reality provides me with the freedom to combine animals with a surrealistic environment, which I find very exciting.
For me I just hope I can continue to get excited over new ideas for paintings. That I’ll always love painting as much as I do now. That my emotions will still be evident in my work, and that I’ll be less fearful of others’ opinions. Maybe I’ll get another couple of decades to paint, and hopefully continue to benefit from future pivotal moments.
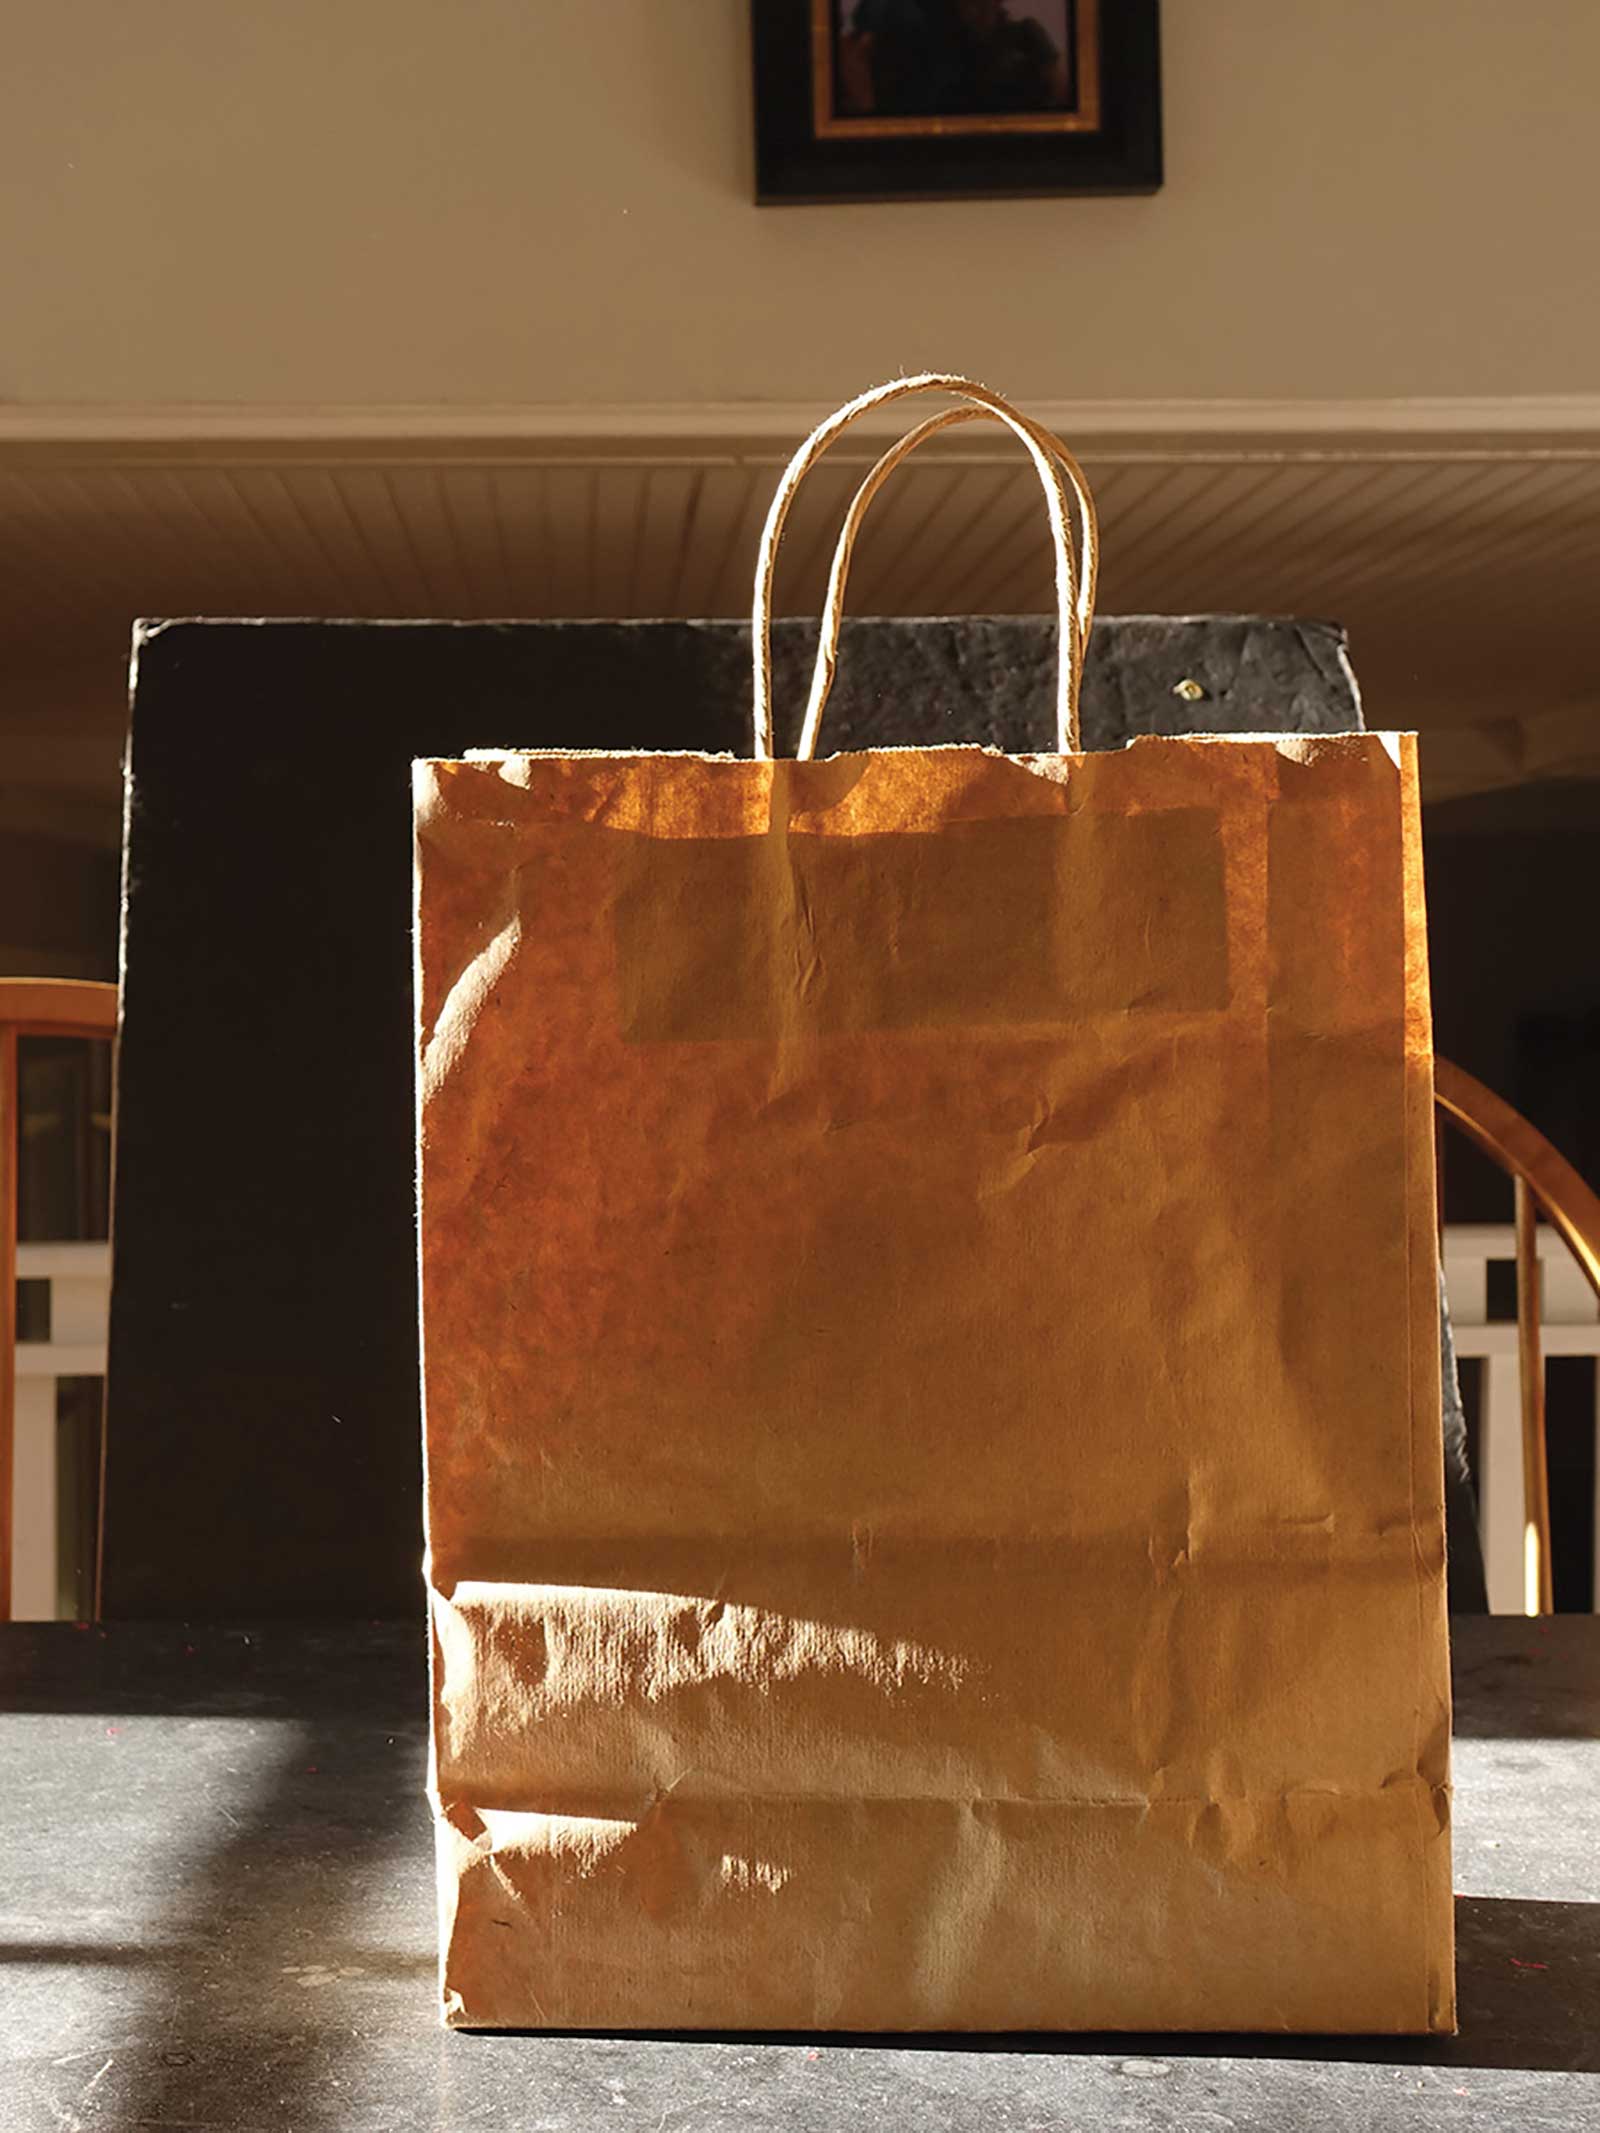
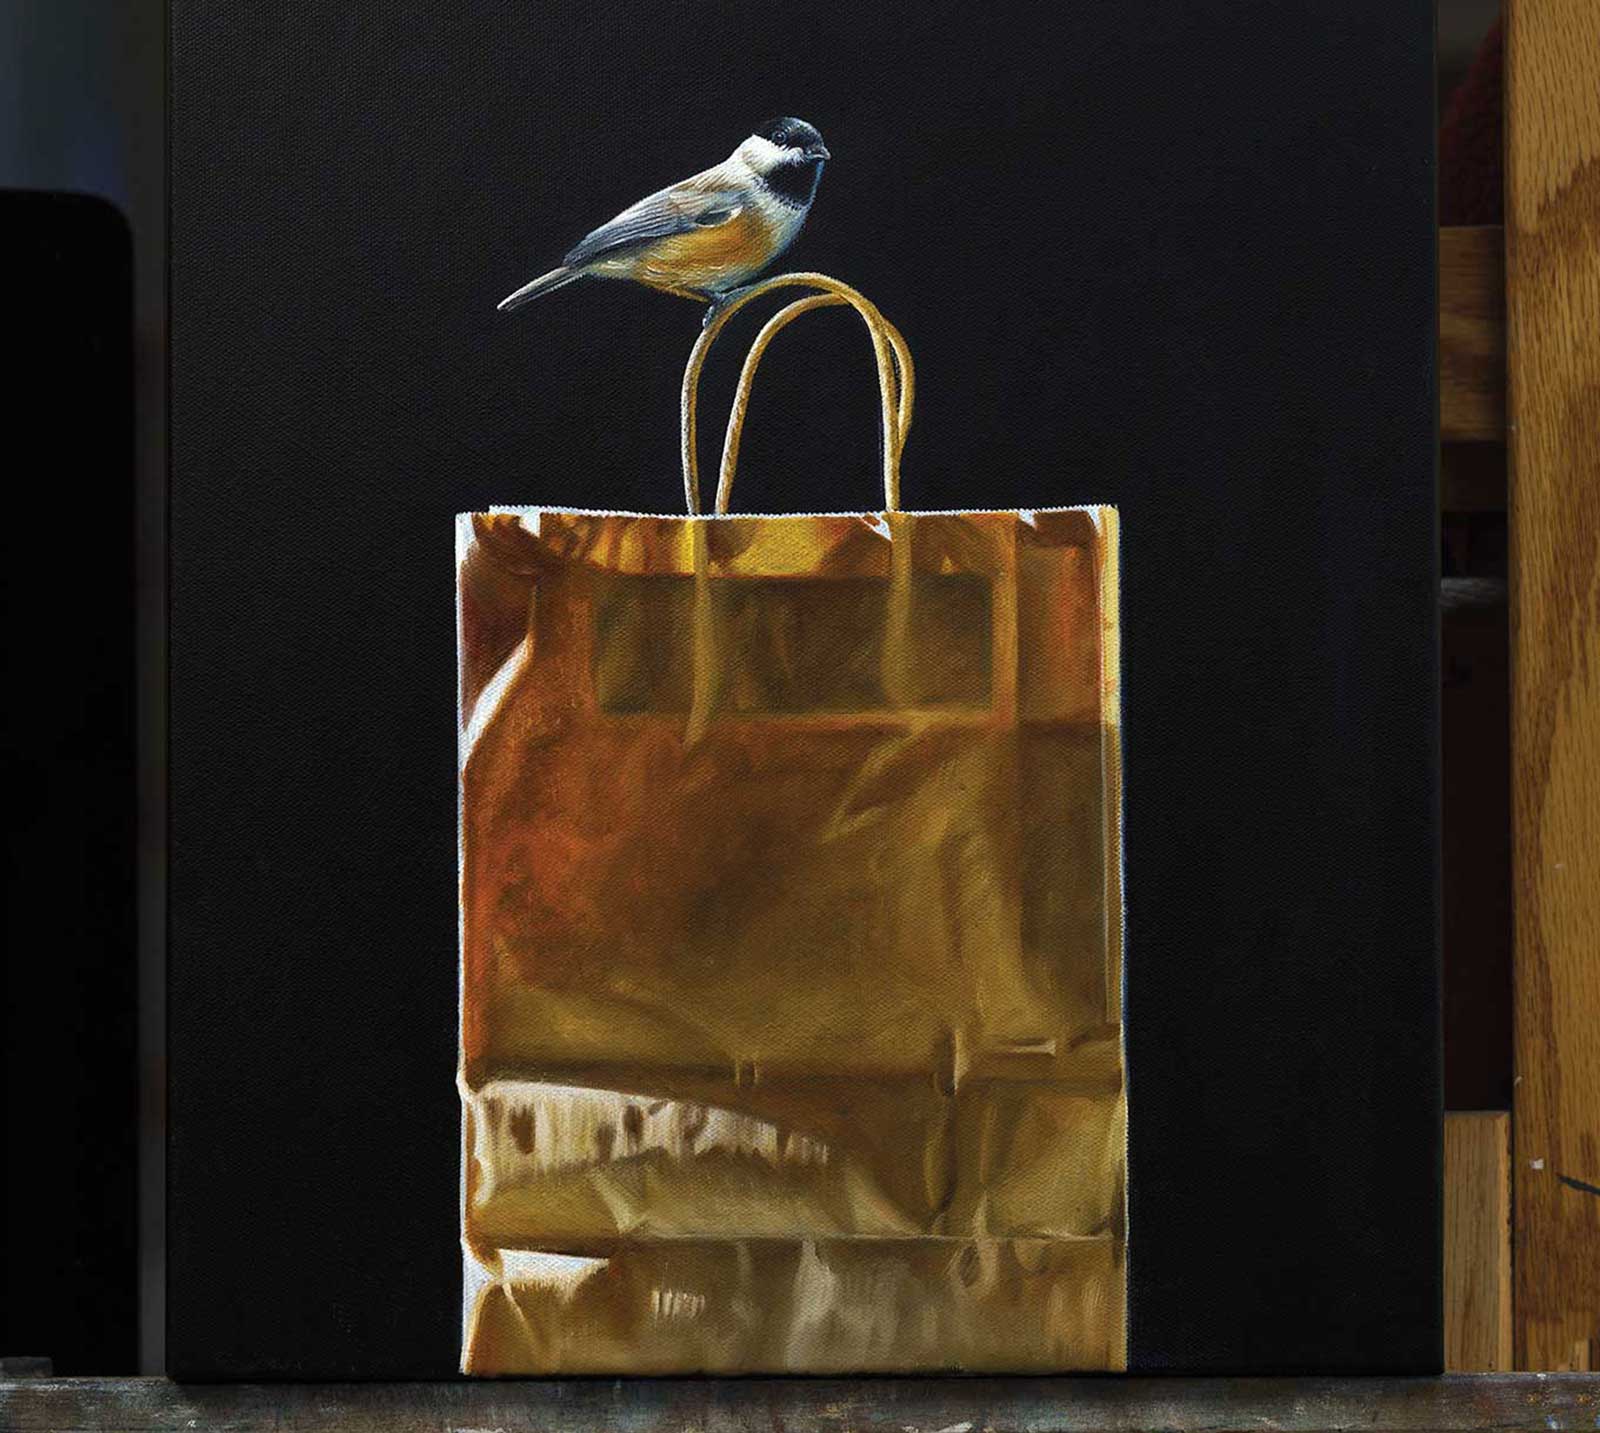
My Art in the Making Sack Lunch
Stage 1
Stage 1 Setting up the Composition
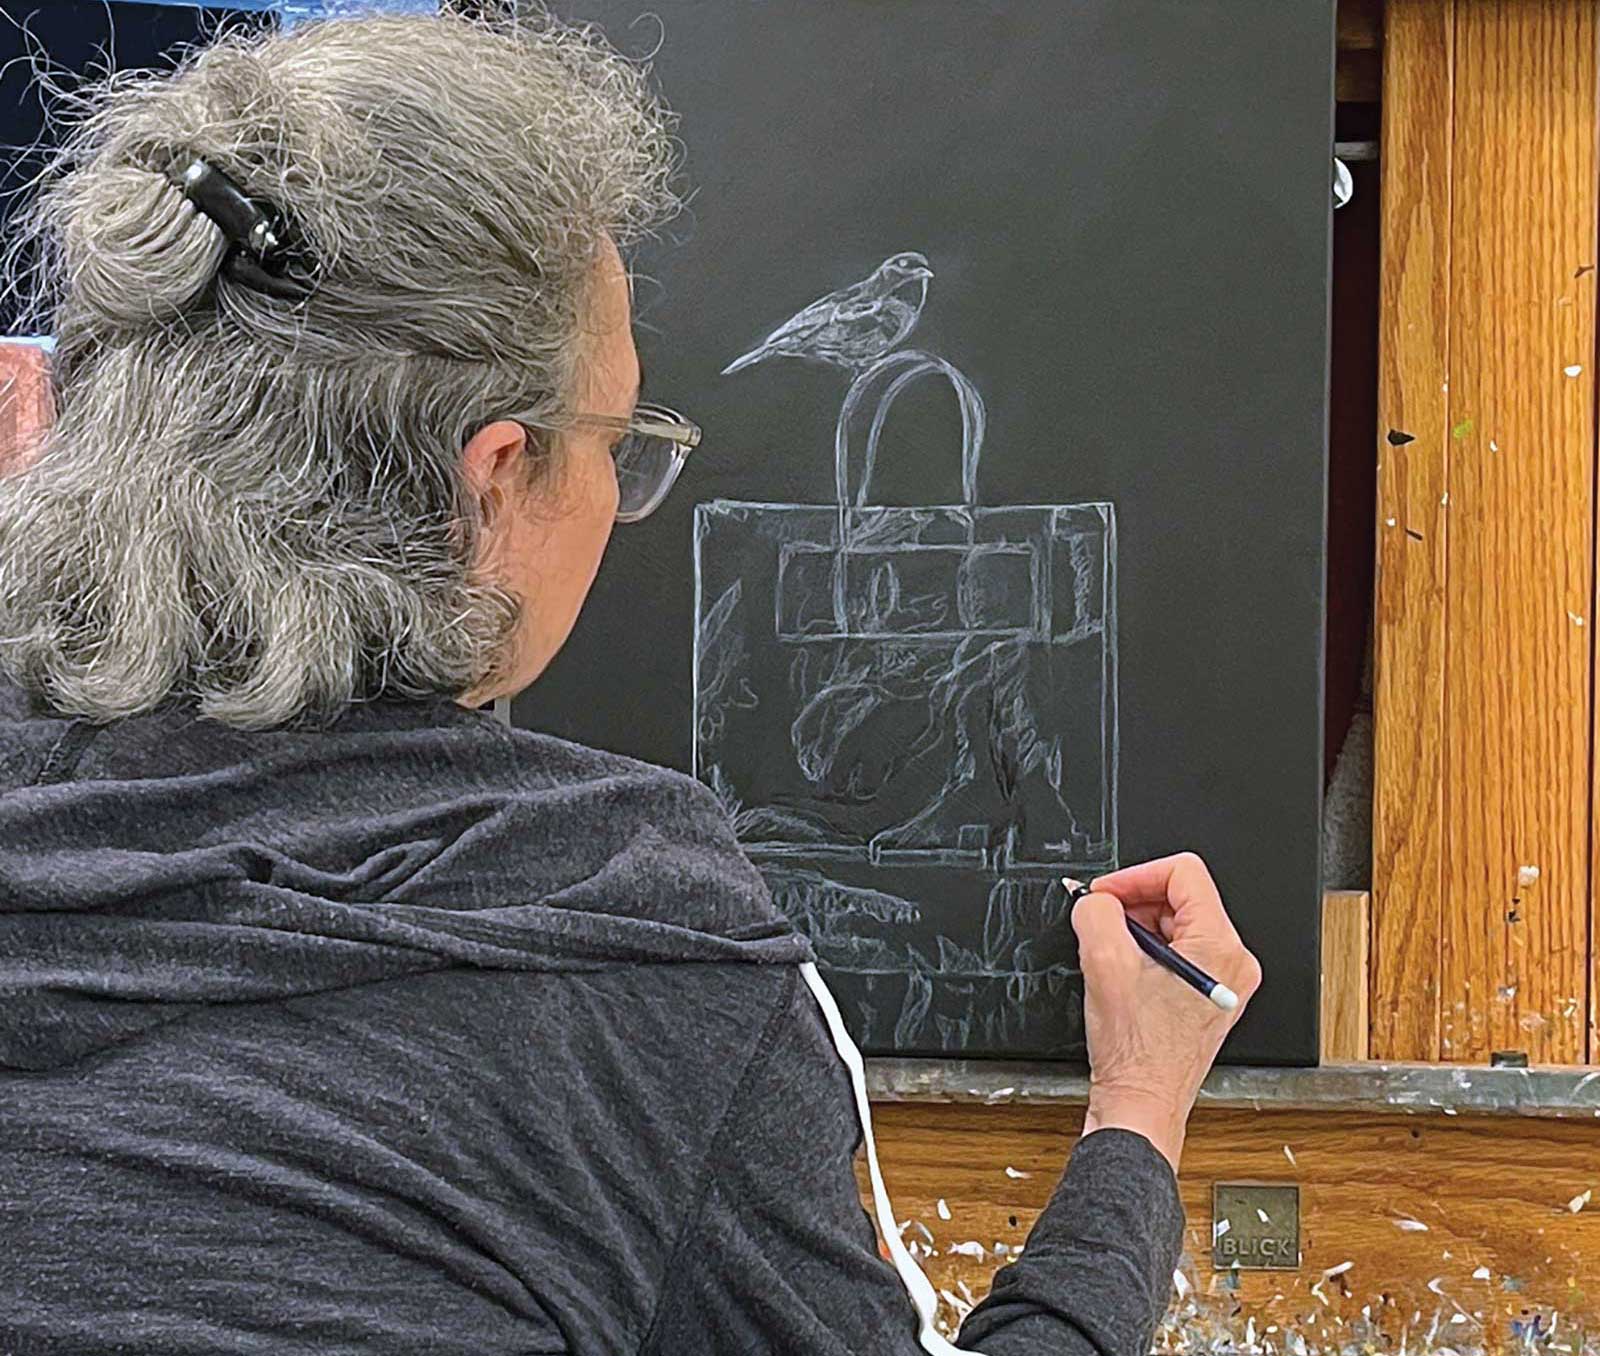
My compositions are created from my photography manipulated in Photoshop. This gives me the ability to combine my props with a variety of animals and birds.
Stage 2
Stage 2 Toning the Canvas
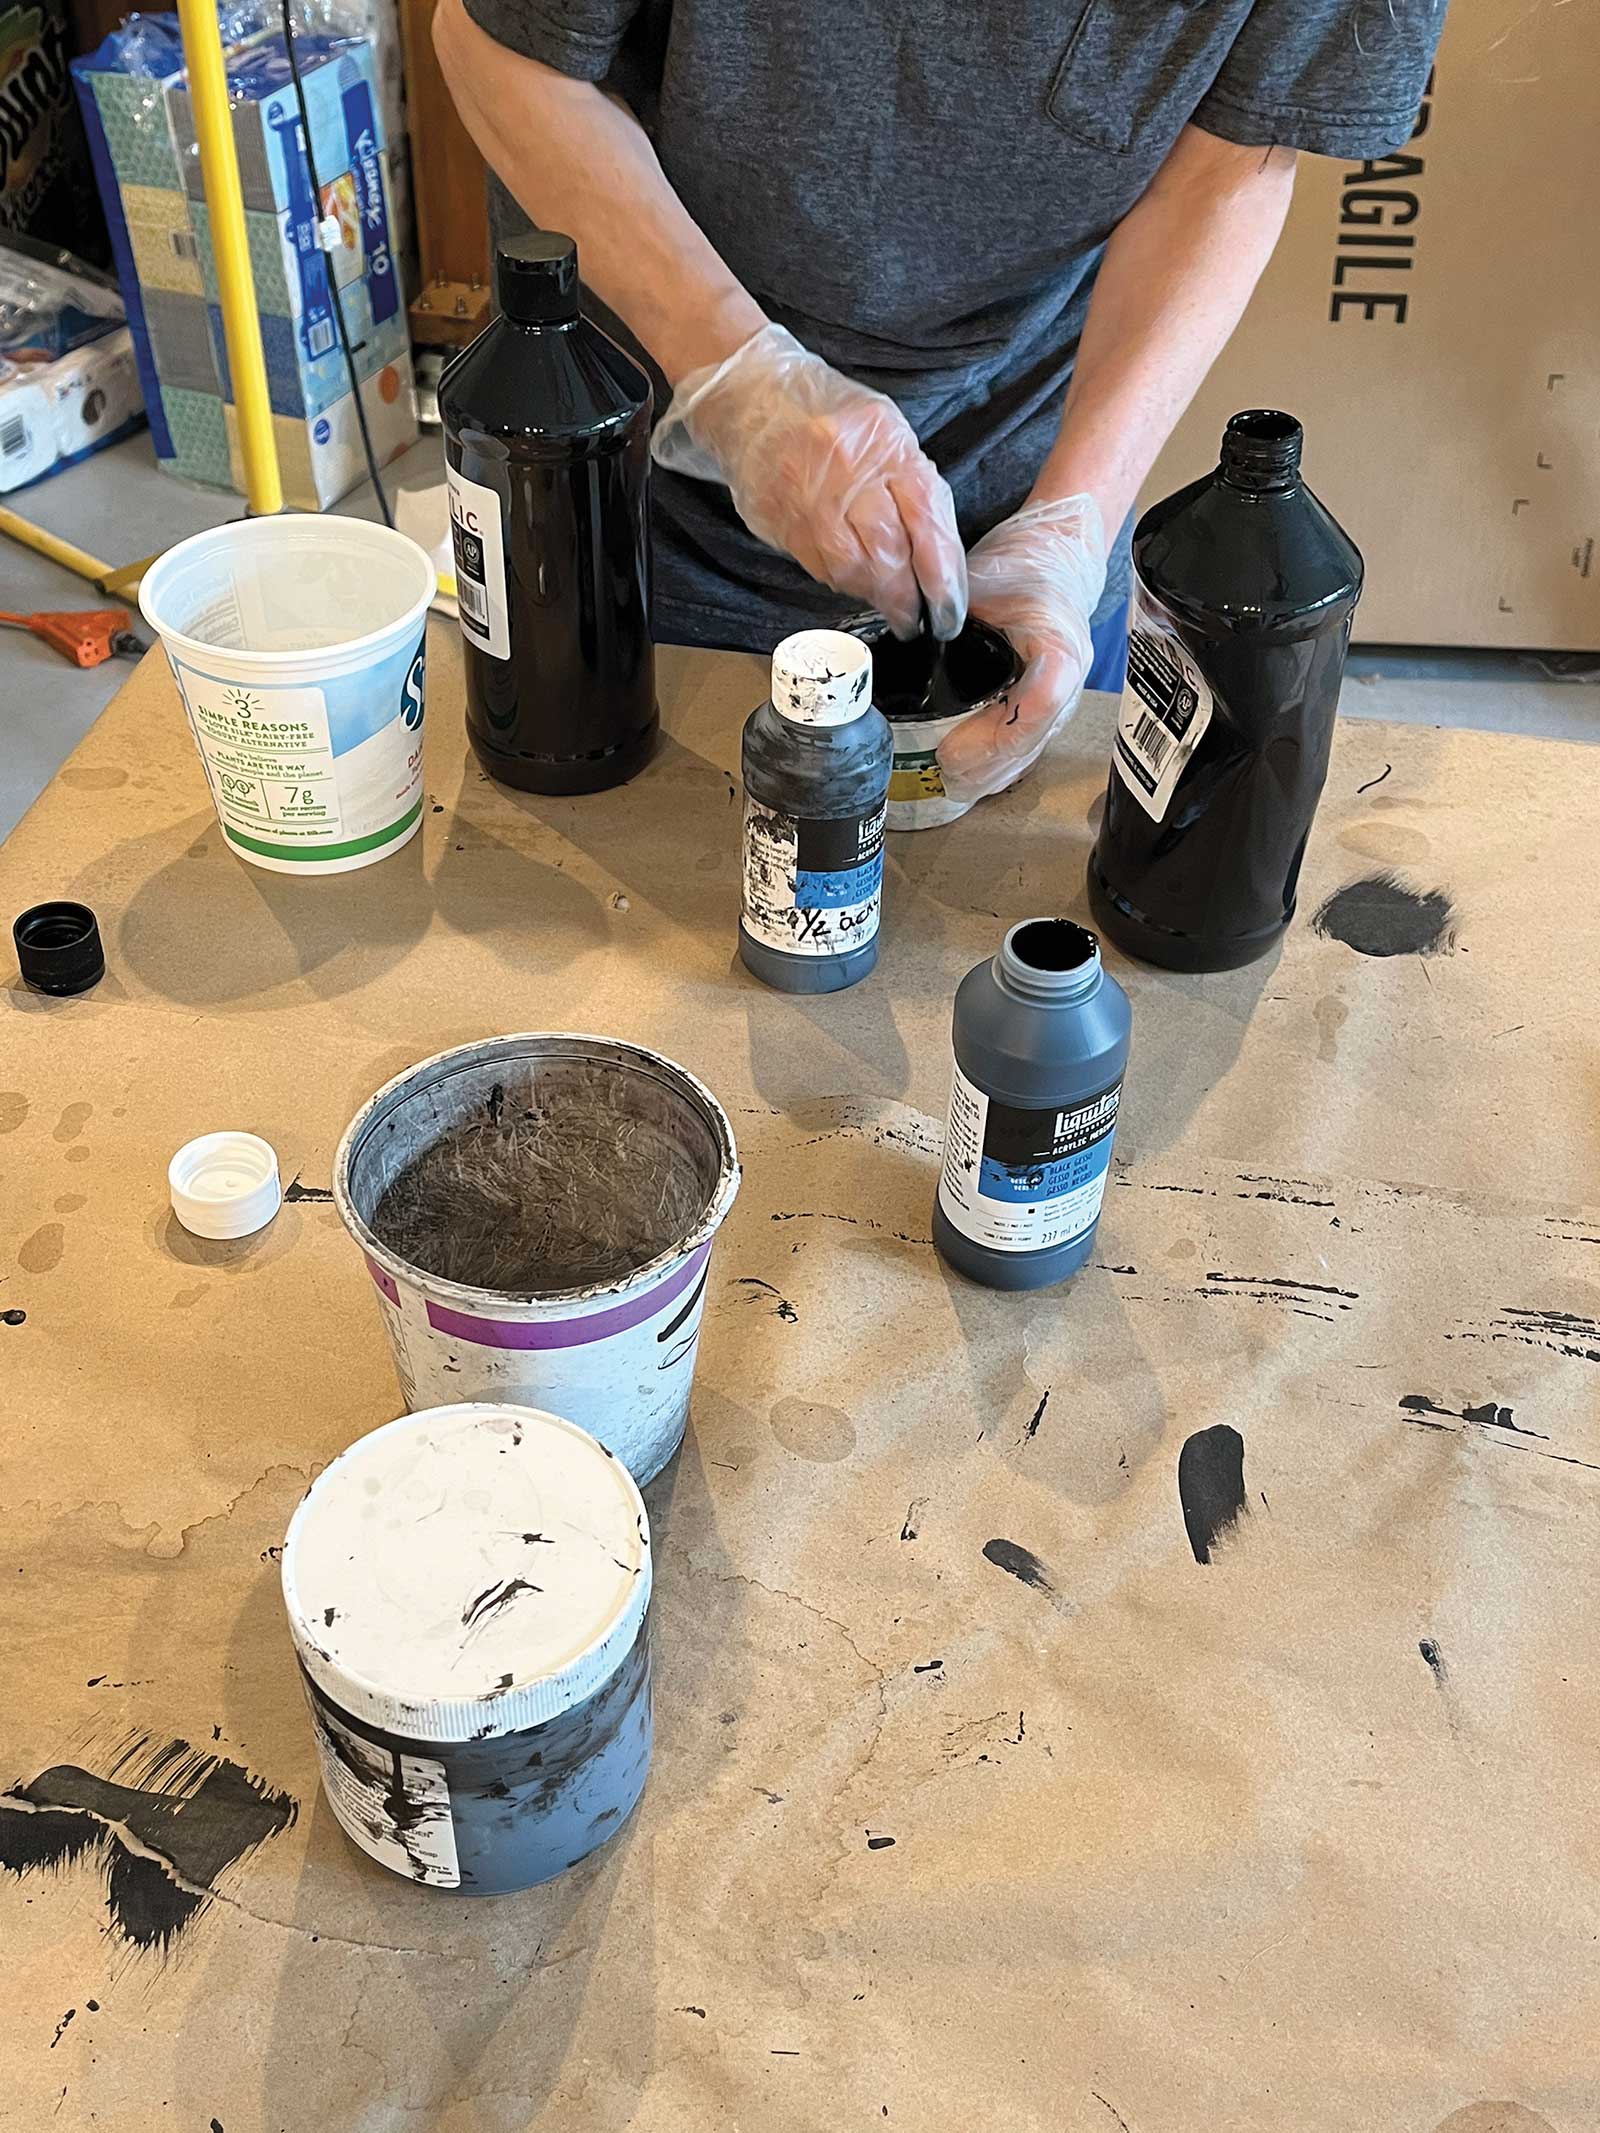
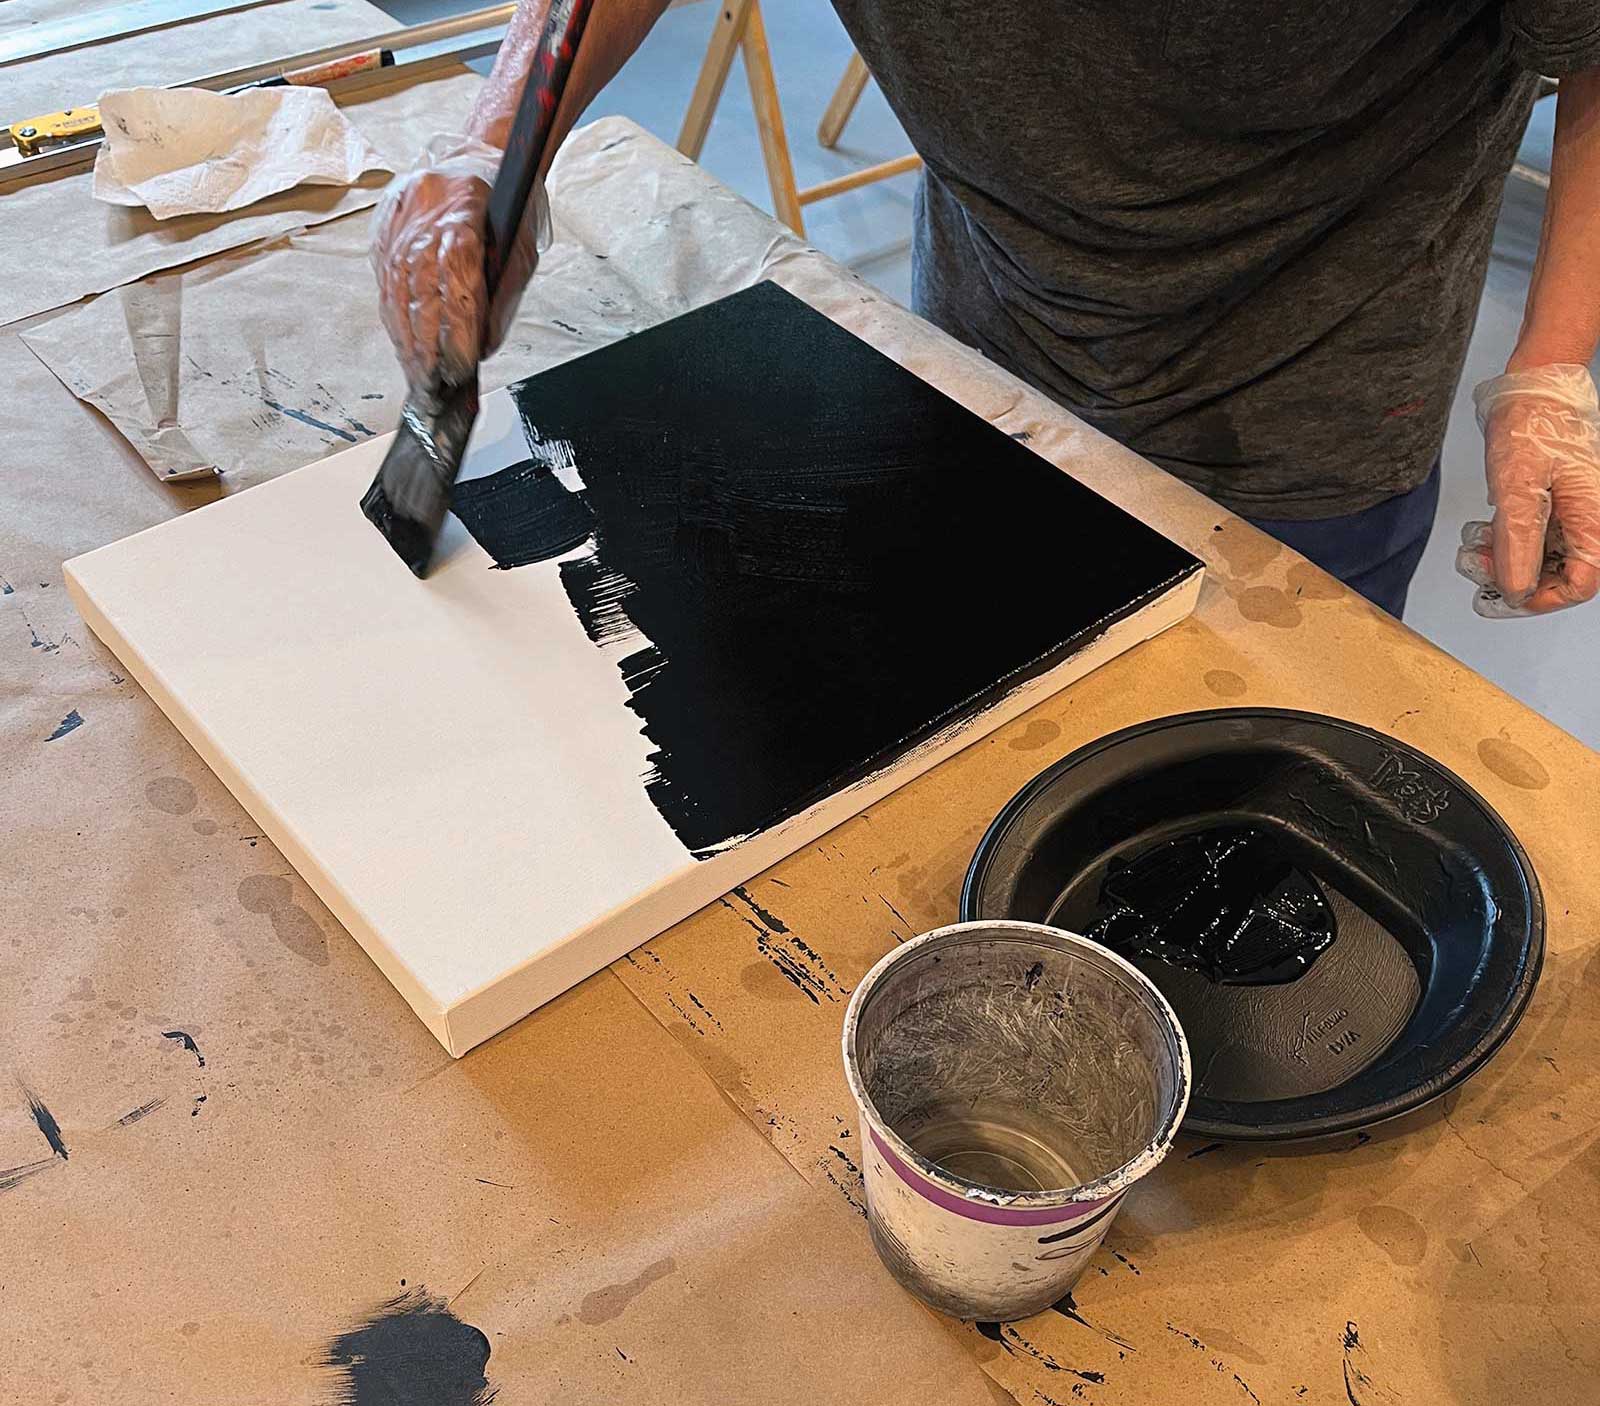
Late in my career I discovered that I liked painting on a black surface. I find painting on black does half the work for me. It was difficult transitioning from a neutral toned surface to black, but when I mastered it, I loved it. My black toning mixture has evolved over time. Currently I use a combination of Liquitex Black Gesso mixed 50/50 with black acrylic paint. I’ll add to that some Liquitex Slow-Dri Medium to retard the drying, and Liquitex Flow Aid, which minimizes brush marks and creates a more uniform surface. I follow the manufacturer’s instructions then let the toned canvas dry for 24 hours before I do the drawing.
Stage 3
Stage 3 Additional Prep
I like to work on a smooth canvas. The Fredrix Blue Label is one of my favorites, which I actually smooth even further by sanding with a high grit sandpaper prior to toning.
Stage 4
Stage 4 Simple Drawing
When I’m happy with my composition I’ll make a simple drawing on the canvas using a white watercolor pencil. If the drawing needs modifying I’ll use a medium, composed of a 50/50 mixture of Gamblin Solvent Free Gel Medium and Gamsol Odorless Mineral Spirits, which I refer to as my “magic eraser.” I apply this mixture to the area with a brush then gently remove the pencil marks with a rag. I also use this mixture as my standard medium when working on a painting.

Stage 5
Stage 5 Working from Composition on Monitor
I work from a composition viewed on my computer monitor. This gives me the ability to zoom in on a particular area for more detail or zoom out to see the entire image.
Stage 6
Stage 6 Applying Vibrant Color
When it comes to the paint manufacturer I have no particular brand loyalty. I just try to find the most brilliant colors I can. The one restriction I do employ is I usually avoid paints that are too thin or transparent.
Stage 7
Stage 7 Continuing to Mix Colors
Since I am self-taught, my method for mixing colors is unique in that I don’t really have a method. I just keep mixing various colors on my palette until I finally hit on what I’m looking for, then modify those colors on the canvas as needed if they aren’t quite right.
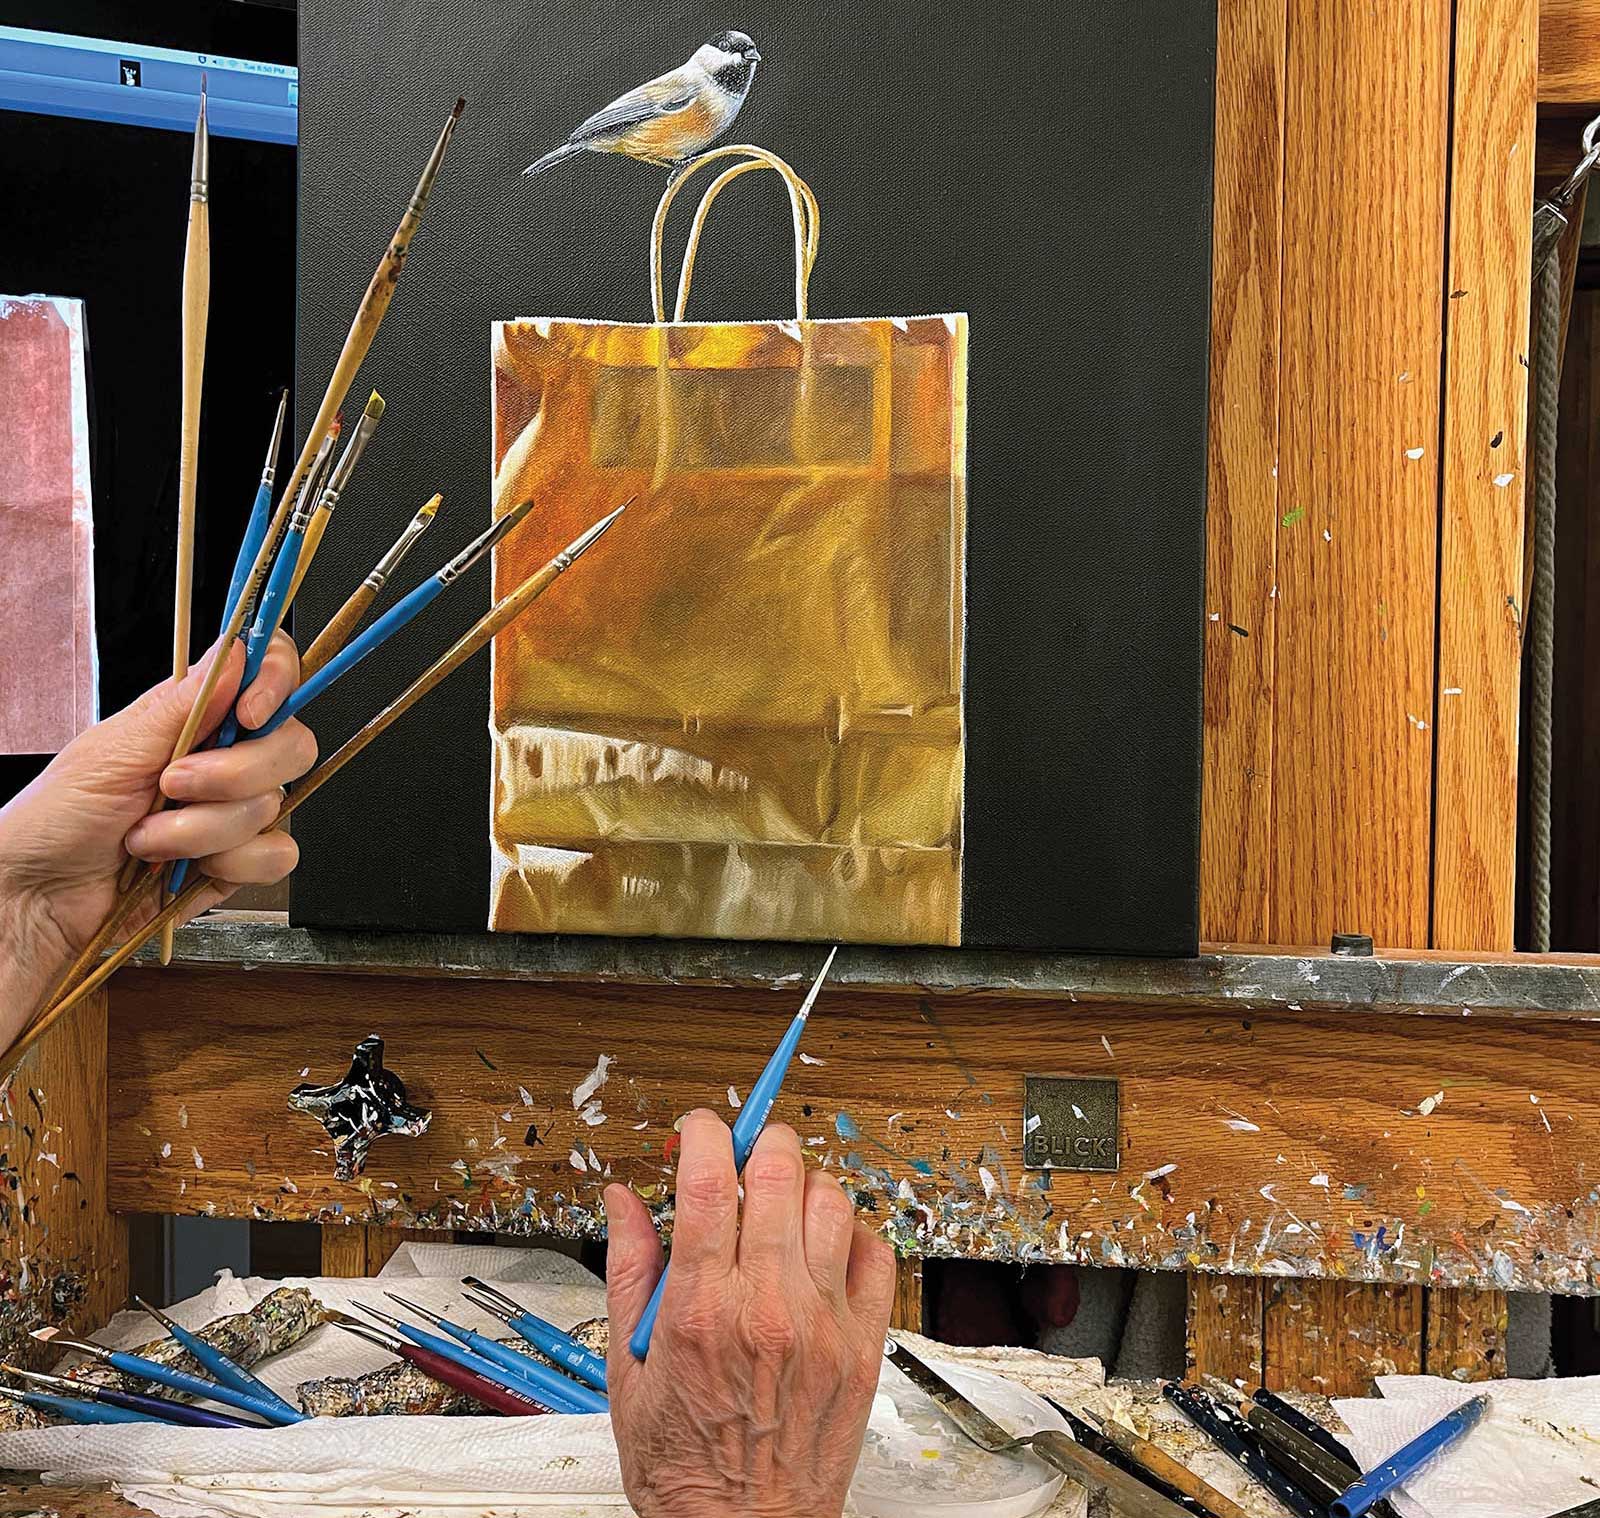
Stage 8
Stage 8 Brushes
I use all types of brushes. If I’m working on a detailed area like the latch of a suitcase I’ll use my small round brushes; for edges and straight lines I’ll use one of my angled flat brushes; and if I’m working on wood grain or specific patterns I’ll use one of my larger flats or rounds. I also never throw away a brush. I’ve found that they can still be used for a variety of techniques. I like to use a tapping motion for blending on the canvas, which gives me a lot of control.
My method for applying the paint to the surface of the canvas is, I think, unique. At least I’ve never seen it used by anyone else. Rather than clean my brush each time I change colors, I assign a brush for each color and use it only for that color. That means I can have many brushes in my left hand at one time. I’m not sure how I do it, but I can intuitively pull the appropriate brush out of my hand that is loaded with the color I need. This not only speeds up the painting process, but it also keeps each color pure and un-muddied by contact with other colors. I think this method may have been born out of 15 years working with pastels and having to keep track of multiple individual sticks at any one time.

Stage 9
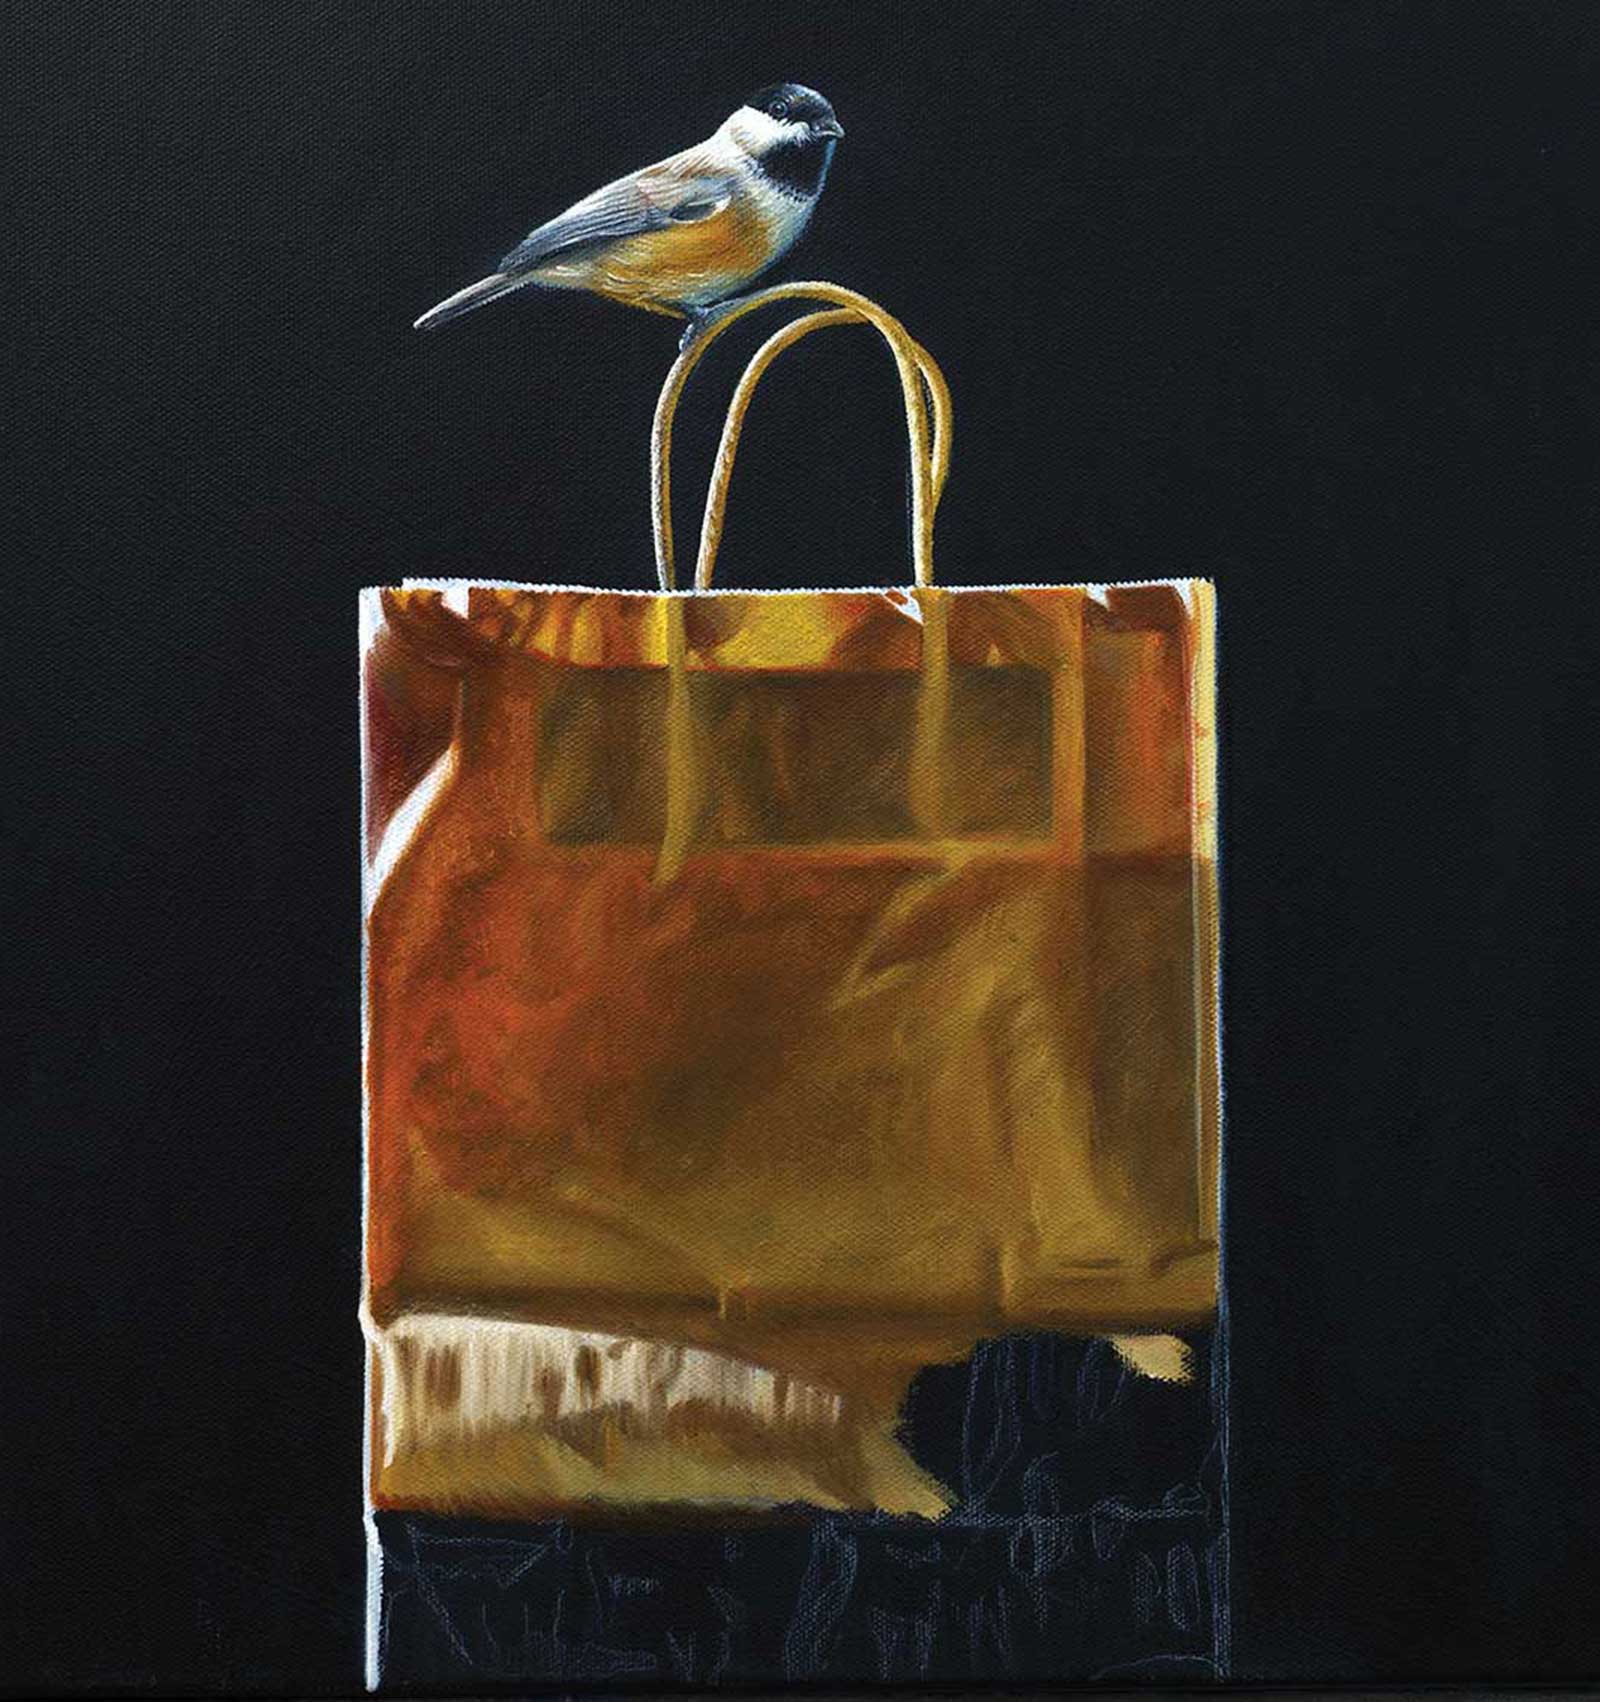
Stage 9 Finished Artwork
Sack Lunch, oil on canvas, 18 x 14" (45 x 35 cm)
As I mentioned earlier, I work from the upper left corner of the canvas to the lower right, and as I progress I’ll try to get the underpainting as close to a finished painting as I can. This painting took four days to complete the underpainting. At this point I’ll set it aside to dry for three to five days.
When I bring it back to the easel for the second layer, I’ll once again start at the top left and begin the correcting, blending, glazing, softening and sharpening until I feel it’s complete. This image shows the final painting. After that, I’ll wait as long as possible for the painting to dry before I varnish. This can occasionally be cut short if time pressures are involved, but never less than 10 days.
About the artist
 Karen Hollingsworth
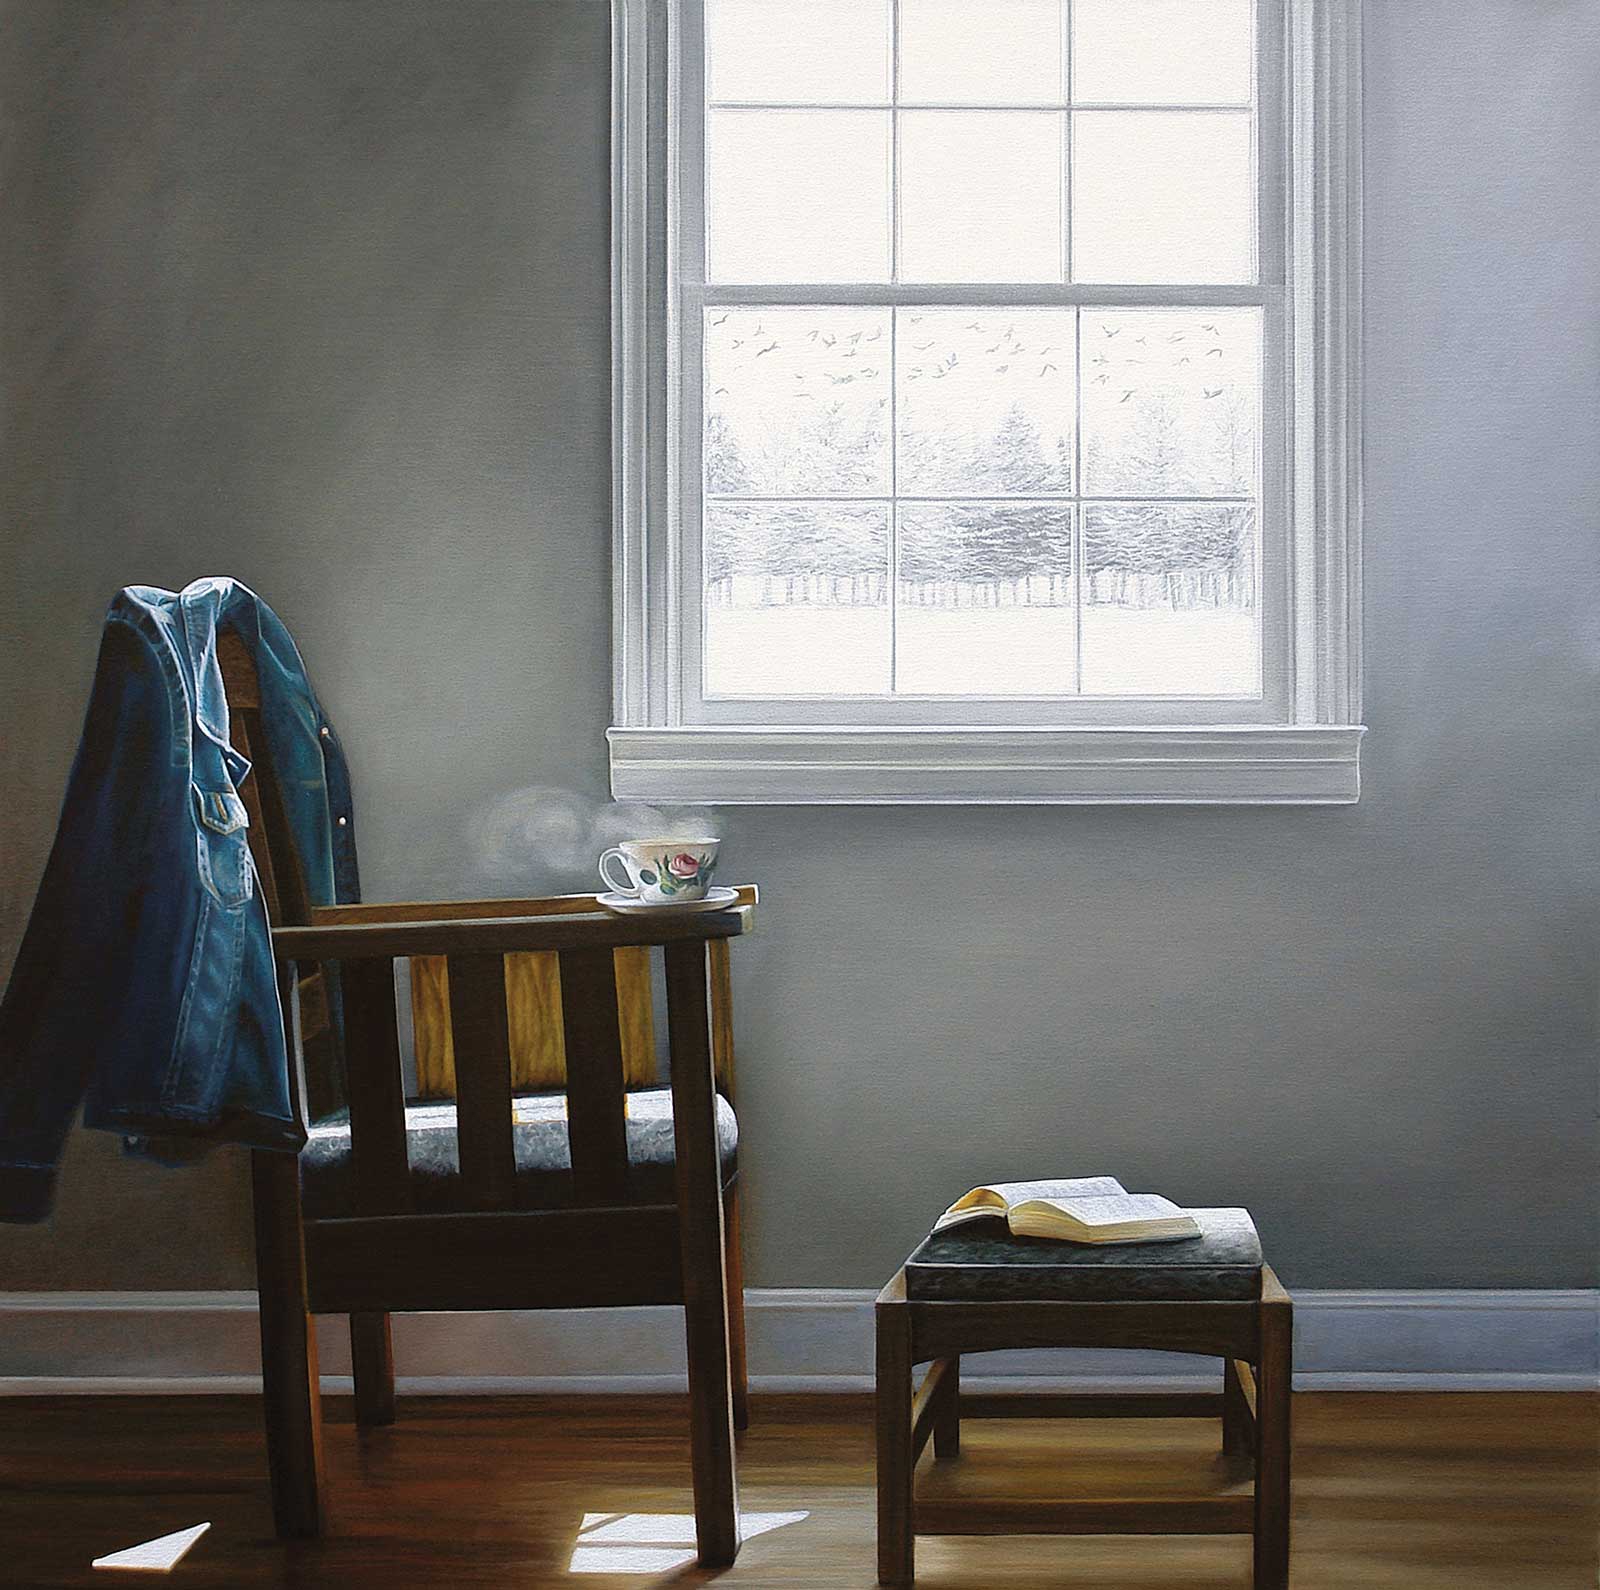
Karen Hollingsworth is known for her unique light, airy WindowScapes. In the past the artist painted interior spaces; now she includes an open window that acts as a portal into the space beyond. Her large oil paintings often depict subject matter that is fairly minimal, like chairs and ordinary interior settings, however what attracts many viewers is the mysticism evoked by the movement of the air and the ocean breeze through the curtains.
For Hollingsworth, a painting is about the feeling it evokes. Although there are no figures present in her WindowScapes, it is difficult to deny the implications of vacant chairs in such an empty space. She is interested in creating the “impression” of looking through a room and seeing the world outside. “I love to create paintings that evoke a sense of the familiar,” says Hollingsworth. “My goal is to blend the common objects of everyday life, within the interior of a room, then add a glimpse of the ocean or a mountain range through an open window. My WindowScapes are intended to provide the viewer with a sense of solitude and well being. A comfortable world bathed in sunlight and warm breezes. For me, a painting is successful if I wish I were there.”
Represented by
Principle Gallery, South Carolina, USA, www.principlegallery.com
Tree’s Place, Massachusetts, USA, www.treesplace.com
Shain Gallery, North Carolina, USA, www.shaingallery.com
Contact at
www.karenhollingsworth.com