


I only draw or paint what I see—nothing added and, usually, nothing taken away. Being an artist who focuses pretty much only on the natural world means I’m never going to be stuck for inspiration in terms of color, texture and shapes. Every drawing presents its own set of challenges and the inspiration for it can come from just about anywhere and anytime. I have focused on birds and wildlife for many years now, after trying to do looser work and using other techniques. I soon realized that I much preferred to produce accurate, detailed drawings of subjects.
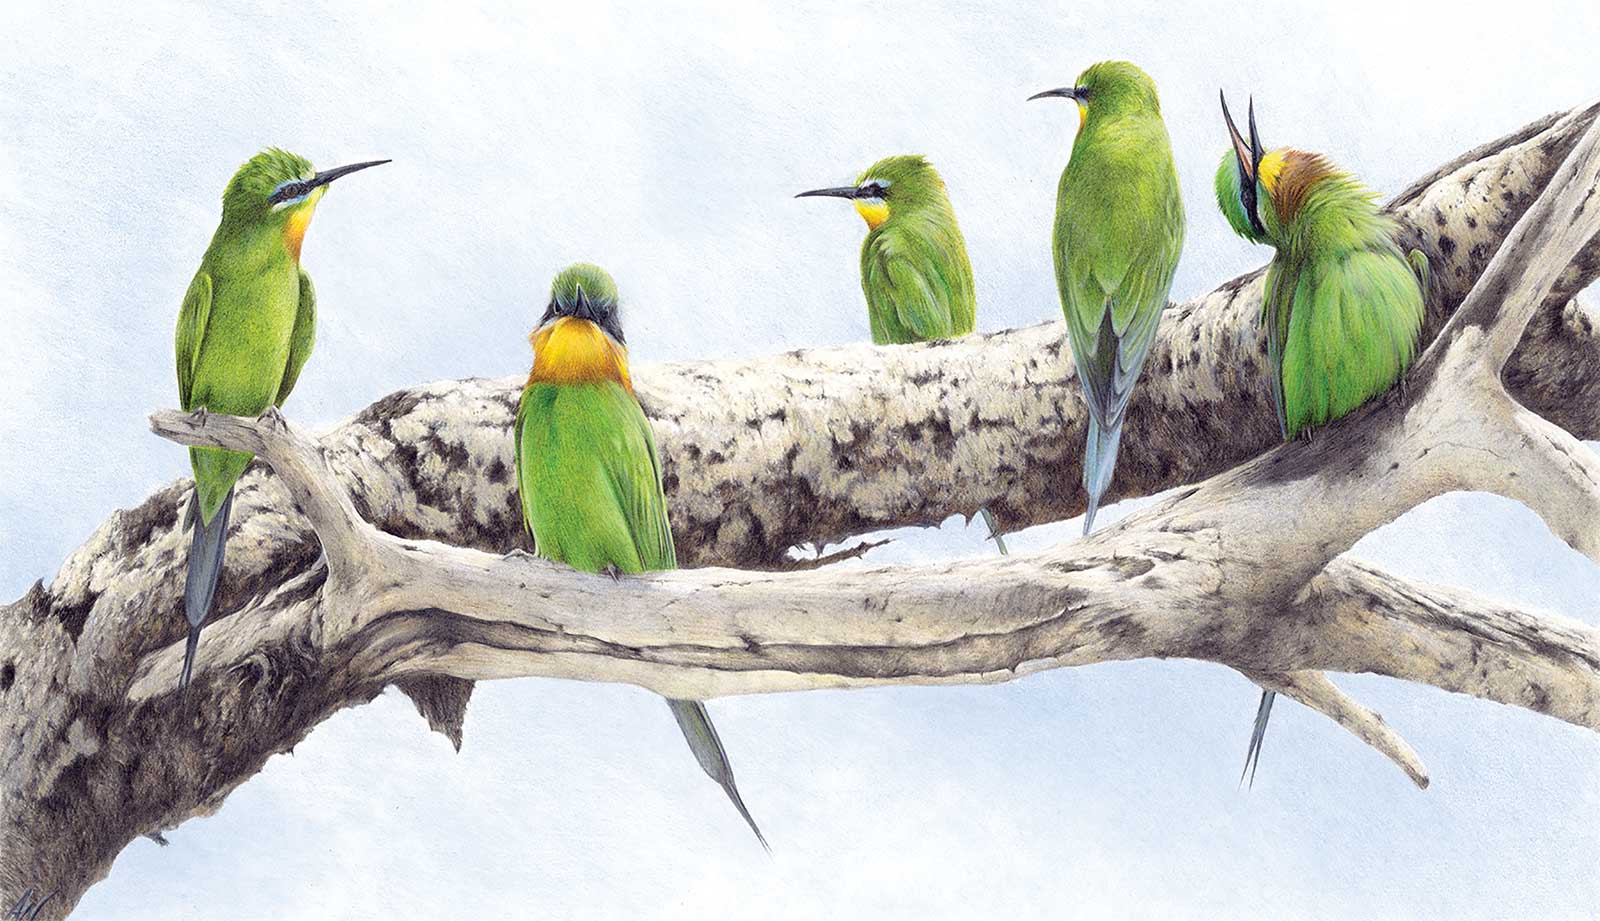
Blue-cheeked Bee-eaters, Faber Castell Polychromos pencils, 13 x 22" (33 x 55 cm) On a trip to Tanzania a few years back, it was wonderful to sit and watch these amazing (and noisy!) little birds as they flitted back and forth near a waterhole catching insects in the warm African sun. This drawing is the result of my many photos to create a composition that conveyed the life and behavior of these colorful birds.
Initially, I produced work using only graphite. My ability with color and paintbrushes was virtually non-existent. I had tried to teach myself how to use watercolor, but this proved to be a frustrating time until I was lucky enough to meet another artist who was happy to sit me down and unravel the mysteries of the medium. I had always tried to approach my art from different and hopefully creative and unique ways. The addition of color proved very helpful along the way.
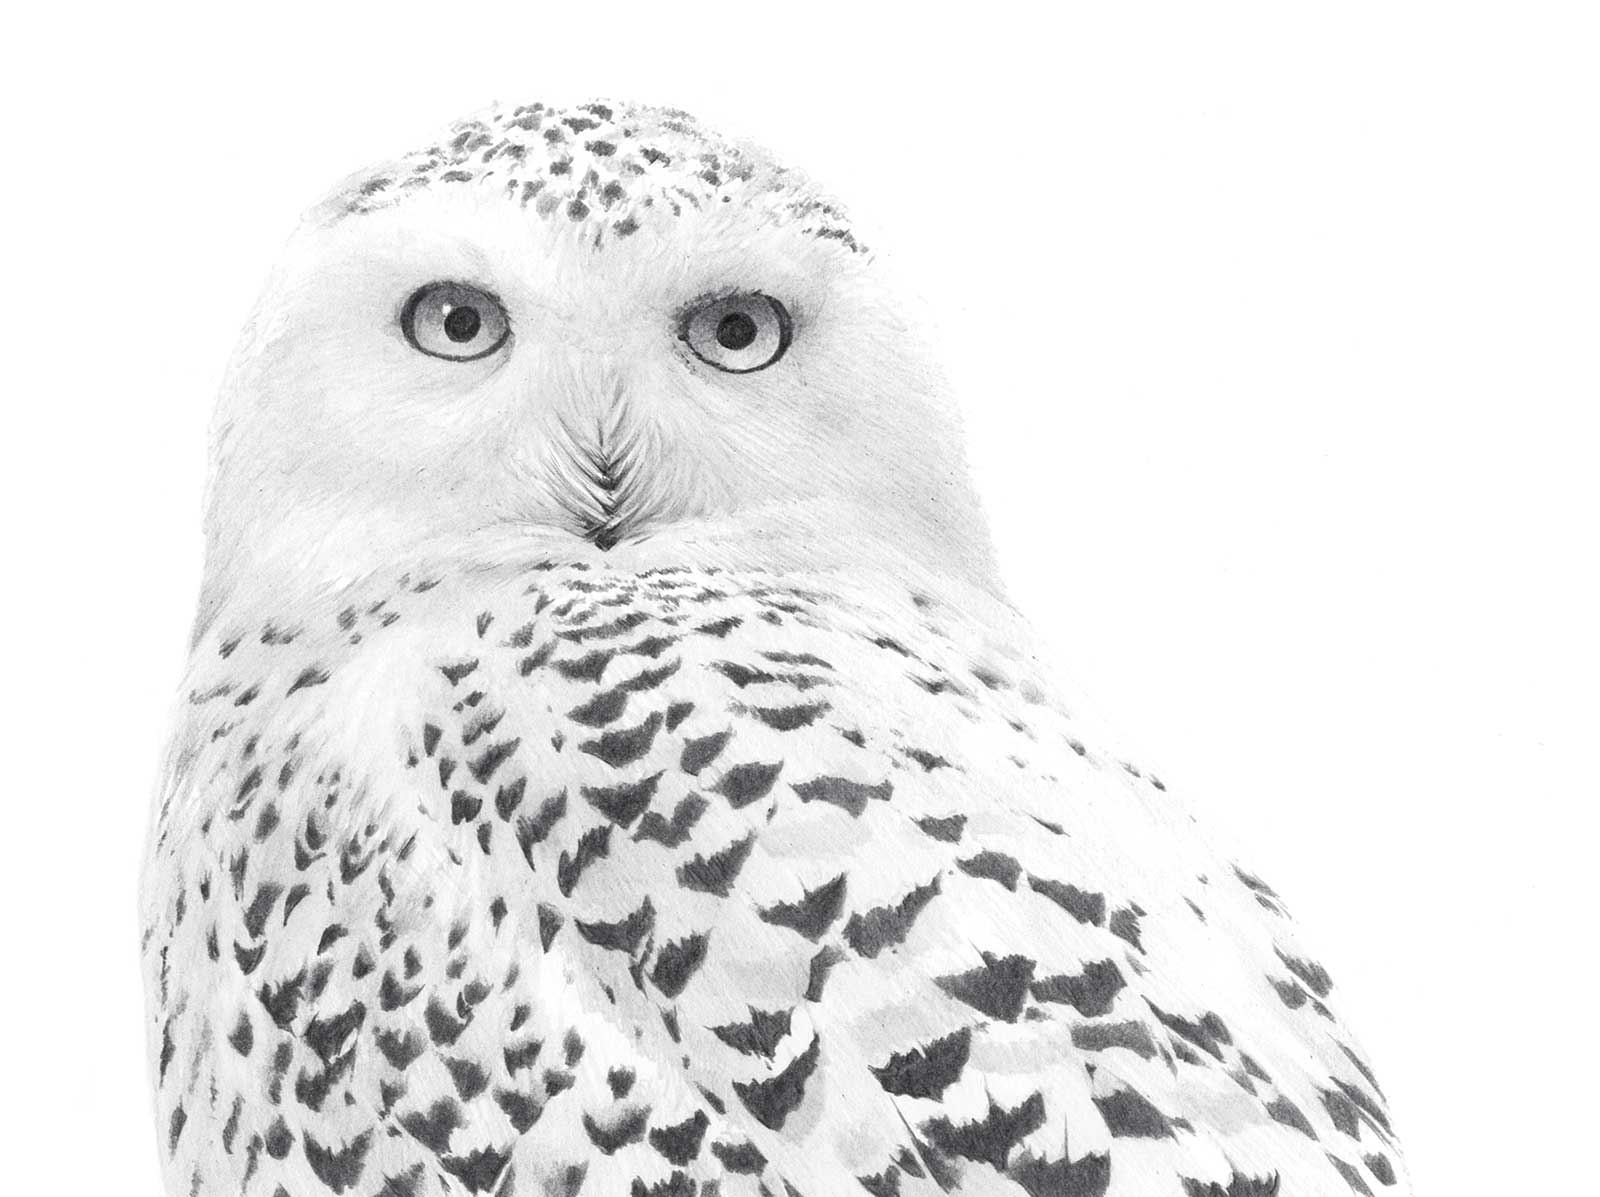
Snowy Owl, Grafwood pencils, approx. 5 x 7" (12 x 17 cm) I had planned this snowy owl portrait for some time but on a much larger and grander scale. However, I then realized that a bird with this much presence could work on any scale. The temptation to use color for those eyes was strong but in the end layers of graphite won the day, which I feel ultimately made for a more realistic image.
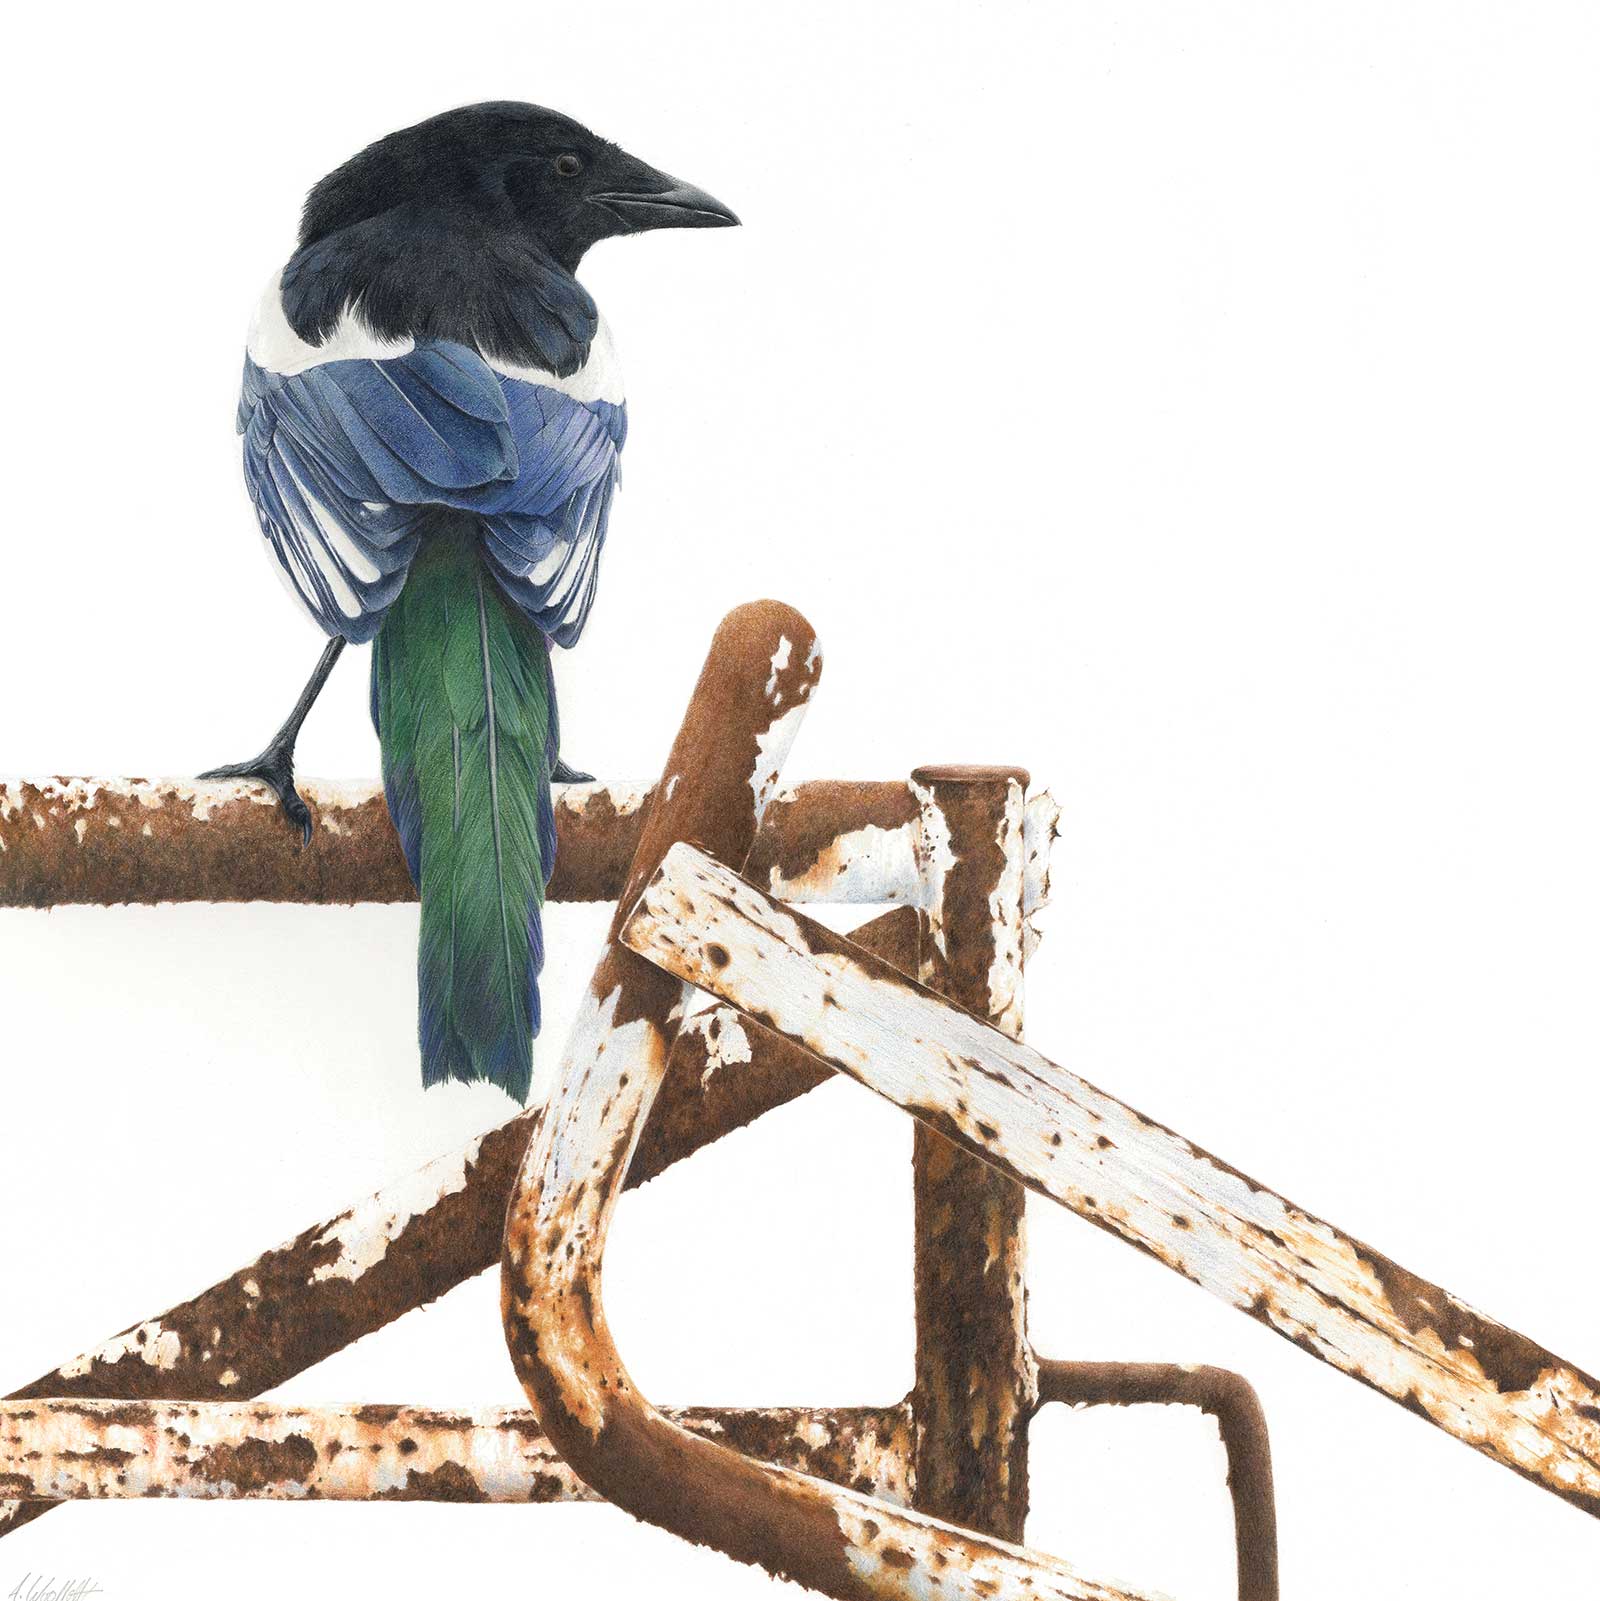
Magpie on a Gate, Faber Castell Polychromos pencils, 19 x 19" (48 x 48 cm) Sometimes the idea for a drawing can take a while to come to fruition and other times it can literally appear in front of you! I have cycled past this gate many times, and the allure of the rusty metal has always attracted me. On one of these trips, I rounded the corner to meet a splendid magpie surveying its territory. Needless to say it promptly took flight upon seeing me. Thankfully I had reference material to turn to and the picture here pretty much captures my encounter.
I have been a keen birdwatcher for many years now and spent a lot of time sitting around in cold weather with a sketchbook and telescope trying to sketch them. This often forms the backbone to a drawing. A sketch or the quick gestural mark made on paper with a pencil can prove to be the seed for a composition.
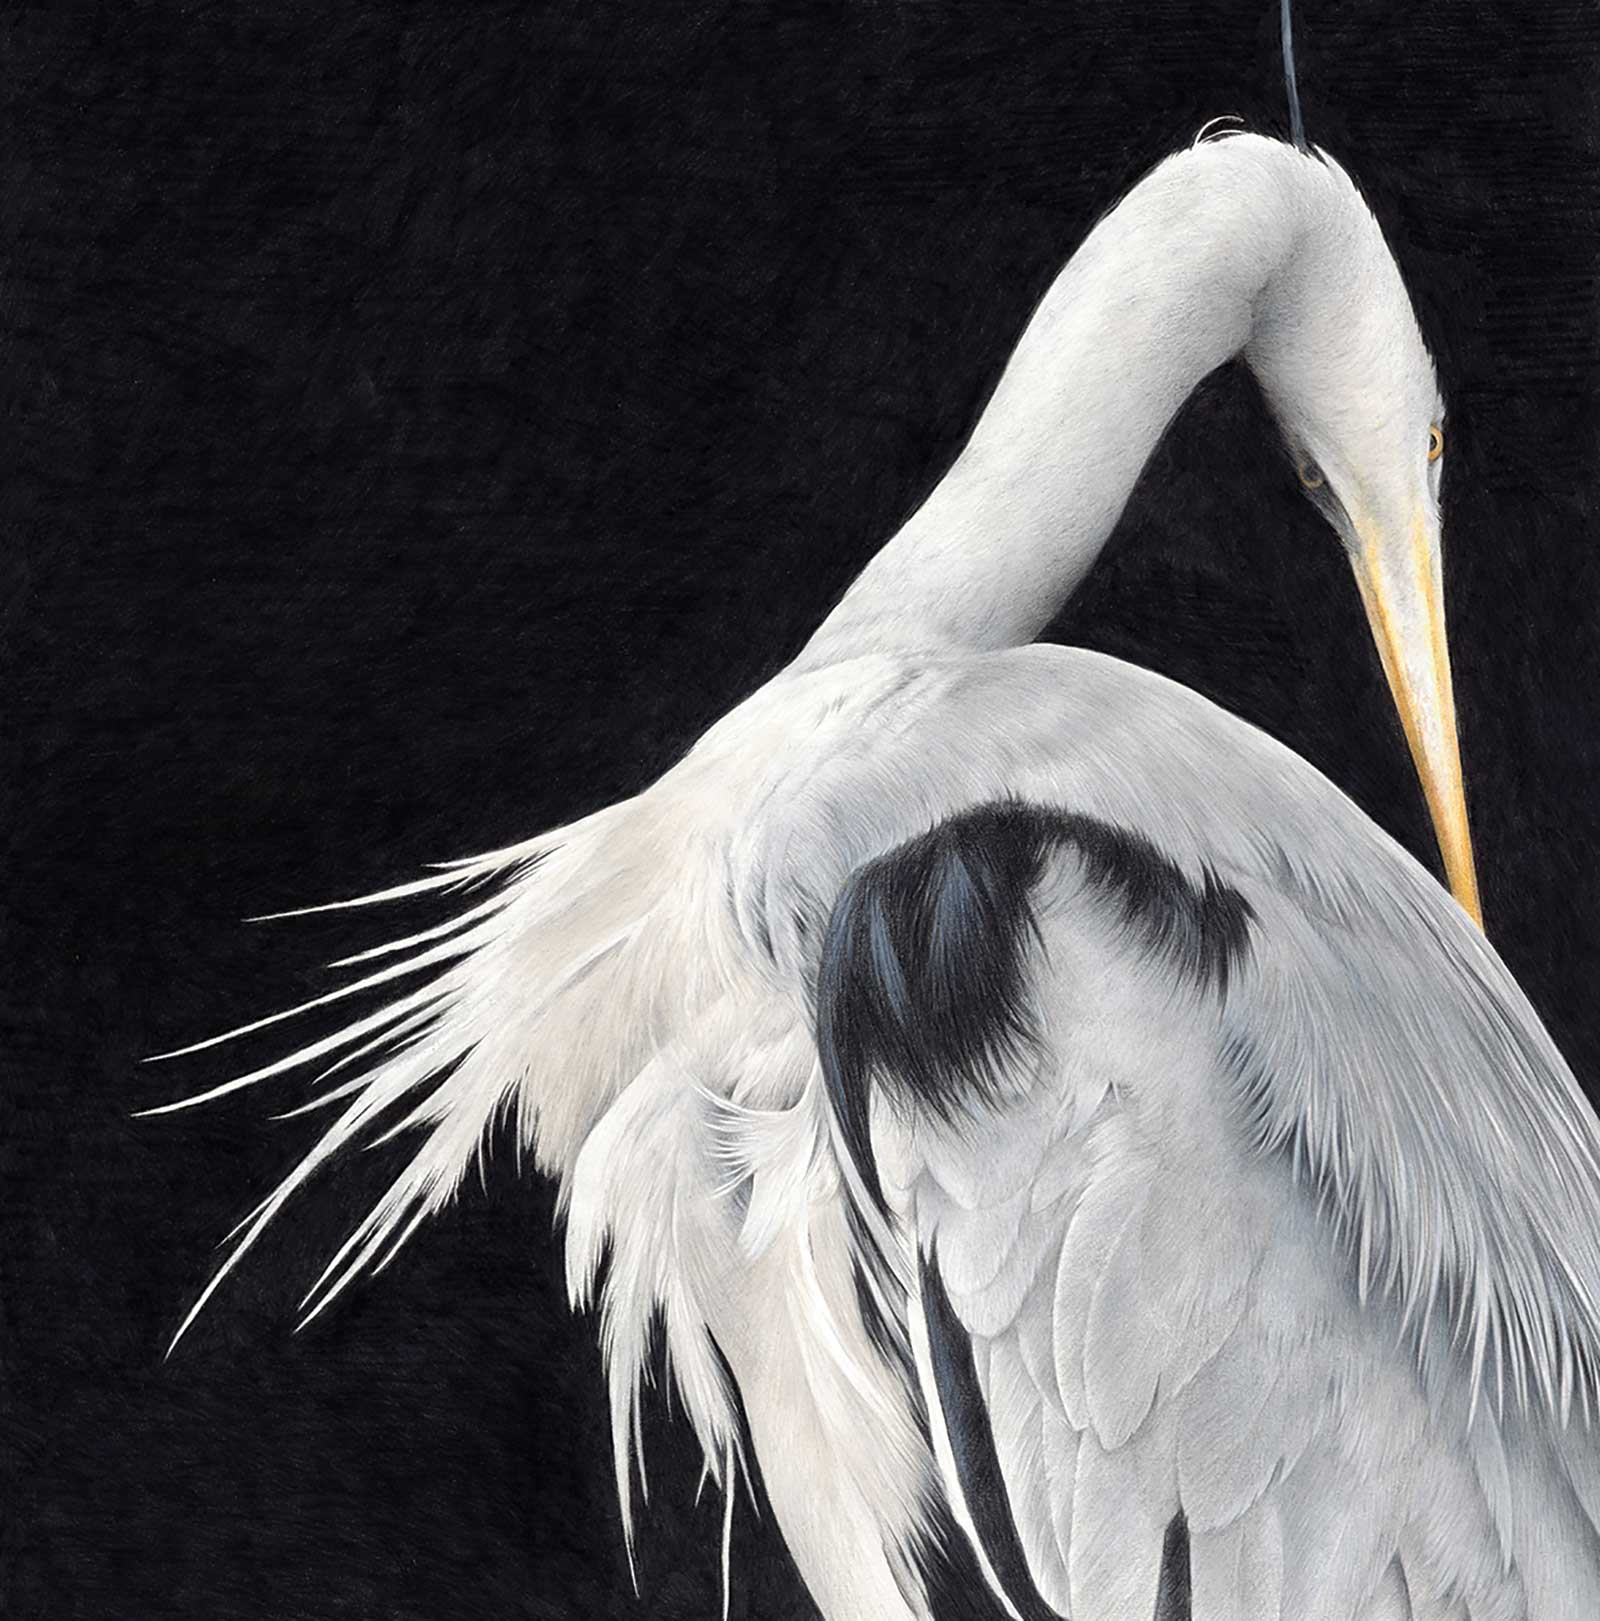
Preening Grey Heron, Faber Castell Polychromos pencils, 19 x 19" (48 x 48 cm) Here is a bird with a dagger-like bill and a reputation as a ruthless killer. And yet it is almost poetic in its elegance and form with those long legs and snake-like neck. I opted for this more unusual pose and composition to invite interpretation. I hope to convey the bird’s elegance and the soft beauty of its plumage. By using a black background, there is nothing to distract the eye from the bird’s wonderfully fluid shape.
I spent two years at college studying graphic design in the 1990s, and the most important thing I learned was to shape an idea in your head into a piece of art with good design and composition. Hopefully this leads to me creating art that is inspiring and successfully conveys my ideas. My main medium of choice at the moment is colored pencil, although watercolor painting was very therapeutic and a wonderful learning curve, but I began to feel more comfortable when I was adding detail on top of the painting with a pencil. It refreshed my enthusiasm and sparked a more fulfilling creative thought process, which was welcome after a spell of artistic frustration.
My Art in the Making Spoonbill Study #1
With my drawings I try to convey to the viewer the sheer beauty of birds. They come in many shapes and sizes including the gloriously crazy-looking spoonbill you see here. I like to bring people’s attention to those birds that won’t ever win a beauty pageant—the ones with unusual features. And then, when I have chosen a subject, I will begin the process of working out a composition that hopefully conveys the character and charm of the bird. This involves drawing a series of thumbnail sketches to try out different positions. This process can take anywhere between an hour or, if it is a particularly complex idea, even a few days.
The spoonbill drawing has undergone a fair amount of cropping as I wanted that bill to play a prominent role in the peace. As is often the case, I have chosen to leave out a fair amount of the bird’s body and legs. With a drawing such as this, I start with the face and tend to work outwards from the bird’s eye and surrounding area. This will usually serve to give me confidence and a feel for the direction I would like the drawing to go.
I tend to build up the layers of color lightly in my drawings, gradually adding layers of color by using more pencil pressure, a technique transferred from my days doing watercolor. This technique is also used to build up the colors and form of the bird’s body. However, on a larger piece such as this I tend to work on just a few feathers at a time, building up the layers of color. This can be a rather slow process. I resist the urge to overwork each feather, as a bird’s form and bulk is the result of many feathers. This is what I want to show.
 Stage 1
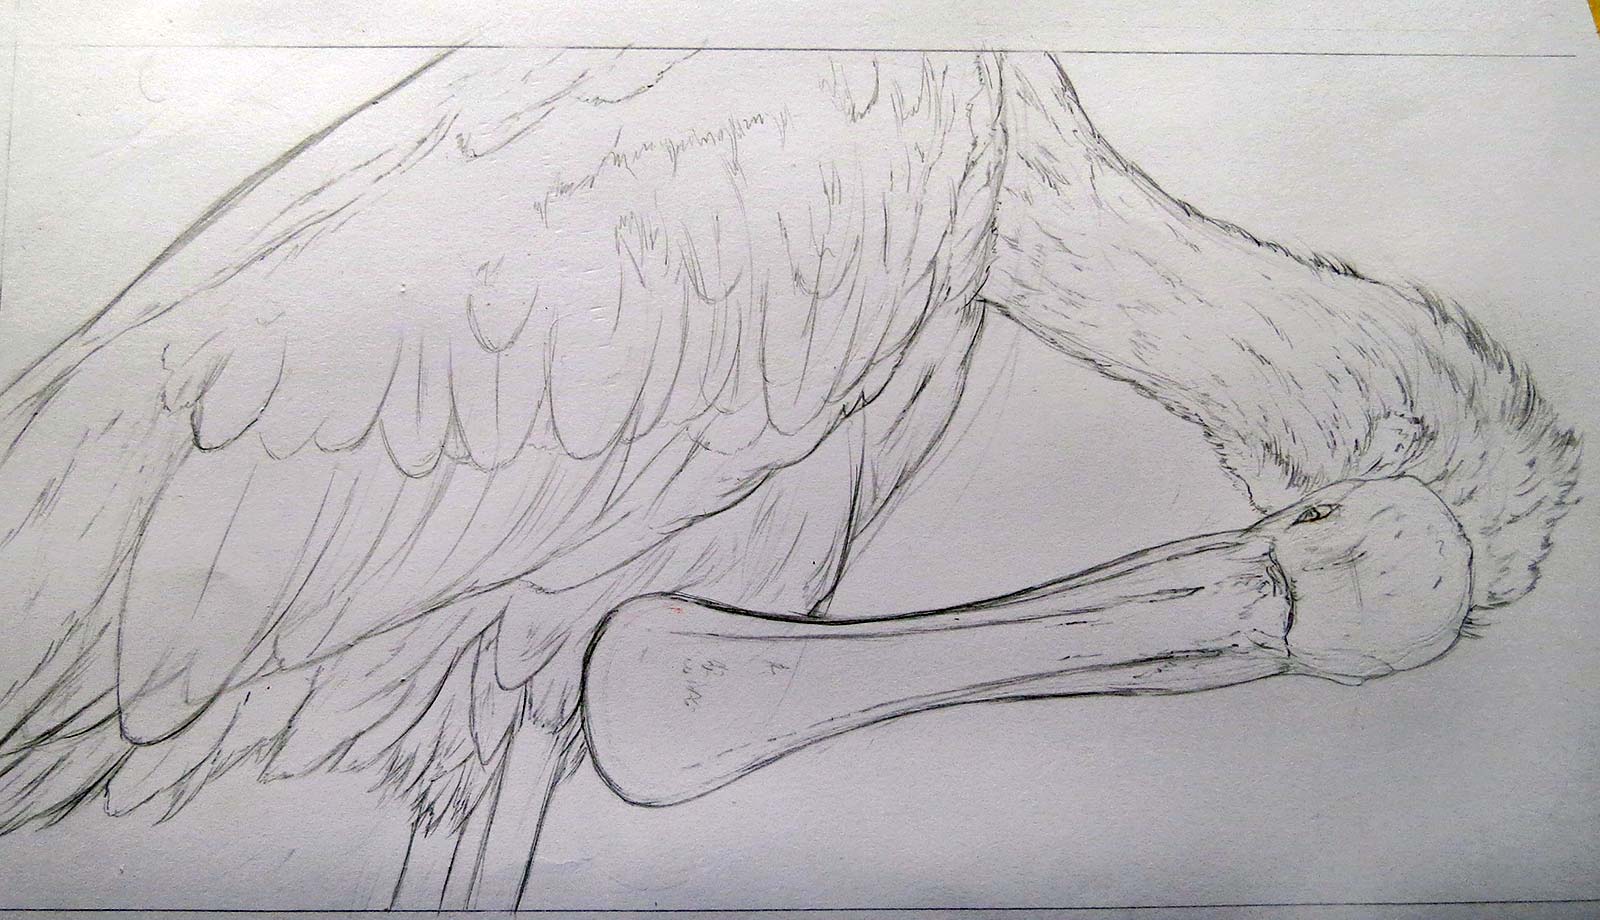
Stage 1 Sketching the Composition
The first stage of my drawing is to sketch out my composition. This involves lots of drawing, erasing and re-drawing to produce an accurate layout. The next step is to transfer my image using tracing paper. This approach works because too much drawing and erasing would soon damage the surface of the watercolor paper I use for my work.
 Stage 2
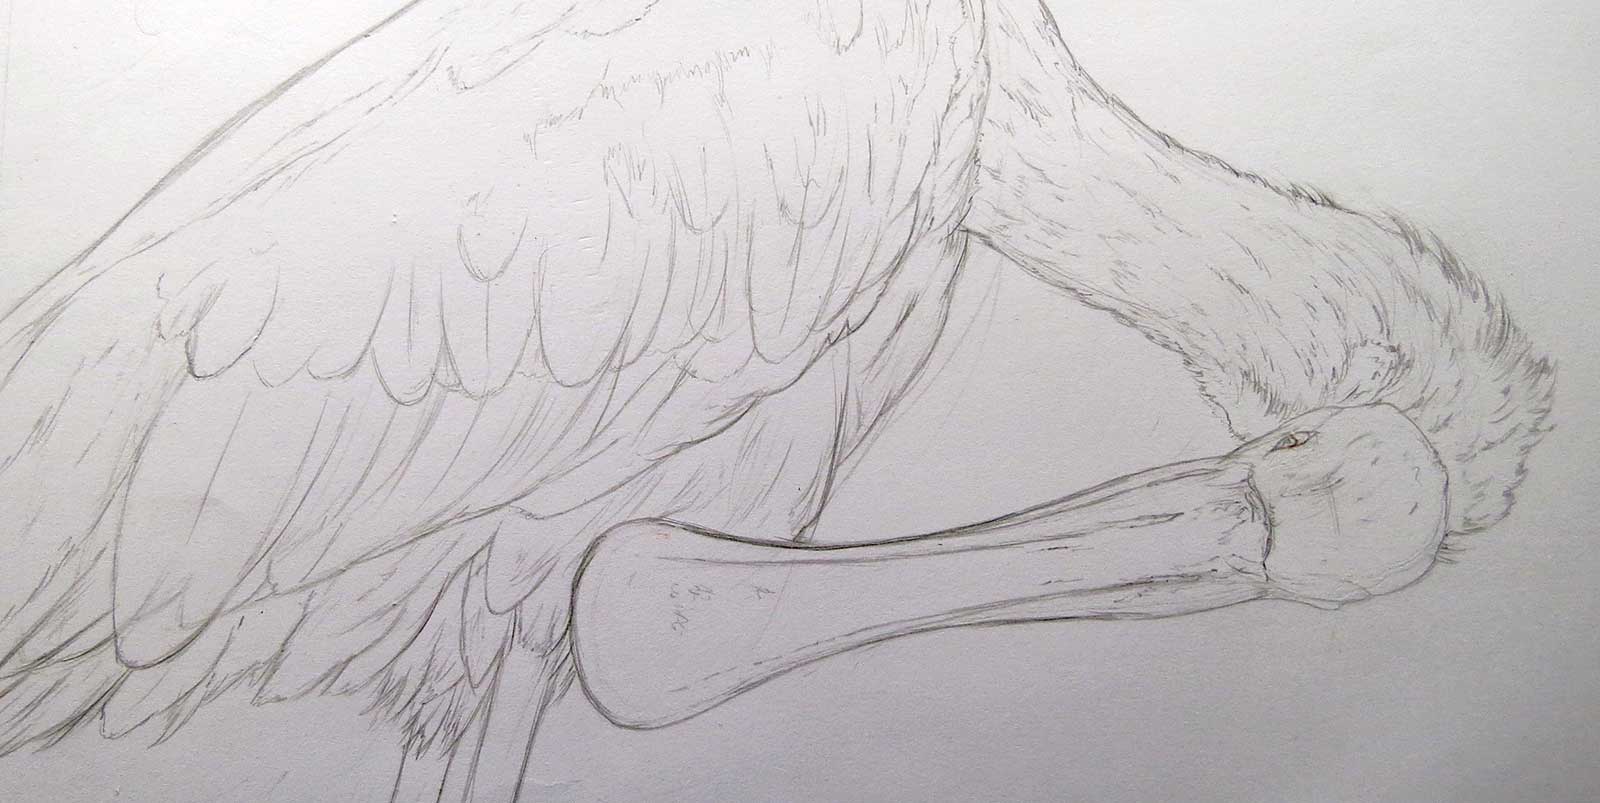
Stage 2 Darkening the Drawing
Once I have transferred my drawing to the paper, I gently redraw over the lines to make the drawing easier to see. As I begin to add color, I gently lift off my graphite outline by dabbing at it with a small piece of putty rubber.
 Stage 3
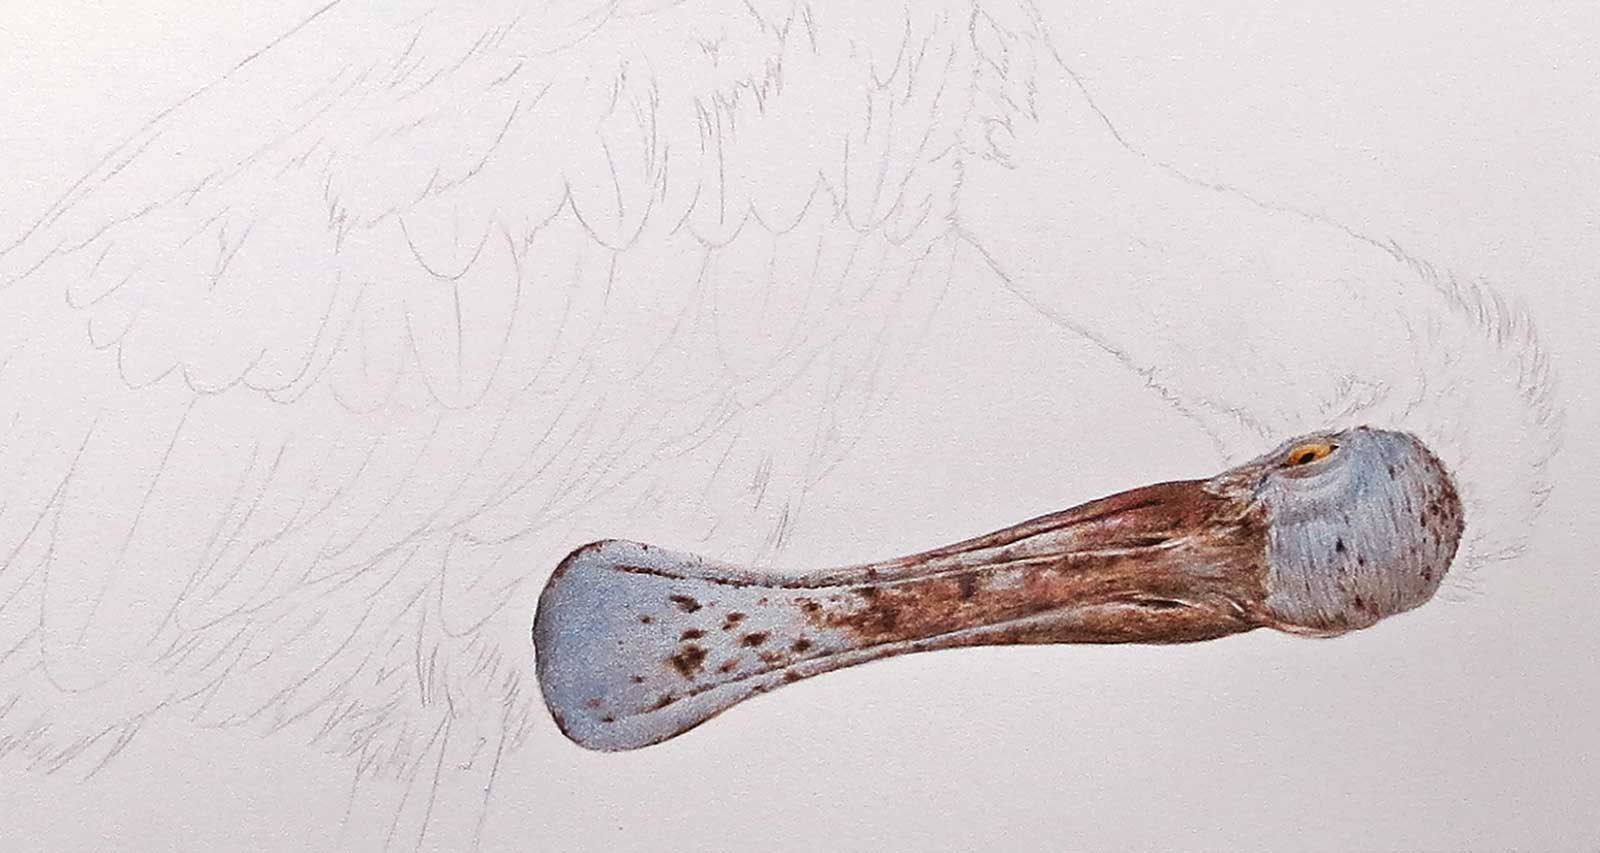
Stage 3 First Few Colors
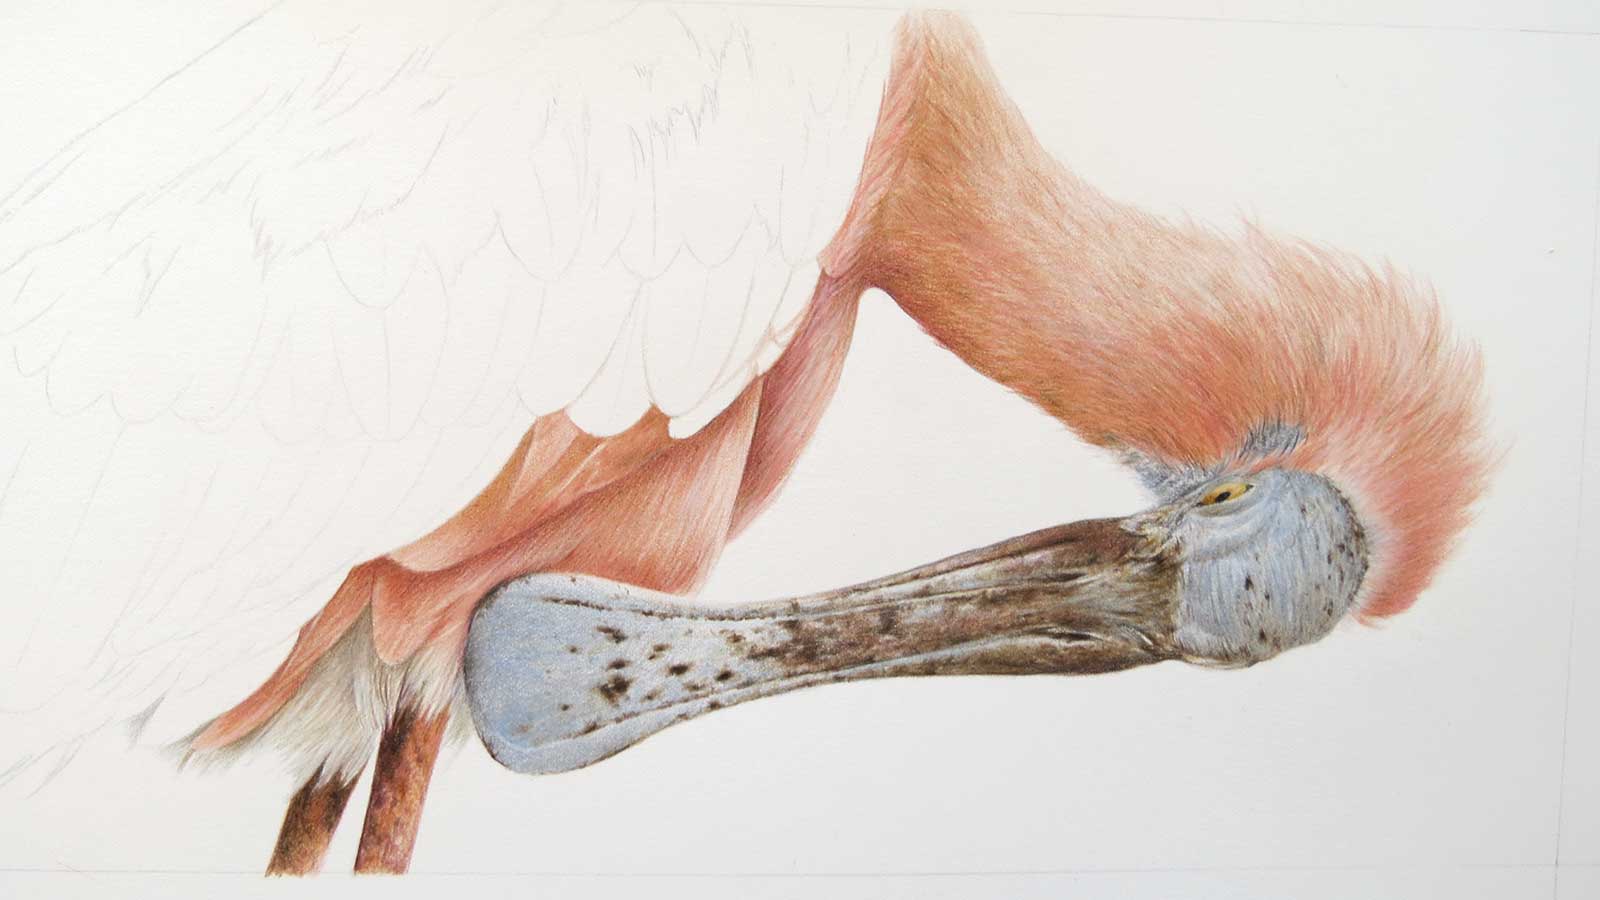
Knowing where to start is not an exact science in my drawing. Sometimes I gently block in the form of my subject using a watercolor style, building up the depth of the color as I progress. With a drawing like this I began with the face and that amazing bill. I began with a selection of cold grays using directional strokes to establish the shape. Then I began to use pristine, burnt umber and dark sepia to firm up the details.
 Stage 4
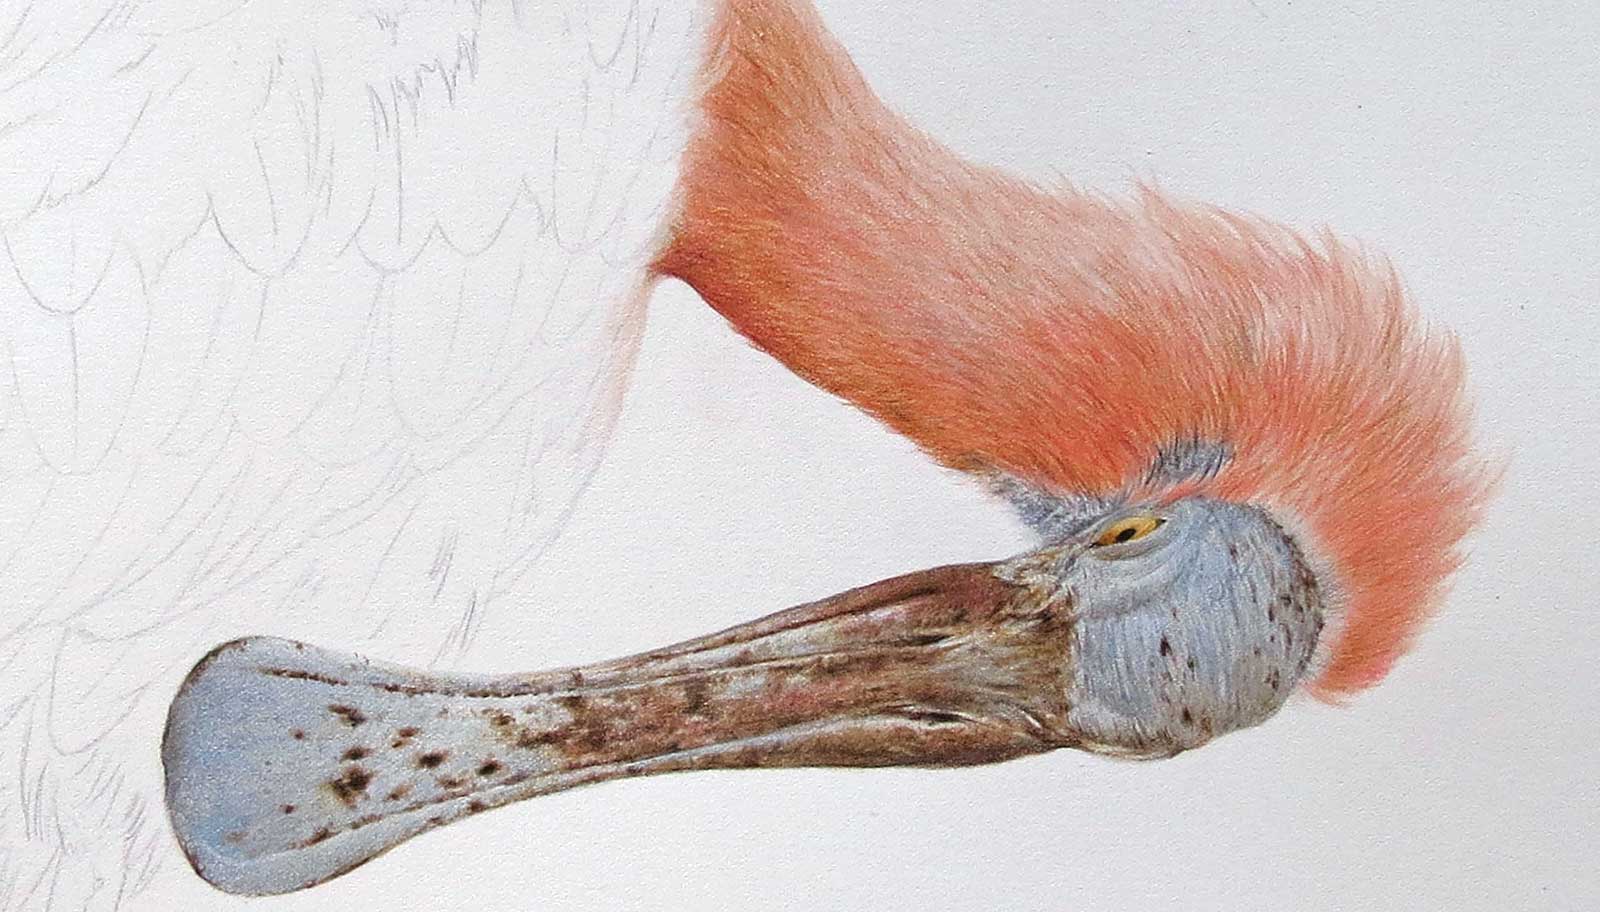
Stage 4 Feathers in the Neck
Once the head and bill were complete, I began to build up the feathers in the bird’s neck. I began using beige red and light, short pencil strokes. I then add cinnamon, cold gray III and bistre in varying amounts. I often find at this stage I need to light in the area to achieve highlights. I use a Tombow mono eraser for this, using short light strokes.
 Stage 5
Stage 5 Beginning the Rest of the Feathers
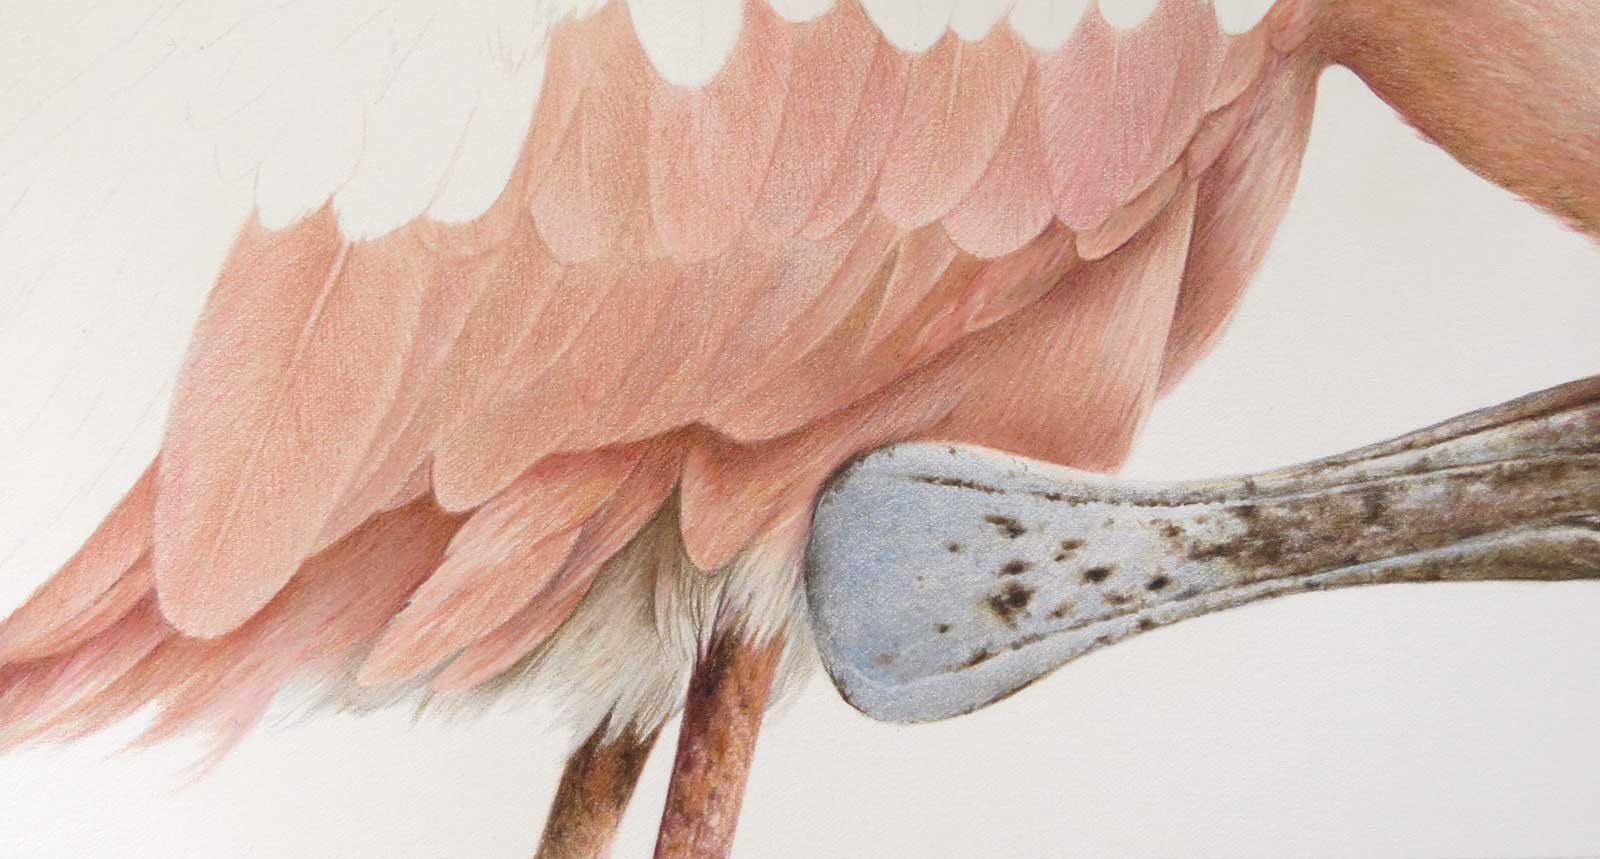
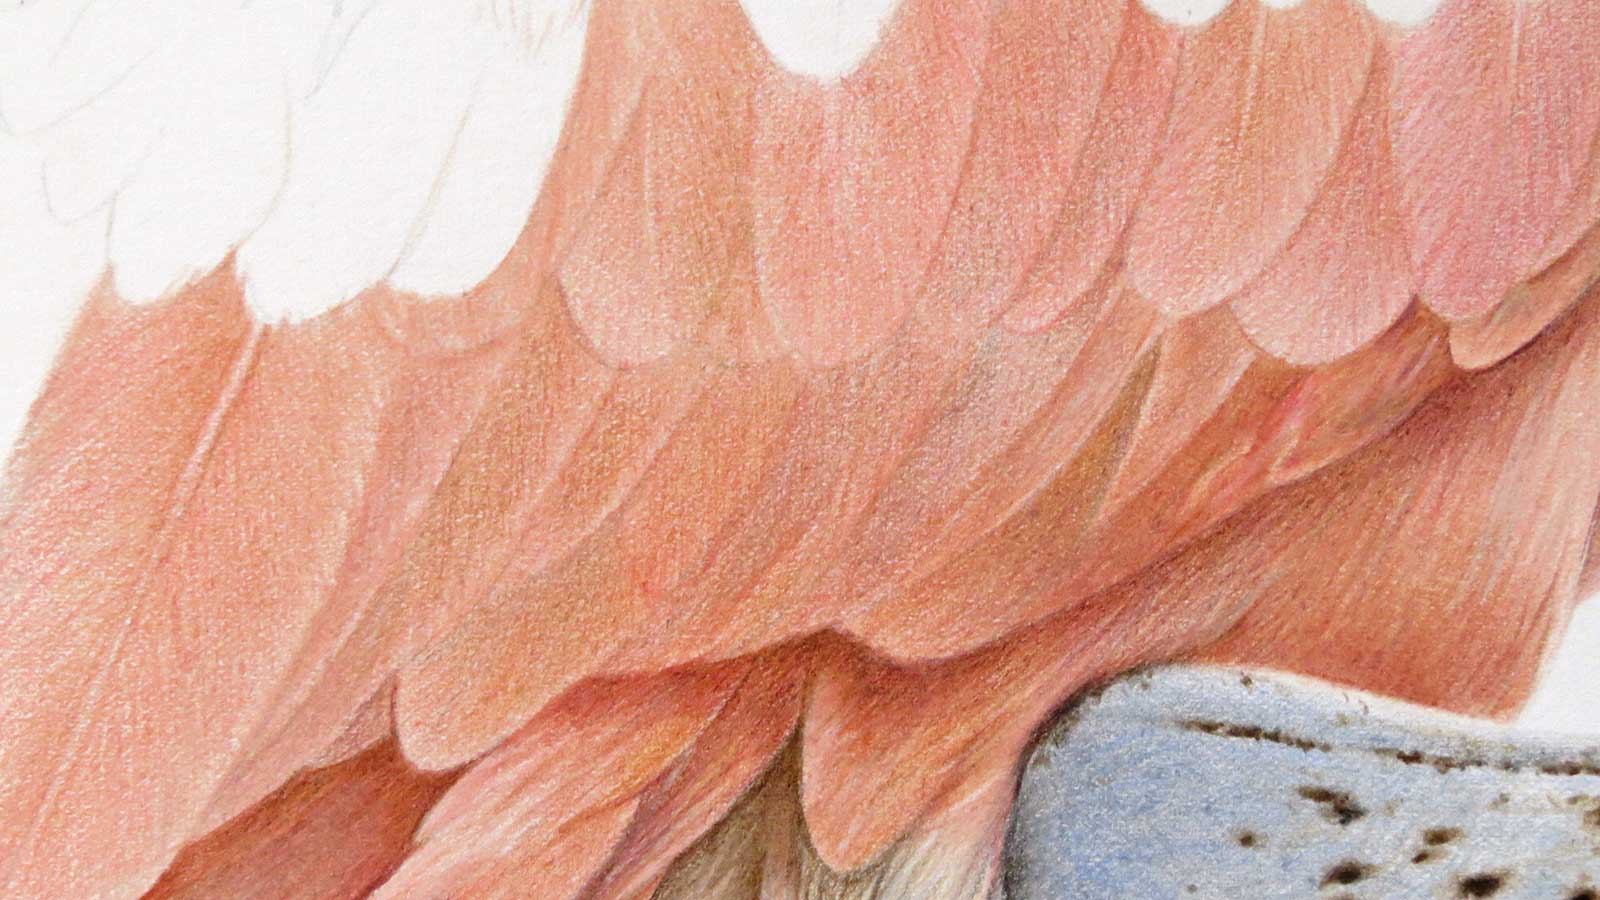
Once the neck area is complete, it’s time to begin working on the feathers. A slightly different approach is taken here as I generally work from feather to feather on small areas using beige red, cinnamon, bistre, medium flesh and caput mortuum. I have also drawn in the legs by now, which enables me to get a better idea of the values required for the feathers in shadow. At this stage it’s easy for the mind to wander, but concentration is required to ensure each feather is drawn in relation to those around it.
 Stage 6
 Stage 6
Stage 6 Blending with Lighter Layers
Here is a close-up photo of how the feathers develop with layers of color blended using light layers. This stage can appear quite messy, but the overall effect is taking shape. I feel it’s important to not overwork each further on a drawing such as this, as by doing so the drawing would soon start to look unrealistic. The compulsion would be to draw each feather in isolation whereas the bird’s form, shape and color are determined by all of its plumage combined.
 Stage 7
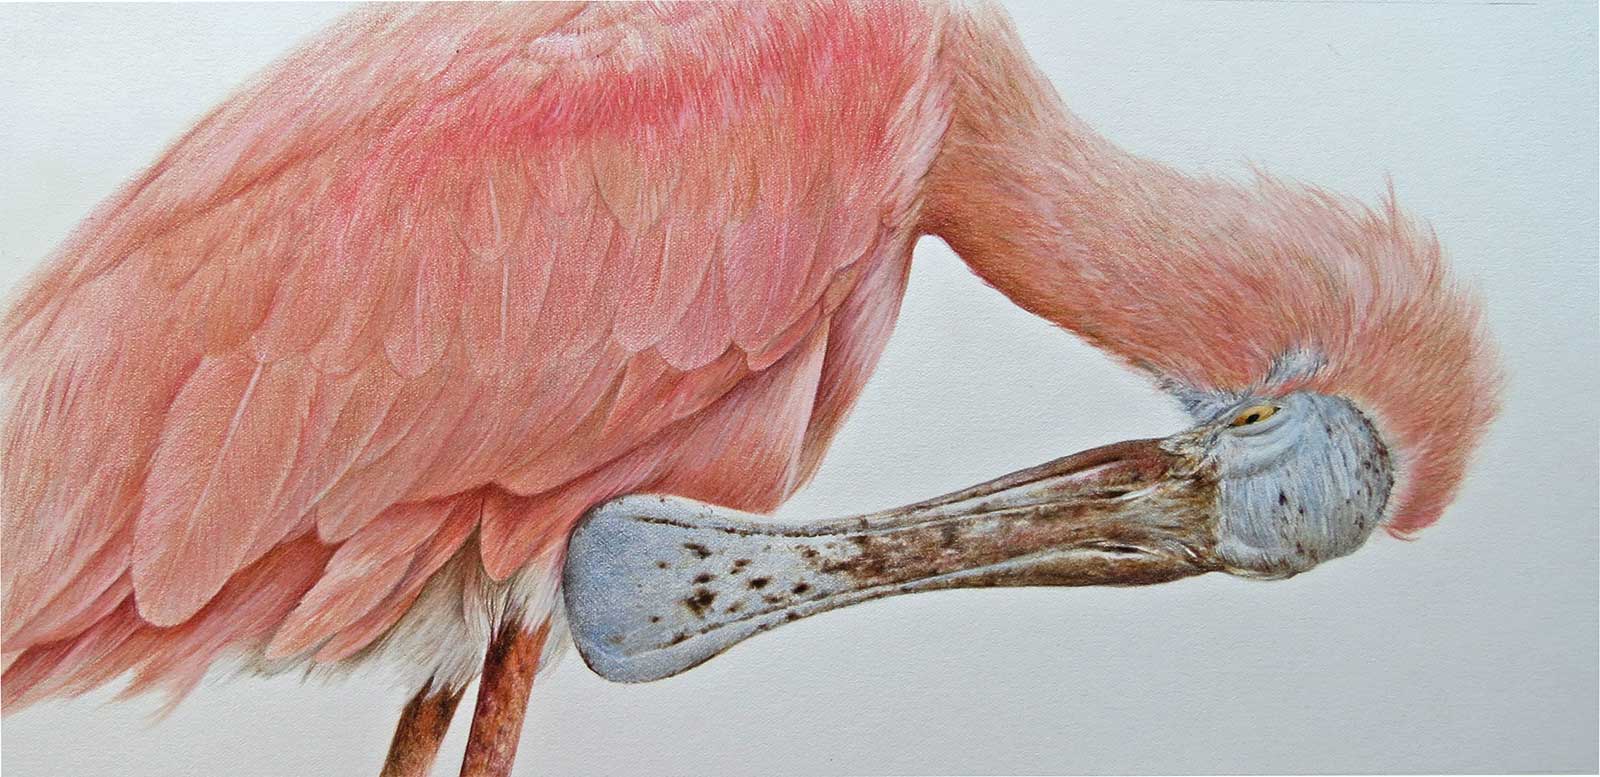
Stage 7 Finished Artwork
Spoonbill Study #1, Faber Castell Polychromos pencils, 14 x 16" (35 x 40 cm)
When is an artist’s work finished? A question that many artists have probably wrestled with. At this stage of the drawing I will make a few adjustments, usually adding highlights by adding light strokes of white and beige red and deepening shadow areas by adding another layer of cinnamon with a light layer of cold gray. Although colored pencil is often deemed a slow medium, a drawing such as this is finished after about 40 hours’ work. All that remains is to sign it.